(with assistance by Neil Peterson)
It turns out there was a major error on my earlier postings on the DARK Dirt One ore analog. This was suggested by Jesus (on Early Iron Group), who also had worked with the Spanish Red iron oxide material. He questioned (correctly) my published figure of 96.5 % Fe2O3 content.
It turns out this was the result of the typical transfer of lab test into full sized production. When Gus did his initial bench tests, he was focusing on material availability and on gross physical properties. What we could purchase, and how easy it was to mix and handle the resulting mixed material. He had purchased a number of iron oxides from a local pottery supply company (Pottery Supply House).
The company sells :
Black Iron Oxide - Fe3O4 = 99.3 % (as Fe2O3 103.5 %) / SiO2 = .2 % (@ $5 / kg)
Yellow Iron Oxide - Fe(OH3) = (typical as Fe2O3 86 % ) / SiO2 = ? (@ $12.25 / kg)
Red Iron Oxide - Fe2O3 = 96.5 % / SiO2 = 2 % (@ $12.50 / kg)
It had been decided at the test stage to use the red oxide as it most closely resembled the iron chemical form created after roasting a natural ore.
These are typically much finer powders ( listed as average 1.5 microns) than are really useful in the smelter. Others who have attempted to use oxide powders have reported the venting of gas out of the smelter tends to blow this fine material right back out again. Our solution was to mix a small amount of whole wheat flour (regular baking flour) as an organic binder. The decision to add a small amount of silica was based on the almost total lack of that component in the sample material. (Required for generating the required slag bath).
DARK Dirt One:
Oxide - 80%
Silica - 10%
Flour - 10%
When it came to purchasing full sized lots (as 25 kg bags), the raw cost of the material became a major factor. Gus had also supplied the first materials for a full scale test The error was in not checking that the cheaper 'Spanish Red'
had the same chemical composition as the 'red oxide' used for the bench tests:
'Spanish' Red Iron Oxide - = 81 % / SiO2 = 5 % (@ $5 / kg)
The dry powders were mixed roughly by hand, then enough water added to make a dough like paste. This required the addition of about 50 % by weight of water. The paste was dried before it was then broken up for addition to the smelter.
As added to smelter:
Solids - 90%
Water - 10%
So in correcting the composition at the various stages of mixing DARK Dirt One, we need to refer back to the specifications of the 'Spanish Red' source material (product number - MIOR) :
Fe203 - 81 %
SiO2 (silica) - 5 %
Al2O3 (alumina) - 2.6 %
CaO (calcium oxide) - 2.3 %
MgO (magnesium Oxide) - 2 %
LOI * ('loss on ignition' - water & C02) - 7 %
At the mixing phase (not considering water) :
Fe203 - 64.8 % (81 % of 80 %)
SiO2 (silica) - 14 % (10 % plus 5 % of 80%)
Al2O3 (alumina) - 2.1 % (2.6 % of 80 %)
CaO (calcium oxide) - 1.84 % (2.3 % of 80 %)
MgO (magnesium Oxide) - 1.6% (2 % of 80 %)
That suggests the Fe total is on the low side. With only 64.8 % Fe2O3, that means only 45.4 % Fe available.
Our original samples of primary bog ore (from L'Anse aux Meadows and St Lunaire) were tested :
St Lunaire (by M. Burnham):
Fe203 - 64.04 % (80.7)
SiO2 (silica) - 2.24 % (2.8)
Al2O3 (alumina) - 3.35 % (4.2)
CaO (calcium oxide) - .69 % (.9)
MgO (magnesium oxide) - .08 % (.1)
Mn0 (manganese oxide) - .62 (.8)
On this sample, there was LOI of some 26 %. That suggests for easy comparison, the numbers should be really be adjusted upwards (the second figures). If considering the LOI potential in the analog (about 20 % in flour and water) the DARC Dirt One is a very close mimic of the St Lunaire material.
L'Anse aux Meadows (by R. Hansen)
Fe203 - 89.5 %
SiO2 (silica) - 1.24 %
Al2O3 (alumina) - 2.45 %
CaO (calcium oxide) - .47%
MgO (magnesium oxide) - .05 %
Mn0 (manganese oxide) - 5.33
There is another variable to be considered when comparing total ore additions to a furnace and comparing the use of DARC Dirt One with other ore types. As the material is not roasted before use, there is a significant amount of the recorded weight contained in volatiles - in this case water and the flour binder. I would suggest we should be at least subtracting the water weight (about 10 %) from our yield calculations. So we really only are putting in 90 % of the 20 kg as actual 'ore' - and of that only 81% was actually the Fe2O3.
From the working (charge) weight of ore - the total iron oxide content is only 64.8 %.
We should be amazed we got anything, as this is right at the bottom limit on Fe concentration normally considered suitable for our type of smelting equipment and process.
From our last test (June 14, 2008) thats:
(Chemistry less water)
Fe2O3 = 64.8/.9 = 72% (Fe = 50.4%)
SiO2 = 14/.9 = 15.5%
Al2O3 = 2.1/.9 = 2.3%
CaO = 1.84/.9 = 2%
MgO = 1.6/.9 = 1.8%
(90 % of 20 kg) = 18 kg (removing weight of water)
(80% of 18 kg) = 14.4 kg (working weight of Spanish Red)
(81 % of 14.4 kg) = 11.7 kg total Fe203 added
(70 % of 11.7 kg) = 8.2 kg as actual iron added
Of which we got back 1.8 kg as bloom.
We normally compare ore weight against bloom, so our 'relative' yield would be 1.8 bloom from 16 kg working ore = 11 %.
If we wanted to spin this, we could compare Fe in against Fe out - 1.8 bloom from 8.2 available iron = 22 %
I am quite happy, that even despite this error in record keeping, the analog is a splendid success. It has done exactly what we wanted - provided a material which mimics primary bog ore in field tests, and which at the same time can be easily changed to duplicate specific chemical contents. The cost is relatively cheap (about $50 per smelt), and the source materials widely and easily available.
* (Thanks to Tim for gently pointing out what 'LOI' means to me - thats 'loss on ignition'.)
Special thanks to Gus Gissing of Harder-Gissing Machining for doing the initial materials samples and donating the first raw materials.
Wednesday, June 25, 2008
Tuesday, June 24, 2008
Report on June 08 Smelt
I have formatted up the smelt data report and re-worked my initial report seen here (now with images) on to the main Wareham Iron Smelting site.
Go on to see the reports
HERE
Note that I still have to put together a version of the report on the slags and post it to the web site (those specific links will not work yet)

Go on to see the reports
HERE
Note that I still have to put together a version of the report on the slags and post it to the web site (those specific links will not work yet)
Saturday, June 21, 2008
Meteors in Forge and History
Do you typically find meteors containing pure iron ore? How pure
typically?
Can a meteor be worked without much further smelting, or does the
metal still need to be pulled out of the rock to work it?
Could you cold hammer meteoric metal into a tool / dagger without
actually heating it in a forge, or would it be practically useless?
Just some questions from an enquiring mind!
Scott
(I had this question forwarded to me, originally posed on the Eldormere discussion group. I don't actually get this discussion group directly (volume interfering with business communications). My wife this been forwarding this topic thread to me however. The original request from Scott was directly about working a found meteor into some kind of object.)
Unlike the other people who made comments, I have actually forged meteor iron myself.
Objects made from meteors are easy to distinguish in the archaeological record, from the per centage content of nickel. Typical meteor nickel contents will range from 7 - 15 %. It was not possible to make 'artificial' alloys with this high a nickel content until the late 1800's. Some of the earliest iron objects in existence (the dagger in King Tutankhamun circa 1300 BC tomb a striking example) are in fact made from this non terrestrial source of metal. Cold worked meteor iron is found in Inuit contexts as well. One surprise in the sample of knives in the collection of the London Museum is that roughly 15 % show some traces of nickel content (hence most likely the inclusion of meteor source materials)
Metallic iron does not naturally occur on the earth's surface - period. There are two exceptions, the significant case being masses of various sizes that are the remains of meteors. The first human smelted iron objects date back to roughly 2500 BC (+ / -), but iron does not become a major material till much closer to the 500 BC time frame. The earliest iron production appears to be centered out of what is modern day Turkey. There is considerable debate currently on just how humans ever figured out how to convert iron oxide ores (essentially rust) into useable metal. The Greeks made only limited use of iron, it was the Celts (about the same time frame) who were about the first culture to be based on iron, especially as weapons. In any case, the creation of a workable iron bloom from iron ore was (and still remains) a challenging and resource intensive effort. Iron was 'expensive' on many levels, and not the wide spread material it has become in the modern era. During the Viking Age, the average 'load per person' was closer to 2 kg each (one axe, one knife, plus your share of the household cookware or boat rivets).
First - the metal in nickel iron meteors will vary considerably in both metal content and more importantly in physical structure. Nickel in an iron alloy serves to toughen the metal, making it more resistant to changing shape. This applies even at the hot forging stage, so considerably more effort is required to hammer form even modern low nickel alloys. (A typical modern stainless steel is likely to have between .5 to maybe 2 per cent nickel.) This means there is a potential problem forging meteor metals using early blacksmithing equipment, using these smaller and lower heat charcoal fires and on extremely small anvils. (The two typical ways to deal with rigid metals is to either increase the forging temperature - or use a bigger hammer.)
The second problem is the physical structure of the meteor itself. A small piece is going to be full of stress cracks after its passage through the atmosphere and the impact with the earth. On the two occasions I have attempted to forge small meteors (roughly half walnut sized) the material almost instantly started to fragment apart. I had no solution to this problem, as the small pieces were too hard to manipulate. If they had been larger, it might have been possible to forge weld the material back into a solid mass. This process might have proved easier in charcoal, despite the lower heat available. The technical reason is that nickel has a serious problem absorbing sulfur - a typical impurity in coal. My solution to the fragmentation of the small pieces was to incorporate them inside a layered steel billet. This is illustrative, as most nickel alloys found in an Early Medieval context are in fact found as part of the layers in pattern welded blades.
If the meteor is large enough, the centre of the mass has no time to overheat during its short passage through the atmosphere (even though the exterior may be burning off and then subjected to huge energies on impact). These larger masses could - and historically were - broken up into chunks small enough to be worked by the smith. I have a slab of a huge (many tons) meteor that impacted in Kenya, eons ago. This piece is roughly 3 / 16 inch thick by 2 x 3 inches, and is clear solid metal. (I had a chance to purchase a 'short sword' sized billet of the same material, and still kick myself for not making the investment.) Such pieces are sold by the gram - and are considered a specialized jewelry material to modern artisans. (That smaller piece cost me about $100.)
So - getting back to Scott's original question:
If you were an Saxon farmer, and you dragged out a head sized mass of iron under your plow (which by elimination would have to be of non terrestrial origin) - you would suddenly be a RICH farmer. Working the metal would be extremely challenging for the local blacksmith, given the nature of the material and the limitations of the equipment of the times. Given the inherent rigidity of the metal (and its curious resistance to rusting) the most likely use of the metal would be for weapons making.
Oh - I should note that the whole 'streaks in the sky to rocks on the ground' connection was actually NOT made until the middle 1800's. The whole concept of a 'sky stone' would have been completely unknown (and unthinkable) to the Medieval mind. This is a fiction created by modern fantasy writers.
Friday, June 20, 2008
June 08 - On Slag Balances
Please also refer to the June 25 Post - ERROR CORRECTION for changes to some of the basic data reported below.
At the Heltborg symposium, metallurgist Arne Espelund stressed several times that he considered measurements of the slags produced during an iron smelt to be be critical to evaluating the process. We rarely actually do this, as the raw mechanics (and general chaos) of an experimental smelt in the field make exact measurements difficult, if not totally impossible.
That being said, I was presented with a unique opportunity with the last smelt here in Wareham. This smelt was inside our standard clay cobb 'Norse short shaft' style smelter, and was a full scale test of the 'DARC Dirt 1' bog ore analog material. (See Monday's entry)
In brief:
Charcoal consumption - average of 10 minutes per 1.85 +/- kg
Air rate - 90 - 95 KpH = 750 - 800 LpM
Ore charges - roughly 1 : 1 to charcoal (2 kg per charcoal bucket)
Total ore added - 20 kg
This then represents most of the input numbers. The most important is the total ore addition. This needs to be modified by the water content of the ore. That was determined by taking a 500 gm sample and baking it in a propane gas forge at roughly 950 C (by colour) for about 10 minutes. The sample was then again weighed - the result was a net loss of 47 gms, or the sample being roughly 10% water.
The ore analog itself is made up of a mix of 80% 'Spanish Red' iron oxide, combined with 10 % silica sand and 10% flour. The Spanish Red itself is roughly 96.5 % Fe2O3 with 2 % SiO2 (no data on the balance)
So of the 20 kg ore added, 2 kg was water, leaving 18 kg remaining.
Of that 18 kg, a further 1.8 kg was the ( inert ) flour, leaving 16.2 kg material.
Of this, 15.6 kg is the iron oxide, and there is .3 kg of silica.

Now this smelt was quite unusual, in that there was extremely little effect on the structure of the smelter itself. The image above shows the inside surface of the smelter, with the area around the tuyere in the upper right.
First, there is very little erosion of the wall material. The area above the tuyere, normally sustains damage, but in this case you can see that the wall has hardly been effected. Curiously, what erosion that took place was just bellow the tuyere. The tuyere itself was also only slightly effected, and other than a slight rounding of the square tip, still remains the same distance proud of the wall surface as at the start of the smelt.
Second, very little material, either slag or partially sintered ore, can be seen remaining attached to the inner wall surface. In many past smelts, a considerable build up of these two materials can be seen.
As this was a newly constructed furnace, it proved possible to gather, sort and record the various slag types produced over the smelting process. The furnace was constructed on a relatively clean base of course sand, allowing any related debris to be easily distinguished. After the smelt, the largest pieces were gathered, and sorted by eye into types. All the remaining debris, including ash and unburned charcoal, where then passed through a 3/16 inch (about 4 mm) screen. Next a magnet was passed through the remainder, extracting any pieces containing enough iron to allow attraction. These were measured separately. The remaining larger pieces were then sorted by eye, using the same skills used to daily clean clinker from my forge fires. Any pieces of slag much larger than about 1.5 cm were sorted by type. (So there will be some loss of smaller particles)

This smelt had a major 'self tapping' event occur late in the sequence, during the last stages of the burn down phase. This slag was fluid, dark olive / black and proved to have no magnetic quality.
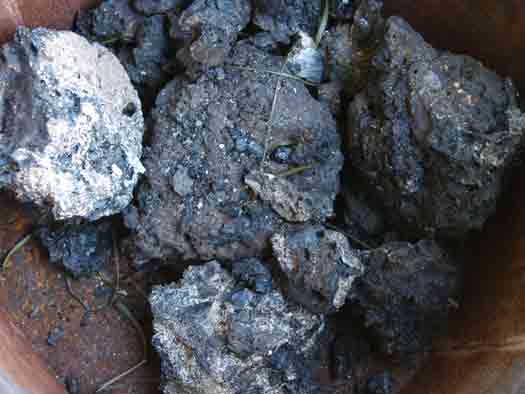
As the bloom was extracted, a mass of hard slag remained attached. This material (we call 'mother') cools much more quickly than the iron bloom. It is also brittle, and is shattered off the bloom under the effect of hammering on a wooden stub during the initial consolidation step. Generally this material is quite dense, and a medium matte grey in colour. Some portions of it may prove magnetic (fragments broken off the bloom). Most of the pieces are walnut to fist sized. As this work station is a grassed area just to the side of the smelter platform, any fragments smaller than about 3 cm were surely not recovered.

Considerable slag material remained both inside and scattered around the smelter after the bottom extraction of the bloom through the tap arch. This material would have formed the bulk of the slag bowl. These pieces are also a dull medium grey, and often include some imbedded charcoal and ash. Generally the pieces are quite irregular and range around 'walnut' sized.
The total weights of the collected slags:
Magnetic 'Gromps' - .5 kg
Tap slag - 3.2 kg
'Mother' - 2.3 kg
Bowl pieces - 6.6 kg
TOTAL COLLECTED - 12.6 kg
The bloom itself for this experiment is somewhat smaller than our usual. One factor here is that the weight was taken at a later step in the consolidation process than what is normally the case. (Standard practice is to make a single consolidation heat, striking off the majority of slag 'mother'. In this case, the bloom was subjected to two additional heat / hammer sequences.) The bloom reacted well to hammering, but was somewhat 'lumpy' in texture. Through spark testing, it appears to have some low carbon content (roughly equal to a mild steel).
Weight of Bloom - 1.9 kg
TOTAL INPUT - 16.2 KG (oxide 15.6 / silica .3)
TOTAL OUTPUT - 15.5 kg (slag 12.6 / bloom 1.9)
This looks pretty close to matching, assuming a reasonable amount of slag material lost in collection and the rough sorting process used.
At the Heltborg symposium, metallurgist Arne Espelund stressed several times that he considered measurements of the slags produced during an iron smelt to be be critical to evaluating the process. We rarely actually do this, as the raw mechanics (and general chaos) of an experimental smelt in the field make exact measurements difficult, if not totally impossible.
That being said, I was presented with a unique opportunity with the last smelt here in Wareham. This smelt was inside our standard clay cobb 'Norse short shaft' style smelter, and was a full scale test of the 'DARC Dirt 1' bog ore analog material. (See Monday's entry)
In brief:
Charcoal consumption - average of 10 minutes per 1.85 +/- kg
Air rate - 90 - 95 KpH = 750 - 800 LpM
Ore charges - roughly 1 : 1 to charcoal (2 kg per charcoal bucket)
Total ore added - 20 kg
This then represents most of the input numbers. The most important is the total ore addition. This needs to be modified by the water content of the ore. That was determined by taking a 500 gm sample and baking it in a propane gas forge at roughly 950 C (by colour) for about 10 minutes. The sample was then again weighed - the result was a net loss of 47 gms, or the sample being roughly 10% water.
The ore analog itself is made up of a mix of 80% 'Spanish Red' iron oxide, combined with 10 % silica sand and 10% flour. The Spanish Red itself is roughly 96.5 % Fe2O3 with 2 % SiO2 (no data on the balance)
So of the 20 kg ore added, 2 kg was water, leaving 18 kg remaining.
Of that 18 kg, a further 1.8 kg was the ( inert ) flour, leaving 16.2 kg material.
Of this, 15.6 kg is the iron oxide, and there is .3 kg of silica.
Now this smelt was quite unusual, in that there was extremely little effect on the structure of the smelter itself. The image above shows the inside surface of the smelter, with the area around the tuyere in the upper right.
First, there is very little erosion of the wall material. The area above the tuyere, normally sustains damage, but in this case you can see that the wall has hardly been effected. Curiously, what erosion that took place was just bellow the tuyere. The tuyere itself was also only slightly effected, and other than a slight rounding of the square tip, still remains the same distance proud of the wall surface as at the start of the smelt.
Second, very little material, either slag or partially sintered ore, can be seen remaining attached to the inner wall surface. In many past smelts, a considerable build up of these two materials can be seen.
As this was a newly constructed furnace, it proved possible to gather, sort and record the various slag types produced over the smelting process. The furnace was constructed on a relatively clean base of course sand, allowing any related debris to be easily distinguished. After the smelt, the largest pieces were gathered, and sorted by eye into types. All the remaining debris, including ash and unburned charcoal, where then passed through a 3/16 inch (about 4 mm) screen. Next a magnet was passed through the remainder, extracting any pieces containing enough iron to allow attraction. These were measured separately. The remaining larger pieces were then sorted by eye, using the same skills used to daily clean clinker from my forge fires. Any pieces of slag much larger than about 1.5 cm were sorted by type. (So there will be some loss of smaller particles)
This smelt had a major 'self tapping' event occur late in the sequence, during the last stages of the burn down phase. This slag was fluid, dark olive / black and proved to have no magnetic quality.
As the bloom was extracted, a mass of hard slag remained attached. This material (we call 'mother') cools much more quickly than the iron bloom. It is also brittle, and is shattered off the bloom under the effect of hammering on a wooden stub during the initial consolidation step. Generally this material is quite dense, and a medium matte grey in colour. Some portions of it may prove magnetic (fragments broken off the bloom). Most of the pieces are walnut to fist sized. As this work station is a grassed area just to the side of the smelter platform, any fragments smaller than about 3 cm were surely not recovered.
Considerable slag material remained both inside and scattered around the smelter after the bottom extraction of the bloom through the tap arch. This material would have formed the bulk of the slag bowl. These pieces are also a dull medium grey, and often include some imbedded charcoal and ash. Generally the pieces are quite irregular and range around 'walnut' sized.
The total weights of the collected slags:
Magnetic 'Gromps' - .5 kg
Tap slag - 3.2 kg
'Mother' - 2.3 kg
Bowl pieces - 6.6 kg
TOTAL COLLECTED - 12.6 kg
The bloom itself for this experiment is somewhat smaller than our usual. One factor here is that the weight was taken at a later step in the consolidation process than what is normally the case. (Standard practice is to make a single consolidation heat, striking off the majority of slag 'mother'. In this case, the bloom was subjected to two additional heat / hammer sequences.) The bloom reacted well to hammering, but was somewhat 'lumpy' in texture. Through spark testing, it appears to have some low carbon content (roughly equal to a mild steel).
Weight of Bloom - 1.9 kg
TOTAL INPUT - 16.2 KG (oxide 15.6 / silica .3)
TOTAL OUTPUT - 15.5 kg (slag 12.6 / bloom 1.9)
This looks pretty close to matching, assuming a reasonable amount of slag material lost in collection and the rough sorting process used.
Monday, June 16, 2008
DARC Spring Smelt - Draft Report
Folks:This is a very fast report on the DARC Spring Smelt on June 14.
Attendance was lower for this one. The core team was:
Darrell Markewitz / Ken Cook
Notes, Charcoal (and other messy jobs) - Anne Graham
Strikers - Neil Peterson / Richard Schwitzer
Smelter construction - Sam Falzone / Richard
As reported earlier, the intent of this smelt was a full scale test of Gus Gissing's DARC Dirt One - primary bog ore analog. A new standard 'Norse Short Shaft' furnace was constructed. It was decided to make two alterations from the earlier tests:
The analog had shown a tendancy to produce a crumbly high carbon bloom, a type which often proves difficult to forge down to a working bar. For that reason is was decided to increase the average particle size. The dried plates were lightly hammered through a 1 inch wire grid, then screened through a 3/16 inch mesh to remove the fines. This resulted in a slightly larger size than the last two tests.
Second, it was decided to charge very heavily right from the start. Ore was added at one to one against charcoal (2 kg ore with 2 kg charcoal).
We used 20 kg of the bog analog and got a very nice small bloom at 1.8 kg.
Those numbers need a bit of massaging to compare to our past work:
The ore number is actually higher than reality. Thats because the analog is mixed with water, and the paste was air dried. There will be some content of water still remaining. I have to take a measured sample and put it into the gas forge on a pan to get a 'dry weight' that would relate it back to the roasted rock ores we have been using. On the last test, the analog was also air dried, and after baking the water content removed was about 12%.
The bloom weight was taken at a different stage in the process than what we normally use to take that measurement. Normally we pull the bloom and work over the surface for one heat to knock off the real 'frobby' bits. This is when the production weight is recorded. For this bloom, which was pretty 'juicy' we had put it back into the smelter with more charcoal (using the smelter like a big forge). We ran through two more hammer cycles, compacting it down to a very rough brick, then one more to slice it in half. So there would have been a bit lower comparative weight to others.
Taken together, this does put our yield down into the 10 - 15 % range - not into the 25 - 35 % range we have come to expect.
We were running this smelt with a bit less air than normal. By the anemometer, we started in the range of 450 litres per minute, eventually working up to closer to 750 LpM. Our consumption of charcoal was averaging about 10 minutes for a standard 2 kg bucket.
We are going to have real good slag volume numbers on this one (to send to Arne Espelund).
First the smelter itself came through the smelt with almost no internal damage at all. There was some erosion just BELOW the tuyere. The slag bath started out sitting a bit higher than normal. We had to poke through the bottom of the bowl as it first formed to drain it a bit lower to keep the tuyere clear. I think that might be the reason. There was no noticeable effect to the smelter wall above the tuyere at the usual hot zone. The inserted ceramic tuyere was hardly effected at all.
We were just getting everything ready into the very end of the burn down phase when the furnace decided to self tap. It was like the waters breaking in a pregnancy. Pretty much all the liquid slag ran out all at once. This was the dark olive green / black real runny stuff. I got concerned that this would expose the top of the bloom to the air blast, so quickly decided on a bottom extraction and reduced the air and got working to yank it all out. There was a very clear volume of slag that formed the bowl itself that was pulled clear. When we grabbed the bloom, there was a third type of slag adhered to the outside of it as well. The analogy of the chocolate covered cherry is perfect here. I will be able to pretty much separate out the three types, and gather all of the slag for weight later.
The bloom feels like nice iron (I've not photographed or spark tested it yet). It is a bit on the crumbly side, more larger blobs hanging together than the nice dense rock blooms you always achieve. Better cohesion than the 'brown sugar' effect you saw at the Smeltfest test of the ore analog. I know its going to be easy to forge this one to bar, the initial consolidation went very smooth, no slitting or fracturing at all.
I'm very pleased with the overall results. The smelter came through in almost perfect condition. We were able to predict and modify the sequence to get around the tenancy of the ore analog to absorb too much carbon and not fully sinter together. Neil and Ken worked as an excellent and smoothly functioning team.
I have to find my actual notes from the day, process the images and get a field report together. So expect an expanded version of this report available on the web site later this week.
Friday, June 13, 2008
Ores and Furnaces in 'the Colonies'
Jens wrote:
The Heltborg ore is correctly from "Guldforhoved" nearby Herning, and one of the sources that have been used for a lot of experiments in Denmark during the years.
Thanks for that.
I really noticed two big differences between the general approaches used in Denmark and what we have been doing here in North America.
We don't 'really' have any history of really small iron bloomeries in NA. There might have been something like the Evenstad furnaces used in the very earliest days of colonization - basically in the 1700's. But the general trend then was to build larger blast furnaces instead, the normal technology of that period. There is also a strange attitude in the days of the early colonization. In the first days of any settlement there was often some small scale testing, maybe some limited production. The concept
was to first prove the value of the colonization efforts, then attempt to 'make them pay'. This never worked out, and pretty fast certain agricultural production (tobacco for one) was shown to give much better return for effort. Once the new settlements were developed, often industrial development was actually discouraged - to keep the colonies dependent on the host nations for finished goods. So it was often much later (closer to the 1800's) before any serious North American industrial iron production took place.
So what we have here as inspiration are bits a pieces of not very clear archaeology to read about from a remote distance. As you know, even finding any kind of descriptions is not easy, and many are not clear (or as we have so often found, just plain wrong). In Denmark you have all these slag blocks and some furnace bases to actually go out to look at.
For that reason, the stress here in NA has been on actually making the iron, not so much on matching the layout of the furnaces or duplicating the slag remains. Frankly, I have always treated the slag as a waste product that is just in the way. The furnace is just a tool to make iron, and considered a largely disposable tool at that. For my first number of smelts, I had been making a brand new furnace every smelt.
The second big difference has been the quality of the ores we have been using. The stuff from Virginia is all from an ancient sediment that lays under the Blue Ridge Mountains. It is like a fossil bog ore, hardened to stone - and very pure. Skip and Lee have been generous giving away their stuff, which we pull right out of the rock layer. The stuff that the Williamsburg team is using is the same material that has eroded out and washed away to a new surface deposit. In either case, the iron oxide content of this stuff is in the range of 80 - 85 %. *
The primary bog ore I pulled from Newfoundland tests out to be even purer - close to 90% iron oxide.
And the other materials I have been using (commercial taconite, hematite grit) are also in the range of 95 % iron oxide.
You can see that making blooms from ores that pure might get you working in a certain way.
If anything, I certainly have worked with a LOT of different ore types!
- L'Anse aux Meadows - primary bog ore
- St Lunaire - primary bog ore
- Taconite (Stelco) - commercial
- Virginia (Lexington) - geothite
- Hematite (grit) - commercial
- 'DARC Dirt 1 - 'Spanish Red' analog
and at Heltborg
- Guldager - 'ancient bog ore'
- Guldforhved / Guldager / Tranemo - blended
I never did get any numbers from anyone about the various ores from Denmark. Here would be either the Guldforhoved or the Guldager ores used at the symposium. (I'm hoping others can supply any hard numbers on iron oxide content for those?) I heard a lot of comments about 'good ore', but never any numbers that could be used for comparison. In comparison, the team from Tranemo did mention their ore being something like 70 - 75 % iron oxide. This compares with some of the materials we have been using here. At Helborg, the Swedish team were able to consistently pull out good working blooms every smelt they undertook.
Although there was a lot of talk at Heltborg about how I was running my furnaces differently than most of the rest of you, at the most basic level, I don't think that really was that important. I feel it was the ORE that creates the problems. I may try a couple of smelts here using our ores here with the slightly slower burn rates that Michael Nissen was using. I'm less convinced, because I did undertake a number of smelts at the beginning with lower air volumes (so slower burn rates) and never got any iron produced. As soon as I learned about the higher air volumes from Skip Williams and Lee Sauder, using their basic method instantly gave me positive results. Large solid workable iron blooms!
* Figures corrected after I had this comment come in from Lee Sauder:
I looked at your blog this morning- you've misspoken- our brown ores have generally indicated 80- 85% iron oxide (as Fe2O3).
Lee also referred me back to the analysis done by Marcus of DARK, one of the very few chemical tests we have ever been able to have made.
(Thanks - Its pretty sad when you can't even remember your OWN past work!)
Thursday, June 12, 2008
Spring Smelt - June 14
DARC SPRING IRON SMELT
SATURDAY JUNE 14
The purpose of this year's first smelt is to undertake a full scale test of the DARC Dirt 1 - bog ore analog inside our standard furnace design.
This material, a combination of commercial 'Spanish Red' iron oxide, was developed by Gus Gissing. Two earlier tests (sponsored by Harder Gissing Machine) were promising, but someone inconclusive. Both earlier tests suffered from the combination with experimental furnaces. The first (at Smeltfest 08 with Skip Williams and Jake Keen), used a 'front plate' system, and also had a considerably higher stack than normal. The second (with Ken running the smelt) used the 'Econo Norse in a Can' smelter, which at 20 cm interior is considerably smaller than normal. In both cases the yields were less than what had been hoped for (in the range of 15 %) and the resulting blooms were somewhat crumbly and higher carbon content.
It is hoped that by using a well understood furnace, both the yield and quality of the bloom can be increased.
The Saturday main event is again 'semi open' By this I mean that interested members of the general community are welcome to come by during the progress of the smelt during the day and observe. Expect a certain confusion and for me to be focussed quite directly into the smelt.
Saturday Events:
Preheat - 9 AM
Main Sequence Start - 10 AM
(ongoing - Charcoal and ore to be graded!)
Expected Extraction : 4 - 5 PM
If you are interested in coming up to Wareham, please post me privately for directions.
Tuesday, June 10, 2008
Heltborg Experimental Notes Available
Slowly but surely I'm trying to get my notes in order from the Denmark trip. I have just posted up my experiment data and field drawings on to the Wareham iron smelting section. Likely the easiest way for those interested to get access is just go on to the 'Overview' of the Iron Smelting Seminar at Thy I had mentioned to you earlier. If you wander down through the short descriptions, you will find the links to the drawings and data now included.
In case you missed it - what I undertook at the symposium were two experiments.
The first was working with Arne Espelund, on the two part ore - slag / slag - bloom theoretical process he has proposed (that we were discussing last week). You can take a look at the sequences and try to figure out what went wrong (!). I have some ideas about this, but have not written those up yet.
The second was an experiment to apply the 'North American' sequence to a blend of Scandinavian ores. I would not consider this entirely successful, even though there was some spongy iron produced. The yield at roughly 12% would seem to be in line with what the Danish teams often get, but certainly less than what is normally seen at home. The conclusion once again is that ore quality must modify smelting sequence, and to a certain extent furnace design.
Friday, June 06, 2008
Museums in Denmark
I had quite differing experiences with the various museums I saw in Denmark:
There were three museums I visited that were basically 'old school' styled presentations: Objects in cases, extremely limited labels, objects generally grouped by type. The lighting varied, but generally was reduced general illumination, with use of some spot lighting in the cases. Some idea of light levels can be gathered by the quality of the images. (I have some experience with longer 'hand held' exposures, so the clarity and shift in colour will give some indication of the relative amount of light available.) None of the museums I visited had any staff visible inside the collections themselves (admittedly I was there 'off season', but I also spent several hours at each museum.)
The National Museum in Copenhagen had its 'Pre-history' gallery closed. For them anything before 1000 AD is lumped together. This new presentation includes virtually ALL the Viking Age materials. It was originally scheduled for opening on May 1, but later delayed to May 17.
The Medieval galleries are very clearly old style. The concentration there was on church related pieces, many larger. The stress appeared to be more to 'treasures' rather than everyday objects. Labels were basic: Object / Location / Date - in English and Danish. Sometimes a line or two of context or more detailed description. No registration numbers (very rarely these were visible on the object itself) . If there were a group of like objects (commonly grouped by type) they would share the same three lines and have no further method of identifying them. ('Early Medieval Axes' for a group of a half dozen, obviously mixed construction and combat types) This would make any attempt to get more detailed information from the collection viewing almost impossible. You were not normally allowed to take photographs, and there were no detailed 'guide to the collection' type books available. (Separate topic discussing those.) The gift shop was large with an excellent selection of books ranging from popular overviews to quite detailed archaeological reports.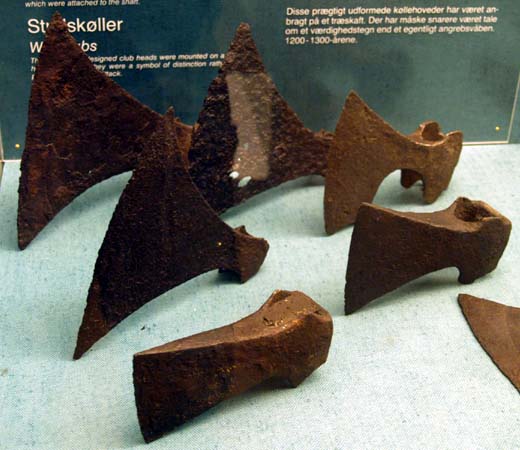
(Group of Early Medieval Axes)
The Roskilde Museum is actually a complex of related buildings and presentations, each with a different theme. I spent my time at the 'History of Roskilde' collection. The building housing the historic collections was originally a warehouse and factory from the mid 1700's, so there are a large number of small rooms with theme groupings. The objects generally were grouped by find location. Again labels very short (and here only in Danish) with Object / Find / Date. The individual pieces were more usually identified by case number, but again registration numbers were not visible. I'm not as sure here what the policy on photography may have been, as I was introduced to the collection by curator Jens Ulriksen. The gift shop was a small display in the lobby, with limited books available, few in English.
(Group of Blacksmith's tools)
The Ribe Viking Museum focuses quite clearly on two aspects of the history of Ribe, with the main thrust of the collection centred on the Viking Age. About the same floor space is dedicated to Medieval, Renassiance, Early Modern objects (with most stress on the earlier materials). Both the building and the presentation itself are more modern, and it shows in the display layout and methods. This unfortuneatly includes the use of dramatic spot lighting in rooms with a generally quite reduced light level (to the determent of possible photography. One excellent feature of the presentation was a full scale diorama of a section of the Viking Age market. This put a large number of the artifacts in a working context (and included a huge number of other pieces not represented in the collection.) I think officially there was not supposed to be photography, but I did see any number of general visitors taking photos. The gift shop was again large and had a fairly good selection of books, but here there was more space given to gift items. Popular works were generally available in English, unfortunately most of the research volumes in Danish only.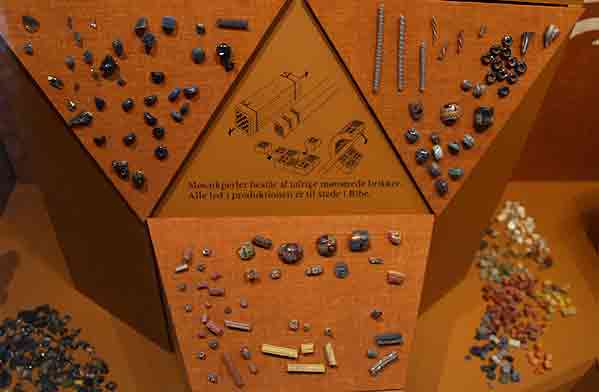
(Glass Working Display) 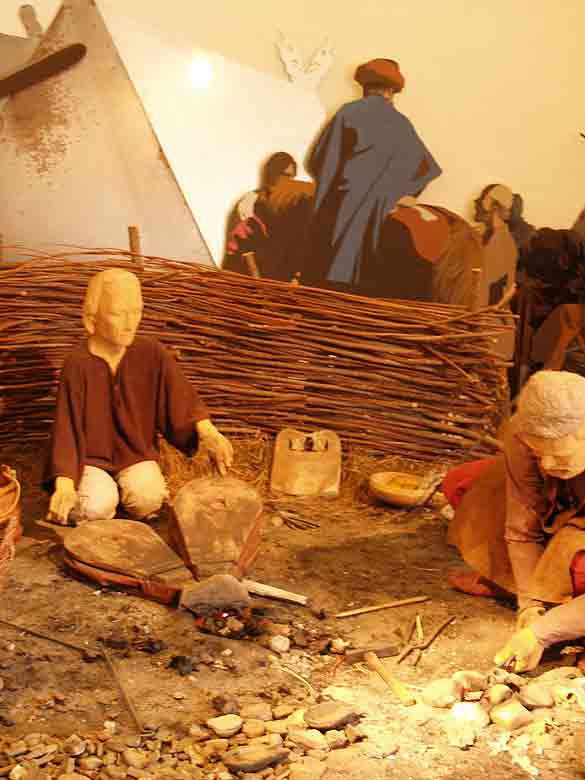
(Metalworking in the Viking Market scene)
My visit to the Viking Ship Museum in Roskilde suffered from a major renovation and my own focus on research of ship building tools. The room normally containing the supporting artifacts was closed, with a new exhibit documenting the recent production of the replica 'Sea Stallion' being installed. Labels were available in Danish and English, with usually a short paragraph of detail. One detail I did like was the working tools in the boat yard area (all replicas of course) were hung in public view. Each had Find / Museum / Registration number. The main ship hall has the preserved remains of a number of the ships on display, backed by detailed scale models for comparison. This hall has a large wall of north facing glass, so photography was simplified (and permitted). There was also a room with walk on reconstructions of two of the ships (primarily intended as a children's activity room. Much of the complex is given over to the docks, the boat construction yard - with the large number of replica ships and boats floating and in use. As outdoor areas, the photography is excellent, outside of the restricted viewing angles. (see an earlier post for ship images). The gift shop here had a very good selection of both popular and research titles, many available in several languages. Most of the detailed research volumes were related to ships (unsurprisingly), but many of those only in Danish.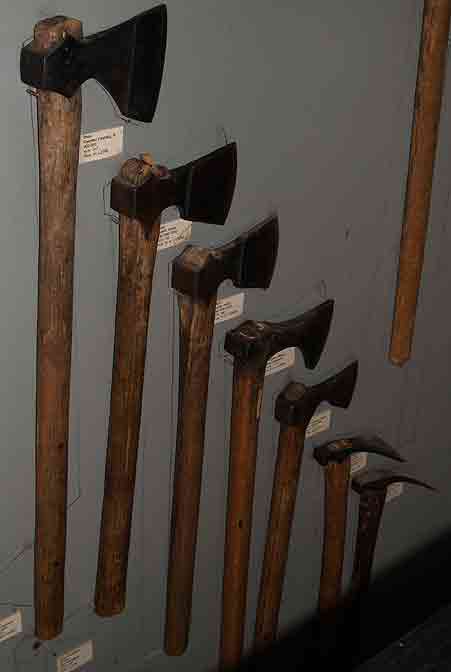
(Working Tools - some of the axes) 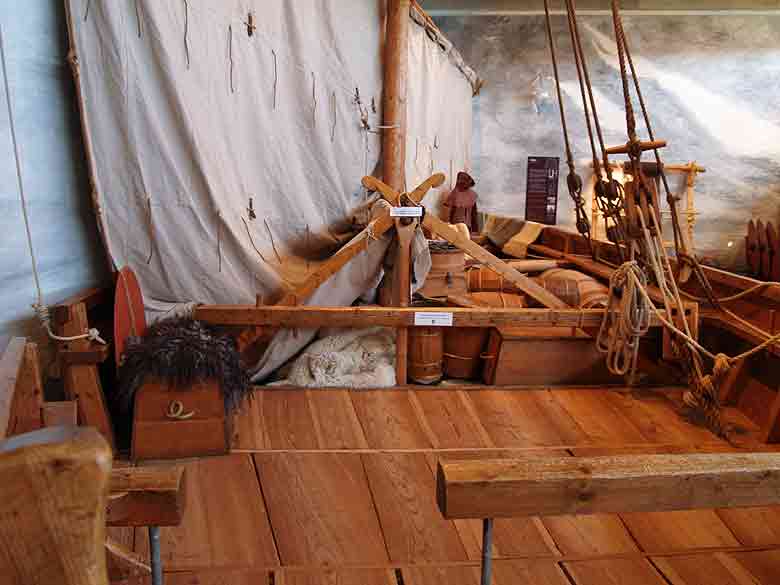
(Children's area with full scale dressed replicas)
Generally I found all the museum collections I visited had greatly reduced information available to the viewer. In many cases only the barest description was provided 'bunch of axes' being typical. Sometimes the objects were not even given enough description to provide real understanding, for example 'spindle whirls' does not inform you about just what those pieces are. With no registration numbers, it would prove very difficult for the research minded to gather detailed information. Rarely were objects placed in any kind of working context. The collections were almost all presented in a formal and static style (Victorian Cabinet of Curiosities). The Viking Ship Museum was the primary exception, but it blurs the line between artifact collection and an experimental archaeology presentation (which in fact are in two distinctive areas of the complex).
I also spent two afternoons at the Ribe Viking Centre, a living history styled presentation. As this museum was not officially open at the time, and also represents an entirely different type of display style, I will leave a discussion of it for another entry.
There were three museums I visited that were basically 'old school' styled presentations: Objects in cases, extremely limited labels, objects generally grouped by type. The lighting varied, but generally was reduced general illumination, with use of some spot lighting in the cases. Some idea of light levels can be gathered by the quality of the images. (I have some experience with longer 'hand held' exposures, so the clarity and shift in colour will give some indication of the relative amount of light available.) None of the museums I visited had any staff visible inside the collections themselves (admittedly I was there 'off season', but I also spent several hours at each museum.)
The National Museum in Copenhagen had its 'Pre-history' gallery closed. For them anything before 1000 AD is lumped together. This new presentation includes virtually ALL the Viking Age materials. It was originally scheduled for opening on May 1, but later delayed to May 17.
The Medieval galleries are very clearly old style. The concentration there was on church related pieces, many larger. The stress appeared to be more to 'treasures' rather than everyday objects. Labels were basic: Object / Location / Date - in English and Danish. Sometimes a line or two of context or more detailed description. No registration numbers (very rarely these were visible on the object itself) . If there were a group of like objects (commonly grouped by type) they would share the same three lines and have no further method of identifying them. ('Early Medieval Axes' for a group of a half dozen, obviously mixed construction and combat types) This would make any attempt to get more detailed information from the collection viewing almost impossible. You were not normally allowed to take photographs, and there were no detailed 'guide to the collection' type books available. (Separate topic discussing those.) The gift shop was large with an excellent selection of books ranging from popular overviews to quite detailed archaeological reports.
The Roskilde Museum is actually a complex of related buildings and presentations, each with a different theme. I spent my time at the 'History of Roskilde' collection. The building housing the historic collections was originally a warehouse and factory from the mid 1700's, so there are a large number of small rooms with theme groupings. The objects generally were grouped by find location. Again labels very short (and here only in Danish) with Object / Find / Date. The individual pieces were more usually identified by case number, but again registration numbers were not visible. I'm not as sure here what the policy on photography may have been, as I was introduced to the collection by curator Jens Ulriksen. The gift shop was a small display in the lobby, with limited books available, few in English.
The Ribe Viking Museum focuses quite clearly on two aspects of the history of Ribe, with the main thrust of the collection centred on the Viking Age. About the same floor space is dedicated to Medieval, Renassiance, Early Modern objects (with most stress on the earlier materials). Both the building and the presentation itself are more modern, and it shows in the display layout and methods. This unfortuneatly includes the use of dramatic spot lighting in rooms with a generally quite reduced light level (to the determent of possible photography. One excellent feature of the presentation was a full scale diorama of a section of the Viking Age market. This put a large number of the artifacts in a working context (and included a huge number of other pieces not represented in the collection.) I think officially there was not supposed to be photography, but I did see any number of general visitors taking photos. The gift shop was again large and had a fairly good selection of books, but here there was more space given to gift items. Popular works were generally available in English, unfortunately most of the research volumes in Danish only.
My visit to the Viking Ship Museum in Roskilde suffered from a major renovation and my own focus on research of ship building tools. The room normally containing the supporting artifacts was closed, with a new exhibit documenting the recent production of the replica 'Sea Stallion' being installed. Labels were available in Danish and English, with usually a short paragraph of detail. One detail I did like was the working tools in the boat yard area (all replicas of course) were hung in public view. Each had Find / Museum / Registration number. The main ship hall has the preserved remains of a number of the ships on display, backed by detailed scale models for comparison. This hall has a large wall of north facing glass, so photography was simplified (and permitted). There was also a room with walk on reconstructions of two of the ships (primarily intended as a children's activity room. Much of the complex is given over to the docks, the boat construction yard - with the large number of replica ships and boats floating and in use. As outdoor areas, the photography is excellent, outside of the restricted viewing angles. (see an earlier post for ship images). The gift shop here had a very good selection of both popular and research titles, many available in several languages. Most of the detailed research volumes were related to ships (unsurprisingly), but many of those only in Danish.
Generally I found all the museum collections I visited had greatly reduced information available to the viewer. In many cases only the barest description was provided 'bunch of axes' being typical. Sometimes the objects were not even given enough description to provide real understanding, for example 'spindle whirls' does not inform you about just what those pieces are. With no registration numbers, it would prove very difficult for the research minded to gather detailed information. Rarely were objects placed in any kind of working context. The collections were almost all presented in a formal and static style (Victorian Cabinet of Curiosities). The Viking Ship Museum was the primary exception, but it blurs the line between artifact collection and an experimental archaeology presentation (which in fact are in two distinctive areas of the complex).
I also spent two afternoons at the Ribe Viking Centre, a living history styled presentation. As this museum was not officially open at the time, and also represents an entirely different type of display style, I will leave a discussion of it for another entry.
Thursday, June 05, 2008
Photography in Museums
This piece was spawned by a discussion between Neil (who just got back from Iceland) and another correspondent (who asked that the entry to be edited from the version originally posted at about 9 AM this morning). My comments took on an (overblown) life of their own...
This is a massive problem, going back to the late 70's into the early 80's. By my observation, about the same time as the switch from museums regarded as collections held as a public trust headed by historians and archaeologists, to museums as entertainment enterprises headed by business managers.
When museums were supported by public funding, a clear argument can be made that the owners of the objects are in fact the visiting public. I therefore have a right to take images of my own stuff. Tempered by the dynamics of maintaining public access and not harming the objects.
I find the general idea that many major museums consider that allowing images to be taken of objects inside the collections is to be considered a form of revenue generation troubling on a couple of levels.
Right off the top, I must temper my opinion by noting that particularly in the United States, there are many PRIVATELY owned collections, rather than the mainly PUBLIC ones normally the case in Canada. There is a further gray area around 'Not for Profit Corporations', which are also far more common in the USA than here in Canada (and I suspect not common in Europe either).
I note that when an institution says it is 'licensing images from the collection' this implies (to me anyway) that it is the likeness of the object that is being controlled, not the physical photograph itself. If the object is held in a public institution, the museum is at best 'holding the object in trust for the public' and a legal argument can be made that 'they' do not actually 'own' the object itself (see above).
Commercial 'for personal profit' use of the images being perhaps a different situation. I say perhaps. There may be a fee charged which is related to the mechanics of making the image itself. Note that this is not related to the 'rights' to the actual object.
If I request the object taken out of its case, so that I can apply special lighting or image set up, then I should fully expect to pay something for that level of access. In this case I am paying for the supervision and action of the curatorial staff. However, as I personally make the actual photograph, what I chose to do with it after the fact is my concern alone.
If I want to use a 'standard image' that the museum has produced of the object (where they have done that set up), then of course I should have to pay for the service provided. Then I am in fact paying to license the photograph itself. This costs whatever the institution deems suitable. Again its not the likeness of the object, but the physical photograph I'm then paying for.
There are clear technical restrictions related to objects and photography.
- The most obvious one is related to the use of lighting. Without direct staff supervision, no use of specialized lighting. This extends into the public displays - no use of flash photography by anyone, at any time, of any thing. It is true that only certain classes of objects react in a negative way to intense light, some are not effected in any way what so ever. Painted versus metals as a clear example. For purposes of control, its just simpler to rule 'no flash photography'.
- No use of tripods (or monopods). Two reasons, the most obvious being the blocking of floor space that tripods represent. The second reason was originally related to image quality. In the days of slow films, it was simply impossible to make 'publication quality' photographs without the use of a tripod during the exposure. The way to solve this physical limitation imposed by the technology of film cameras was through the use of flashes. See above.
So in the 'old days' a simple way to segregate personal 'snap shots' and potential commercial photography was simply to forbid the use of either tripods or flashes. However, starting in the late 1970's technology started to breach these imposed limitations to quality.
- First was the introduction of more sensitive colour films. I can actually remember when the first of these, Kodak Ektachrome 200 ASA, was released against the then standard Kodachrome 64 ASA. At first this increased ability to take effective colour images in lower light was balanced by less clarity to the grain. Eventually most of the major manufacturers had colour print and slide films that gave accurate colour and high image quality at 400 ASA. This the difference between needing bright sunlight to being able to shoot good images with normal indoor light levels. (Refer to the comments on museum lighting below)
- The Second 'problem' for museums was the introduction of physically ever smaller and more automatic cameras, especially as built in flashes became the standard. Again in the 'old days', a quality 35 mm camera was a relatively large and complex piece of equipment. The flash itself was a secondary piece of equipment. These were bulky enough to be clearly obvious. So museum staff could sort out potential commercial photographers at the gate. These were also significantly expensive equipments - a good 35 mm camera cost the equivalent of at least three weeks wages. The standard 'instamatic' type tourist camera took small and extremely poor quality images, certainly not good enough for any kind of publication use. As camera technologies and miniaturization increased, better image quality and more automatic features got packed into smaller packages - and at seriously reduced prices. A major problem now occurs. The camera is far smarter than the person using it. The machine decides if a flash is required, and uses its own built in flash to provide the intense light required. Most owners have no idea how to turn off this function. It becomes easier for museum staff to just forbid ALL cameras than attempt to judge just who is knowledgeable enough to be allowed to use one correctly in the museum environment.
- The switch from film to digital imaging has huge implications. The 'processing gap' between taking the photograph and converting it for publication has shrunk (if not completely disappeared). My current digital camera is an Olympus 35 mm frame with a 8 MG 'sensitivity'. The cost was roughly equivalent to one and half days pay. The images it takes are roughly equivalent in terms of quality to those I got from my 30 year old Yashica using Ektachrome 400. Now I took over 600 images on my recent Denmark trip. At two museums, I took images of virtually EVERY object in the collection from the Viking Age period. If I had done so on slide film, the cost of film and processing would have been at least $600. Most of these images are at least good enough quality for web based publishing. I was not using the best quality that the camera was capable of recording, but even still most of the images would compact to the standard 300 dpi at 8 x 10 size (again about what would be expected from the film).
Curiously (or not so much so) the increasing use of 'theatrical lighting' in museum presentations also have its date traced directly back to the increasing technology of casual photography. Many of us who love detailed looks at objects remember the old days of the 'Victorian Stuff' museums and display methods. Flat groupings of many related objects with simple and ample overhead lighting. One easy way to reduce the quality of potential images is merely to reduce the amount of light available for making the photograph. Some of this shift is also due to an increased consideration for the durability of some objects and the effect of light on them. When the case is full of iron or glass, this argument is laughable however. The current use of small pools of highly directed lighting clearly negates the argument that this is done for preservation alone. Any serious student of the artifact has been endlessly frustrated by the net result of such theatrical effects. A highly illuminated surface that leaves the rest of an object shrouded in darkness leaves the human eye unable to make clear observation. It certainly makes clear photography virtually impossible, and its hard not to assume this is the primary reason for the staging.
On my own recent trip to Denmark, I had contacted each of the major museums I planned to visit well before my departure. The most important net gain to me was that each institution allowed me to take photographs inside the collection. For at least two of the museums (National Museum in Copenhagen and Ribe Viking Centre) there is normally no photography permitted. At the Ribe Viking Centre, I did in fact take images of virtually their entire Viking Age artifact collection. I also purchased both the popular overview and the primary archaeological report containing 'official' images of the same objects (spending some $200 just on these).
I balance that very positive experience against what happened at the National Museum in Dublin on my only other overseas trip (back in 1989). Here I was not even allowed to take my camera INTO the museum. This because they were attempting to generate revenue via the selling of books that described 'the Treasures' - objects like the Ardaugh Chalice and Tara Brooch. My reason for visiting the collection was NOT to see these objects (for which I did in fact purchase both books and 'official' images on slide). My interest was in the many everyday (thus not 'impressive') objects from the recent Viking Age Wood's Quay excavations. Objects which (even still) have largely not even had the original primary archaeological reports published. The net result was that instead of any clear record of what was on public display, I have merely a few scribbled notes and small drawings in tiny note pad. On any number of levels, the entire experience was negative.
How fast the once imposed technical limits on photography are shrinking creates new problems for any institution that operates under a pure business model, where they think access to quality images of their collection is nothing more than a revenue stream. Truth is, many institutions are allowing the imaging technology of the 1970's and the business practices of the 1990's to shape their current policies.
At best, a policy of 'no photography without signed release' is one that would satisfy both researcher and manager.
(Neil's original observation)
1. Allow photos - bluntly get with the modern world and
allow it.
The concept of "we copyright our artefacts you can't take
pictures but we'll sell you..." is dead. The "it interferes
with other people" in most cases isn't true. I would have
said "never" but after Maeshowe I'll moderate that to
"mostly". Even in the case of places like Maeshowe there
should be regular "photo tours" where photos are allowed
(say 1 of the 8 daily tours).
Feel free to disallow flashes, feel free to use anti-flash
glass. Feel free to keep fabrics in drawers with the lights
off until people pull them out and push the button.
This goes further though - people want the photos so HELP
them. Check the lighting for glare on the glass. Provide
scaling in the exhibit cases so the photos are more useful. Perhaps the simplest way is just to use a standard font to
provide the numbers in the cases. A couple of museums did
that, now I just have to email them and ask what font it was
and presto I've got a scale.
This is a massive problem, going back to the late 70's into the early 80's. By my observation, about the same time as the switch from museums regarded as collections held as a public trust headed by historians and archaeologists, to museums as entertainment enterprises headed by business managers.
When museums were supported by public funding, a clear argument can be made that the owners of the objects are in fact the visiting public. I therefore have a right to take images of my own stuff. Tempered by the dynamics of maintaining public access and not harming the objects.
I find the general idea that many major museums consider that allowing images to be taken of objects inside the collections is to be considered a form of revenue generation troubling on a couple of levels.
Right off the top, I must temper my opinion by noting that particularly in the United States, there are many PRIVATELY owned collections, rather than the mainly PUBLIC ones normally the case in Canada. There is a further gray area around 'Not for Profit Corporations', which are also far more common in the USA than here in Canada (and I suspect not common in Europe either).
I note that when an institution says it is 'licensing images from the collection' this implies (to me anyway) that it is the likeness of the object that is being controlled, not the physical photograph itself. If the object is held in a public institution, the museum is at best 'holding the object in trust for the public' and a legal argument can be made that 'they' do not actually 'own' the object itself (see above).
Commercial 'for personal profit' use of the images being perhaps a different situation. I say perhaps. There may be a fee charged which is related to the mechanics of making the image itself. Note that this is not related to the 'rights' to the actual object.
If I request the object taken out of its case, so that I can apply special lighting or image set up, then I should fully expect to pay something for that level of access. In this case I am paying for the supervision and action of the curatorial staff. However, as I personally make the actual photograph, what I chose to do with it after the fact is my concern alone.
If I want to use a 'standard image' that the museum has produced of the object (where they have done that set up), then of course I should have to pay for the service provided. Then I am in fact paying to license the photograph itself. This costs whatever the institution deems suitable. Again its not the likeness of the object, but the physical photograph I'm then paying for.
There are clear technical restrictions related to objects and photography.
- The most obvious one is related to the use of lighting. Without direct staff supervision, no use of specialized lighting. This extends into the public displays - no use of flash photography by anyone, at any time, of any thing. It is true that only certain classes of objects react in a negative way to intense light, some are not effected in any way what so ever. Painted versus metals as a clear example. For purposes of control, its just simpler to rule 'no flash photography'.
- No use of tripods (or monopods). Two reasons, the most obvious being the blocking of floor space that tripods represent. The second reason was originally related to image quality. In the days of slow films, it was simply impossible to make 'publication quality' photographs without the use of a tripod during the exposure. The way to solve this physical limitation imposed by the technology of film cameras was through the use of flashes. See above.
So in the 'old days' a simple way to segregate personal 'snap shots' and potential commercial photography was simply to forbid the use of either tripods or flashes. However, starting in the late 1970's technology started to breach these imposed limitations to quality.
- First was the introduction of more sensitive colour films. I can actually remember when the first of these, Kodak Ektachrome 200 ASA, was released against the then standard Kodachrome 64 ASA. At first this increased ability to take effective colour images in lower light was balanced by less clarity to the grain. Eventually most of the major manufacturers had colour print and slide films that gave accurate colour and high image quality at 400 ASA. This the difference between needing bright sunlight to being able to shoot good images with normal indoor light levels. (Refer to the comments on museum lighting below)
- The Second 'problem' for museums was the introduction of physically ever smaller and more automatic cameras, especially as built in flashes became the standard. Again in the 'old days', a quality 35 mm camera was a relatively large and complex piece of equipment. The flash itself was a secondary piece of equipment. These were bulky enough to be clearly obvious. So museum staff could sort out potential commercial photographers at the gate. These were also significantly expensive equipments - a good 35 mm camera cost the equivalent of at least three weeks wages. The standard 'instamatic' type tourist camera took small and extremely poor quality images, certainly not good enough for any kind of publication use. As camera technologies and miniaturization increased, better image quality and more automatic features got packed into smaller packages - and at seriously reduced prices. A major problem now occurs. The camera is far smarter than the person using it. The machine decides if a flash is required, and uses its own built in flash to provide the intense light required. Most owners have no idea how to turn off this function. It becomes easier for museum staff to just forbid ALL cameras than attempt to judge just who is knowledgeable enough to be allowed to use one correctly in the museum environment.
- The switch from film to digital imaging has huge implications. The 'processing gap' between taking the photograph and converting it for publication has shrunk (if not completely disappeared). My current digital camera is an Olympus 35 mm frame with a 8 MG 'sensitivity'. The cost was roughly equivalent to one and half days pay. The images it takes are roughly equivalent in terms of quality to those I got from my 30 year old Yashica using Ektachrome 400. Now I took over 600 images on my recent Denmark trip. At two museums, I took images of virtually EVERY object in the collection from the Viking Age period. If I had done so on slide film, the cost of film and processing would have been at least $600. Most of these images are at least good enough quality for web based publishing. I was not using the best quality that the camera was capable of recording, but even still most of the images would compact to the standard 300 dpi at 8 x 10 size (again about what would be expected from the film).
Curiously (or not so much so) the increasing use of 'theatrical lighting' in museum presentations also have its date traced directly back to the increasing technology of casual photography. Many of us who love detailed looks at objects remember the old days of the 'Victorian Stuff' museums and display methods. Flat groupings of many related objects with simple and ample overhead lighting. One easy way to reduce the quality of potential images is merely to reduce the amount of light available for making the photograph. Some of this shift is also due to an increased consideration for the durability of some objects and the effect of light on them. When the case is full of iron or glass, this argument is laughable however. The current use of small pools of highly directed lighting clearly negates the argument that this is done for preservation alone. Any serious student of the artifact has been endlessly frustrated by the net result of such theatrical effects. A highly illuminated surface that leaves the rest of an object shrouded in darkness leaves the human eye unable to make clear observation. It certainly makes clear photography virtually impossible, and its hard not to assume this is the primary reason for the staging.
On my own recent trip to Denmark, I had contacted each of the major museums I planned to visit well before my departure. The most important net gain to me was that each institution allowed me to take photographs inside the collection. For at least two of the museums (National Museum in Copenhagen and Ribe Viking Centre) there is normally no photography permitted. At the Ribe Viking Centre, I did in fact take images of virtually their entire Viking Age artifact collection. I also purchased both the popular overview and the primary archaeological report containing 'official' images of the same objects (spending some $200 just on these).
I balance that very positive experience against what happened at the National Museum in Dublin on my only other overseas trip (back in 1989). Here I was not even allowed to take my camera INTO the museum. This because they were attempting to generate revenue via the selling of books that described 'the Treasures' - objects like the Ardaugh Chalice and Tara Brooch. My reason for visiting the collection was NOT to see these objects (for which I did in fact purchase both books and 'official' images on slide). My interest was in the many everyday (thus not 'impressive') objects from the recent Viking Age Wood's Quay excavations. Objects which (even still) have largely not even had the original primary archaeological reports published. The net result was that instead of any clear record of what was on public display, I have merely a few scribbled notes and small drawings in tiny note pad. On any number of levels, the entire experience was negative.
How fast the once imposed technical limits on photography are shrinking creates new problems for any institution that operates under a pure business model, where they think access to quality images of their collection is nothing more than a revenue stream. Truth is, many institutions are allowing the imaging technology of the 1970's and the business practices of the 1990's to shape their current policies.
At best, a policy of 'no photography without signed release' is one that would satisfy both researcher and manager.
Monday, June 02, 2008
Tranemo Team Bellows
If you are a regular reader, you have seen an ongoing discussion of my own re-creations of Viking Age blacksmith's bellows. The air that is delivered to the smelter is one of the most critical elements of the process. The total volume against time, the pressure of the flow, the position of the air pipe - all can have dramatic effects.
One of the things I had really wanted to do at Heltborg was get some numbers on air volumes. This is one of the most poorly recorded of all the variables that various experimenters have to work with. Partially this is due to the extremely wide range of types of air delivery systems individual teams make use of.
I had made a serious attempt to record actual outputs using my small hand held aneomometer. This gives a reading in kilometers per hour, through a standard 2.5 cm diameter hole. A little math converts that number to litres per minute. Unfortunately, it soon became apparent that the meter was not functioning correctly. The measurements were proving too inconsistent (the same power reading would produce quite different air flows on repeating the test).
The Danes especially all use pretty much the same commercial vacuum cleaner blowers. (Now the comments about 'vacuum blower smelters' makes more sense!)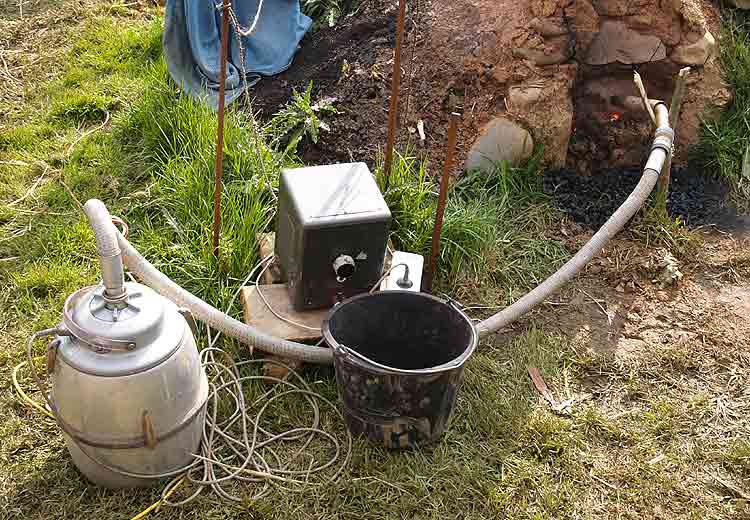 This image is of the equipment Michael Nissen lent me for my own three smelt experiments. The 'Nilfisk' blower is hooked up through a variable transformer to control motor speed. Remember that all the power in Denmark is 220 volt. Measurements are made using an output power meter on the downstream side.
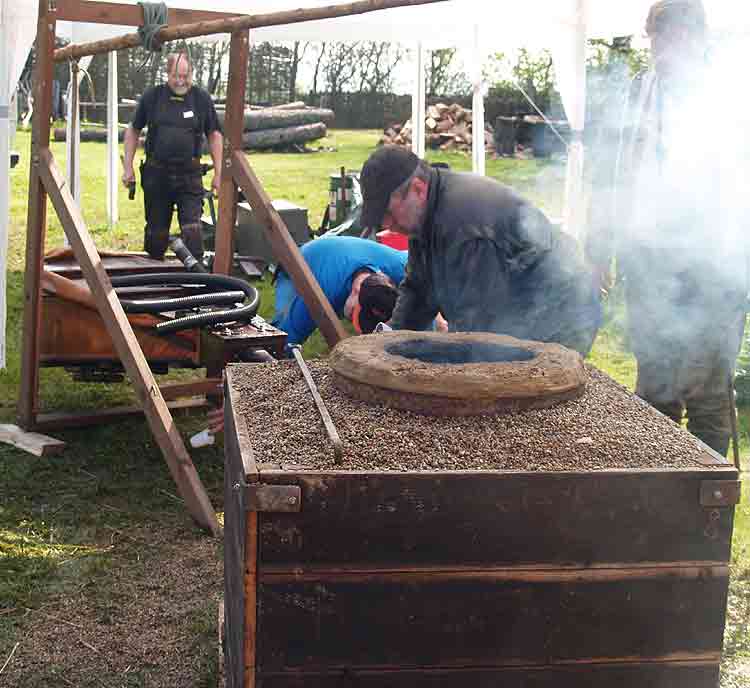
The other air system I was quite interested in measuring was the 'traditional' great bellows (double bag system) used by the team from Tranemo. I only have this image of the bellows, taken on Tuesday as the team was still setting up. (I had shot a long video sequence of the bellows in use during a later smelt. My camcorder died on me half way through the week - and the tape is jammed inside unable to be removed. Don't buy a CANON!)
I did make measurements of the system in use: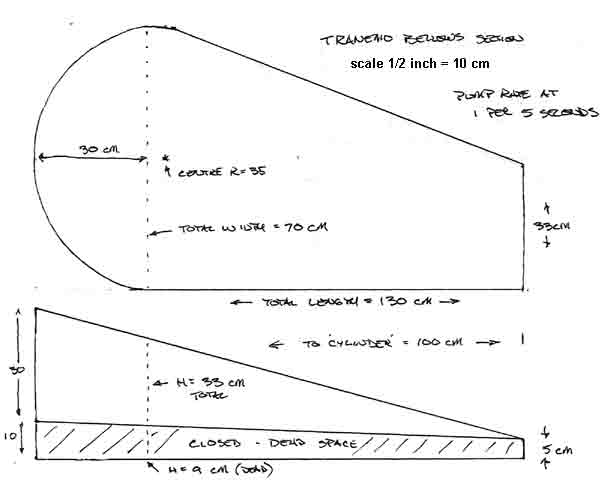
Earlier, Neil had set up one of those 'Google Spreadsheets' which allows users to plug in a series of basic measurements and get a * theoretical estimate * of air volume produced. (Go HERE to see the table)
I had good numbers on both the dimensions and the pump rates. I did have to make some WAGs on the two efficiency numbers. The loss at the valves was considered to be minimal. This bellows used rigid flap valves set on the underside of the bottom plate.
Still, the potential air volume from this bellows is in the high end - a potential at 1380 litres per minute (at the roughly 12 strokes per minute rate I observed.) Given a fairly standard 25 % working efficiency from the theoretical number, that brings the working volume produced to about 1035 LpM.
The smelter itself was 30 cm diameter, so using the Sauder & Williams method numbers (1.2 - 1.5 L/cm2) the required air volume is projected to 850 - 1050 LpM.
Now of course, in use the variable that iron masters pay more attention to is actual charcoal consumption rates. How fast you burn a standard measure of fuel. Hopefully at some point, the individual smelt data reports for the various Heltborg experiments will become available so there can be a comparison made between the air rates and the burn rates.
One of the things I had really wanted to do at Heltborg was get some numbers on air volumes. This is one of the most poorly recorded of all the variables that various experimenters have to work with. Partially this is due to the extremely wide range of types of air delivery systems individual teams make use of.
I had made a serious attempt to record actual outputs using my small hand held aneomometer. This gives a reading in kilometers per hour, through a standard 2.5 cm diameter hole. A little math converts that number to litres per minute. Unfortunately, it soon became apparent that the meter was not functioning correctly. The measurements were proving too inconsistent (the same power reading would produce quite different air flows on repeating the test).
The Danes especially all use pretty much the same commercial vacuum cleaner blowers. (Now the comments about 'vacuum blower smelters' makes more sense!)
This image is of the equipment Michael Nissen lent me for my own three smelt experiments. The 'Nilfisk' blower is hooked up through a variable transformer to control motor speed. Remember that all the power in Denmark is 220 volt. Measurements are made using an output power meter on the downstream side.The other air system I was quite interested in measuring was the 'traditional' great bellows (double bag system) used by the team from Tranemo. I only have this image of the bellows, taken on Tuesday as the team was still setting up. (I had shot a long video sequence of the bellows in use during a later smelt. My camcorder died on me half way through the week - and the tape is jammed inside unable to be removed. Don't buy a CANON!)
I did make measurements of the system in use:
Earlier, Neil had set up one of those 'Google Spreadsheets' which allows users to plug in a series of basic measurements and get a * theoretical estimate * of air volume produced. (Go HERE to see the table)
I had good numbers on both the dimensions and the pump rates. I did have to make some WAGs on the two efficiency numbers. The loss at the valves was considered to be minimal. This bellows used rigid flap valves set on the underside of the bottom plate.
Still, the potential air volume from this bellows is in the high end - a potential at 1380 litres per minute (at the roughly 12 strokes per minute rate I observed.) Given a fairly standard 25 % working efficiency from the theoretical number, that brings the working volume produced to about 1035 LpM.
The smelter itself was 30 cm diameter, so using the Sauder & Williams method numbers (1.2 - 1.5 L/cm2) the required air volume is projected to 850 - 1050 LpM.
Now of course, in use the variable that iron masters pay more attention to is actual charcoal consumption rates. How fast you burn a standard measure of fuel. Hopefully at some point, the individual smelt data reports for the various Heltborg experiments will become available so there can be a comparison made between the air rates and the burn rates.
Subscribe to:
Posts (Atom)


