The objective of this experiment was further investigation of the 'Slag Pit' style furnace - tentatively described as 'Celtic Iron Age'.
To date I have attempted variations on this basic process three times :
October 2011 - Branton's Run limonite (?) - no iron produced
November 2011 - industrial taconite - 6.4 kg / 33 % yield
August 2017 - DD1 analog - 2.9 kg fragments / 15% estimated yield
 |
| Theoretical layout - August 2017 |
The primary difference is in the slag management method. Here a pit is dug below ground level, before the furnace is constructed above it.
1) The pit is filled with vegetation.
2) There is a clay cap placed above the pit, sealing this off from the working furnace above.
What is supposed to happen is that the vegetation below supports the clay cap during the drying fire and early cycle of the working furnace - until the slag bowl forms. As excess slag is generated, it is allowed to drain through the clay cap, down into the pit below. So a kind of 'internal slag tapping' (2).
 |
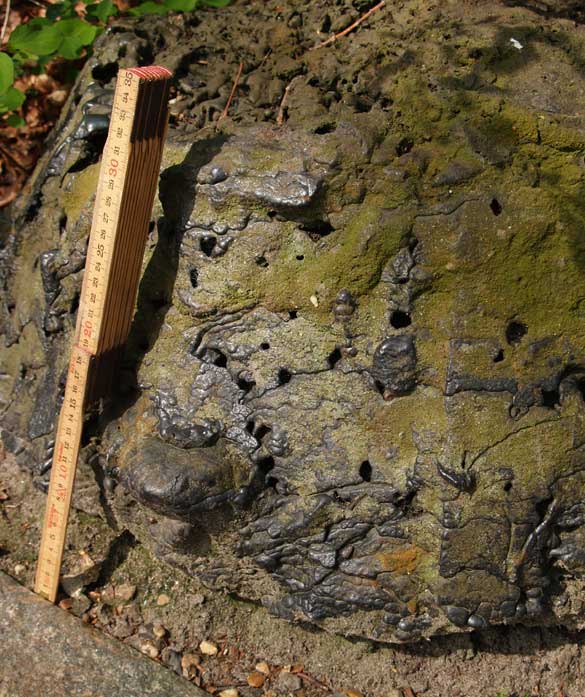
| Early Iron Age slag block, Denmark |
The first experiment used sturdy sticks of willow as the vegetation, but the clay cracked and broke too early in the main smelting cycle, before the slag bowl had really formed. (This compounded by use of a questionable ore - which might not proved iron rich enough for effective iron production to begin with.)
Test two used a virtually identical design, but with a proven (effective!) ore. The results here were excellent, both in terms of bloom production and the slag block remaining.
Test three was certainly a disappointment, given it took place as a public demonstration at the Scottish Crannog Centre. The first clay plate actually cracked and failed during the drying fire. (This may have been partially the result of using dried grass and not packing tight enough?) The pit was re-filled with vegetation, and a second plate installed. It too broke too early in the smelting cycle. (Not unexpectedly, with wet clay exposed to high furnace temperatures!)
 | |
| Proposed Furnace Layout = 6/18 |
The first step then was to dig a pit in the centre of our normal smelting work area.
Always a challenge at Wareham!
 |
| 'Completed' Pit |
One of the first questions from earlier attempts was how to best select the vegetation, then how to best pack the pit with this material.
 |
| Kelly picking some of the chosen plants |
 |
| Packing the Pit |
 |
| Forming the clay 'cap' over the pit. |
 |
| Furnace Build - tuyere in place. |
Originally this furnace had been mounted on a concrete block plinth. (Filled with charcoal fines, that construction allows for easy dropping of the slag bowl to produce larger blooms, and simplifies bottom extraction method.) To ensure the correct space below the tuyere, here the furnace was set on top of a number of half bricks, sealed with straight clay. The proper depth of the base was set by adding a layer of sand / wood ash mix on top of the clay cap.
 |
| Setting Tuyere Angle |
I have written many times (both here, on the main Iron Smelting documentation, and in published articles) about the importance of setting the correct tuyere angle for a well functioning furnace. You can see the method I use to establish this correctly in the image above. I have simply made up a small sheet metal triangle with the 'ideal' 22.5 degrees to one corner. With a small pocket level, it is easy then to find tune the tuyere angle, which is only rough set when the hole is cut into the furnace body.
Other work on this first 'build and prep' day included hauling out all the smelting tools and equipment, setting up both a charcoal prep and the visitor's area.
Enough for one day! (And one blog post...)
(1) This event, along with the 'Thanksgiving Weekend' and 'Samhain' ones, continue to be part of ongoing experimental investigations into early bloomery iron smelting methods.
All are considered 'Open Invitational' events = meaning that interested observers are welcome to come. I do ask that you contact me before coming up however. This primarily to calculate septic loading and parking spaces.
There is usually some possibility of becoming directly involved (there is always 'dirty work' to be undertaken!). Those hoping to participate are warned to dress in suitable work clothes.
These are not intended as teaching events however (see the 'Introduction to Iron Smelting' course)
(2) The slag pit arrangement was common throughout Europe, roughly up to the end of the Roman period. The upper furnace structure itself varies, ranging from earlier smaller bellows blown to huge (Roman) natural draw types. The slag blocks created are almost indistructable, and thousands remain. In Denmark alone, over 2000 have been found. Typically these are roughly the size of a bushel basket. (Image above is from the lower Jutland area, seen on my 2008 trip.)
No comments:
Post a Comment