Monday, August 31, 2015

Railroad Spike Knives - WHY?


On 19/08/15 1:51 PM, Steve wrote:
I have numerous rail spikes that I was hoping I could bring to you to heat and pound the ends into steak knives and or cheese knives?

Short answer - no

see : http://www.cartercrafts.com/carbon_myth.htm

The problem with rail spikes as a starting material is that the highest carbon content available is only 1030.
Regular mild steel is usually 1020
For a machette, you might use 1045

The second number of those specifications is 1/100 of percent carbon. Any knife expected to hold a decent working edge should be at least the range .5 % (1050), but ideally closer to .7 to 1 % carbon.
This refers directly to what I at least call 'the Bladesmith's Dilemma' :
As you increase * hardness * (via more carbon), you also increase * brittleness *.
Compare a typical machette at about 0.50 % carbon. You can hack down a tree with it, but it does not stay sharp all that long.
With a box cutter, which is razor sharp, but breaks with the least amount of force to it.
The amount of raw material on a rail spike will limit the finished cutting edge to something in the range of 4 - 6 inches. At that size limit, normally use of a higher carbon range is indicated.
Do also remember that you can make a piece of paper 'sharp' enough to cut your finger. The question should not be 'how sharp is it?' (a function of care with polishing). More important is 'how long will it *keep* that edge?'.


I personally consider making knives from rail spikes as a kind of a beginner's trick.

Go and search Google Images : 'railroad spike knife' ...

'Typical' rail spike knife - here by Salem Straub (shows as #2 on search)

If you also take a fast look on etsy - the average price for the 'standard' designs seems to start about $50 and maybe to $75 each (US).

Mind you there are some nice looking examples showing in the general search :
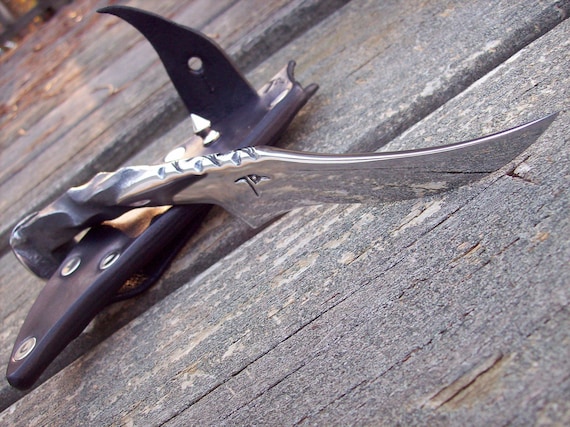
...by RplRaven / Robert Lindsay (shows as  #10 on search)
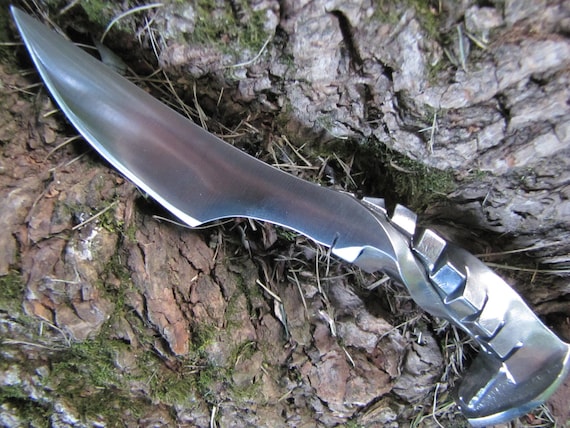
... by Mainline Steel Works / E. Sievers (?) (shows as #19 on search)

 As far as you can tell from a photo on Etsy - those both look like very nice pieces,  in terms of design, forge work and finishing. (And both have sold btw.)


Another thing to consider : New or Used material?
All these makers stressed in their description these were HC marked spikes. Even at a 'low medium' carbon content, a *used* rail spike has been subjected to stress in its normal working life.
• The process of hammering it down into a hardwood (typically oak) rail tie does involve in the application of considerable force as it is driven in *. This may produce shearing force to the area joining head to body of the spike.
• The purpose of a rail spike is to secure a section of rail track. Which is repeatedly pounded by passing trains. Certainly this must produce considerable shock / stress into the same area (joint of head to shaft. The body of the spike would certainly be cushioned by the surrounding wooden tie. Of course this is the part of the metal spike being forged into the blade itself.

It does make me wonder why anyone would put so much time and effort  - into what is an inferior material??


Taken all together, the only reason I can envision for using a rail spike as starting material for a blade may be the knob of the original spike's head. If you like that kind of thing. (I don't.)

Or more likely - it is because rail spikes are easily picked up along the tracks for free.
This may be a consideration for the cheapest / simplest (usually also least skill employed) versions. The more elaborate (higher skill and attention to detail) versions run into the $100 - $200 (US) range however. At that price, 'saving' the small price of brand tool steel bar stock, (at roughly $3 - $5) honestly just does not make any sense.


Do check my general information on custom bladesmithing:
http://www.warehamforge.ca/knife.html


* Believe me! I worked one summer in my early summer building rail track switches for Canadian Pacific RR out of Thunder Bay. Handling a specially designed spike driving hammer is trickier than it may look - especially when seen in the (skilled!) hands of someone who does it all day, every day. A slight shift in aim puts the striking force to one edge of the semi-spherical shaped head. This produces sideways force (and shock) to that 'hard' metal.
Thursday, August 27, 2015

(Some more) Questions and Answers

 I was contacted a while back by a fellow working as a freelance writer. He had some interest in just what I did here at the Wareham Forge. He came up and spent a few hours, took some photographs. He was hoping to shape the material into a submission he could offer to a regional newspaper for a feature. 
These are some follow up questions  - and my answers to them (modified to insert a few links to the main web site) :

1. When did you start smithing?
While a student at Ontario College of Art in the late 1970's.
I was not encouraged there (in fact only received a passing grade in metal studio on the provision I 'not return'.)
What drew you into this work?
Initially it was the functionality of the medium. It also turned out I had an affinity for the combination of technical and artistic aspects of this work. The almost infinite flexibility of steel when forged that inspires so many creative possibilities.
What is your specialty?
Objects based on or inspired by history, most specifically North European from the period 600 - 1000 AD. My contemporary work (architectural and decorative) echoes the design traditions of Celtic and Nordic artifacts. One absolutely unique area is my work with self made bloomery iron.
What do you enjoy the most about this work?
With practice comes skill, and usually my artistic vision flows from my mind through my hands into the metal as it is shaped (relatively) easily. The plastic nature of hot metal while being forged contrasts the extreme durability of the material when cold. Objects well made have a life time measured in decades, if not centuries. I am drawn to create objects that are at core functional, but at the same time are beautiful to look at.

2. Why do you think it is important to keep the old skills and traditions alive?
I was part of a generation of blacksmiths (in Canada at least) who had to essentially re-invent the trade from the ground up. This primarily because the traditional chain of Master to Apprentice had been broken here through the 1940's to 60's (considered my father's generation). Even basic working techniques were only recovered through many trials and considerable errors - experience that was hard won. There is often a sensitivity to materials and processes buried in 'old wisdom' that is the result of many lifetimes of practical experience. I consider it a responsibility to ensure what I have learned (often painfully!) is passed to younger hands.
At the most basic, we never know when skills acquired in the past might prove a necessity to a rapidly changing future.
  What do they offer us in the modern word?

There are many methods of constructing an object using forging that simply produce higher quality in the end product. This is most obvious in tool making - inset hard cutting edges hammer welded intimately into softer supporting frameworks. Metal shaped hot is not subjected to the same stresses to materials forced while cold. In many cases it is just not possible (or extremely wasteful) to make the kind of extreme shapes possible through forging by any other methods.
In a world that increasingly holds the paradox of disposablility against shrinking resources, well executed forge work offers extreme durability. The material processing leading up to the creation of a forged object may prove considerable, but the long working lifetime of that object represents a wise investment.

3. Any other info you might like to toss in,
The reality of life for the modern  Artisan / Maker is always a combination of creating what the soul inspires to - and what the marketplace demands. On any given day my work might range from simple hooks for historic re-enactors to functional architectural railings to experimental archaeology research to pure artistic objects. Time actually with hammer in hand is bracketed into all the mechanics of running a business - a productive day is commonly only one with 20 - 25 % of the time spent actually in the workshop. People often mis-understand that what seems fast working is actually the result of decades of endless repetition with each task.
All these factors need to be taken into account when considering the very 'real cost' of any object from an artisan's hands.

"Twenty minutes to make the thing. 
Twenty hours getting ready for the work. 
Twenty  years to know how."

Tuesday, August 18, 2015

(not so much) 'Quenched in the living body...'

The background here is a commentary I posted back in May of 2009:

'Quenched in the body of a Slave...'


I had a couple of personal e-mails sent to me by Professor Helmut Föll,  a materials scientist from the University of Keil (Germany) :

You don't know how right you were in your analysis that quenching a sword in the body of a slave is pure BS!
I found the source of that nonsense, here it is:
....
Let me emphasize that there are no early Arabic texts. The whole thing was a kind of April 1st joke in that Berlin Newspaper in 1894. 


In his blog post, Prof. Föll discusses a number of historic receipts for quenching solutions. He provides the original texts, translations, plus interpretations of the (often hidden) meanings for the individual components.
Not too curiously, carefully manipulated urine figures prominently in many of the historic 'secrets'.


In my own return communication to him, I had mentioned my belief that the original source for the 'quenched in a living slave' concept was from an Early Medieval Arabic text. His research into historic sources has pointed to this idea itself being nothing more than another piece of the 'fake-lore'!

Fortunately, I see my original post on 'Quenched in the Living Body' does not give this specific (incorrect) source. I had just referred to the very real practical problems that makes the whole idea plain stupid.


Of course the  Secret Ritual (TM) in my workshop is :
Wait till a full moon night. The Master and his two apprentices go to the local pub and each drink nine Guinness (Nine being the sacred number of O∂in). We then make love to a virgin, red haired and green eyed, Irish, slave girl (in order of seniority)*. After this, we each pee (in turn) into the slack tub. This prepared liquid is used for quenching the perfect sword** the next morning.

* Sword makers of alternate polarity using this method are suggested to substitute their own preference here.

** Those who follow this method can expect exactly the degree of success they so richly deserve. Double so for those who pass on this Secret.


PS : If you have not checked the link to Prof. Föll's bog - I strongly suggest most readers here should do so.
There is an extensive section : 'Iron, Steel and Swords'
(I have only had time to skim the first part, bit it looks excellent!)

Tuesday, August 11, 2015

Bowl from Bloom Iron

Now you have an iron bloom.
What do you do with it?? 

Bloom Bowl #4 - Summer 2015
This is the most recent in a series of bowls forged from self made bloomery iron.

The source of the iron itself was from Smelt #24, conducted in June of 2007. The specific experiment was a 'hot swap' - a double use of the same furnace. Once this bloom was formed, and extracted, a second charge was added to the still hot furnace and a second bloom created.

The description of these pair of smelting experiments can be found on the main Wareham Forge Experimental Iron Smelting web records.

The starting bloom was created by the team of Neil Peterson, Dr Ron Ross, and myself:

The two blooms created - #24 to the left
After initial compaction (right after extraction) the bloom from Smelt 24 weighed 860 gms.
A spark test on the surface suggested the metal content was fairly low carbon - considerably less than the 0.20 % of modern mild steel.

I don't have any images of the actual forging 'bloom to bowl' sequence:
• The bloom mass was pre-heated to a bright orange in a gas forge (lengthy heat soak)
Considerable slag could be seen flowing to the outside surface at this step.
• The bloom was transferred to the coal forge, and brought to a welding heat (bright yellow)
• A first two compactions were under the hydraulic press
• An additional series of welding heats were taken, using the hand hammer in an attempt to weld in the ragged edges, resulting in a rough rectangle.
• Again at close to welding heat, the plate was returned to the hydraulic press, this time under a cylindrical 'drawing die'.

At this point, the plate started to fragment along the edges, with several match box sized pieces working loose.
I decided to try fluxing the remaining surface, then placing the individual fragments on top. The intent was to weld in the fragments, back to a solid (if thicker) plate. (This is something that I personally have never had a lot of luck with, but that I have observed friend Jesus Hernandez accomplish many times.)

I was also getting a bit tired out! It should be mentioned that a second small bloom had been in progress over the initial work cycle, heating one while the other was being forged. I had duplicated the steps up to switching to the drawing die on the second piece at the same time. (This other piece spark tested out to be closer to 0.30 carbon, so was set aside as a plate for later work.)

As it turned out - the key was a * slow * heating process (Thank you to Lloyd Johnson, who had stressed this during the adze forging demonstration he illustrated for OABA on Saturday!)
The result of a compaction at welding heat (on the press) was a successful weld.
Then:
• An additional series of welding steps with the hand hammer to ensure the edges were firmly attached.
• Several forging heats under the air hammer to thin out the welded plate (starting at about 1/2 inch thick) down to roughly 3/16 thick. A mushroom head die (on a handle) was used for these steps.
• A final set of forging heats using the 1 kg rounding hammer to smooth out any ripples from the die.

At this point I had converted the initial bloom into what was basically the * starting * material for the actual object I had in mind :
• Gathering natural rock ore = several hours work
• Building a smelting furnace, preparing raw materials = a full day's work (ideally two people)
• Smelting rock ore into the initial iron bloom = a very full day (ideal minimum two people)
• Consumed materials = roughly $110 (56 kg charcoal, ore not considered)
• Forging bloom to starting plate = just over 2 * hard * hours
• Consumed fuels - roughly $15 in propane + roughly $ 10 in coal
Note that 'knowing how' is not a consideration here.
Or the $2000 plus full week of work for the Hydraulic press - installed specifically for bloom work.

Forging the bowl itself took about another 30 - 45 minutes.
The next day there was polishing and finishing, about another 30 minutes.
The completed object is 550 gm (so roughly a one third loss in its creation).
The rough size is 6 inches long by 4 1/2 wide and standing 3 tall.


So...

How do you price an object like 'Bloom Bowl #4'?

( It probably should be a consideration that I am one of only two artisans in Canada who regularly works with bloomery iron. Certainly I have the most accumulated experimental experience in creating this unique material within Canada.  )


...with endless thanks to Lee Sauder, for showing me how and then pointing the way

Monday, August 10, 2015

Cross Medium Inspiration

We had intended to visit the Royal Ontario Museum in Toronto last Thursday. The goal was to view the current Pompeii exhibit.
Truth be told, even mid morning on a weekday, there was a line up at admissions that looked a good 1/2 to 3/4 long.
Instead, we crossed the street and went to the Gardner Museum (of Ceramics) instead.

As it turned out - a wise decision.

Inspiration for an artisan can come from many places. At the Gardner, both the contemporary work and the artifacts from Central America sparked some ideas:


I'm not going to comment on what exactly I saw in each of these pieces that triggered some concept that I think I can apply to my own work (forged metals). Part of the creative process is also imagining how some source out there can be interpreted into  your own primary material or working methods.

Monday, August 03, 2015

Old World people in the New World before Columbus?


Old World people in the New World before Columbus?

In posing the question ... it is claims that people from Europe crossed the Atlantic Ocean before 1492 that I want to examine. It’s a huge area, with claims ranging from Magdalenian hunter-gatherers to late medieval fishermen from Bristol (England), and supported by a variety of evidence, from artefacts to inscriptions.
 by Keith Fitzpatrick-Matthews


I suggest anyone interested in archaeology go take a look at Keith's blog 'Bad Archaeology'.
After you have read the (excellent) source article - come back for my few comments...

*******

If I might correct a small factual error?
Keith said :
"In the short-lived site at L’Anse Aux Meadows (Newfoundland, Canada), iron ring-headed pins and typical Viking houses were found: truly exotic material that confirmed the Vinland Sagas."
The actual Ring Headed Pin found at LAM
There are a chain of small objects which can narrow down the cultural group which are responsible for the occupation of highest interest at L'Anse aux Meadows :
• Both iron rivets and smelting furnace remains, a technology used by Europeans, but unknown to First Nations.
• Turf wall remains - of a layout and construction style typical to Iceland / Greenland
• A soapstone spindle whorl - most likely to be found in an Early Medieval (European) context.
• That cast *bronze* ring headed pin, of a type common to Iceland in the late Viking Age.

There is not all that much garbage (unfortunately) :
• A couple of small wood plank pieces made of species found in Europe (and not North America)
• A lot of wood chips showing cutting with iron tools.
• Some broken pieces of wooden objects, suggesting possible European techniques or Norse designs.

All this backed up by carbon 14 that puts those timber fragments roughly 1000 AD.

The general lack of mounds of rubbish at L'Anse aux Meadows is likely due to its location right on the ocean beach. The simplest way to dispose of any organic trash is just to toss it in the water, one tide shift later it is simply washed away. (We observed this directly during a living history presentation on the site in 2010. Yesterday's pot washing of discarded soup bones were gone the next morning!)
As 'Lief's Houses' were never intended as a colony / long term occupation, the Norse simply took everything away with them when they left.

The current interpretation of the use cycle of the buildings at L'Anse aux Meadows by the Norse is a series of several short (over winter) stays, with gaps between uses. This roughly estimated by taking the volume of trash found and placing it against the number of bodies likely to have occupied the houses. (One other obvious wiggle factor is assuming that the massive work of creating the houses would not be undertaken without need.) Total use period for the buildings estimated by placing normal life cycle of the construction type against no visible repairs.
This all works out to most likely four or five use cycles over a likely period of 20 - 25 years.

on the Kensington Stone & Related:


Most damning for me - people who insist the Norse travelled to central USA have complete ignorance of the actual geography involved for such a voyage - against the real ship construction used by the Norse.

The Lachine Rapids at Montreal formed a natural barrier well past the European settlement of Ontario - the Lachine Canal bypassing them not opening until 1825.
What about Niagara Falls? (No passage there until the original Welland Canal in 1829.)

*Theoretically* a Norse explorer could have sailed a large, deep hulled (and extremely heavy) ocean going knarr (freight ship) over from Europe and down the St Lawrence (or into the bottom of James Bay).
Norse 'Knarr' - The LARGE ocean going ships that crossed the North Atlantic *
Then got out, *built a new ship* - only this time a smaller, light framed 'river boat', on the other side of the Montreal rapids (or at the river system at James Bay).
*Theoretically* you *might* be able to drag that smaller boat around Niagara. Its only 12 - 15 kilometers (look at a map). Through the virgin bush (6 foot diameter trees).
And then *walk* from the top end of Lake Superior....
The route south from James Bay is a bit better - no Niagara to contend with. You still have a second boat to construct (and no suitable trees at James Bay by the way.) Even in a smaller boat than a Norse river trader, there is excessive portage required.

But why on earth would you be so crazy to even attempt this?


Keith also did reference the Peterborough Petroglyphs.
I grew up just by those. Forget even getting a Norse river boat up into that area. Before the Trent Canal was installed (later 1800's) it was enough work even using a canoe. And then only 'close'. When I was a kid (in the late 60's) it was a half day walk from the nearest road to the actual Petroglyphs. The nearest connected waterway is even further.
Over my own life, I have seen the Petroglyphs 'atributed' to : Space Aliens, Phoenicans, Egyptians, Celts, Norse... Virtually everyone BUT the people who have actually lived there (for like the last 5000 plus years!


This piece slightly expanded and with additions from a comment I placed on Keith's original blog posting.

* Image scanned from 'Vikings - North Atlantic Saga' by Fitzhugh & Ward

Sunday, August 02, 2015

New Work - Forged Bowls

With Summerfolk coming up in a couple of weeks, I am creating a number of new pieces, all echoing this year's theme - EARTH

This is the collection of new forged bowls I have made over the last couple of weeks:

'Bulls Eye'

'Deep Dish'

'Off Centre'

'Segmented 3'

'Whorls'