The first piece I made up was 'Offering Bowl', which I earlier in the month.
The second piece was actually intended more as a test of an idea, extended into a finished object. The concept was this: 'Would a slab of bloom iron, folded and twisted in the pattern weld technique, actually show any distinctive patterning?'
The parent bloom used for both 'Offering Bowl' and the resulting 'Layer Test Seax' was one made at Early Iron 2 (Cooperstown 2005), the 'Reserection' bloom. The bloom bears its name from the unusual process that created it. I had been supervising Elizabeth Hendrics and Toby Bashaw (a team from MIT). Unfortuneately, Elizabeth had not been feeling well and they had to abandon their efforts 3/4 the way through the smelt sequence. I thought it a shame to just abandon the process, so took over with a modified method for the last roughly 2 hours of the smelt. When the smelter was opened up, there were clearly two distinctive bloom masses. Below was a rather lacy and wide mass, and sitting on top a quite separate small puck shaped one.The gap were the switch over had taken place had clearly dropped the temperature for just long enough that the final work I had done with the furnace had created this second separate bloom. This proved to be a very workable low carbon iron.
As with Offering Bowl, the work on Layer Test Seax had started with two fragments from an earlier (failed) attempt to forge a larger vessel. My best guess is that the compacted bloom had undergone two fold in half and weld sequences at that point.
Two pieces, each roughly 1/4 inch thick and about 2 x 3 inches, were tack welded (with MIG) to a mild steel bar to allow them to be worked on. These were then surface welded with a hand hammer. A second welding heat was taken, and the block worked under the air hammer. The material was drawn out enough to allow it to be cut and stacked in two, then the weld sequence repeated. This step was repeated twice, each time rotating the line of the fold by 90 degrees.
At that point, the billet was drawn to a longer bar, then loosely twisted, cut in half and welded again. If you count just the folds and welds from the starting pieces, that gave 16 layers total.
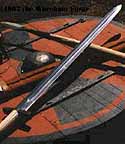
This last billet was forged out to a single piece knife, the shape loosely based on Romano British table knives and using the distinctive seax blade shape from the Dark Ages. The blade tapers in thickness from hilt towards point. It also was shaped with a strong V cross section. (Both common features on Viking Age knives.) The total length is 9 inches, with 5 inches of blade. It is 1" wide and 3/16" thick at the back at its widest point (just at the transition to the hilt).
The blade was quenched in water from bright orange, but not tempered. After final polishing (to 120 grit) it was etched in Ferric Chloride. Note that as a test and display piece, the cutting edge was intentionally not finished to sharpness.


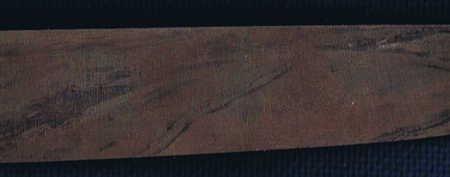
These images roughly life sized - direct scans of the knife.
(The some of the gold discolouration is due to a slight amount of copper plating out of the etchant - most is due to some effect of the scanning process.)
Looking at a close up, you can clearly see variations in colour that are at root caused by variations in carbon content of metal. The source bloomery iron will of course have stringer inclusions of microscopic slag, which does account for some of these lines (the brighter coloured ones?). Also the process of working the metal repeatedly at a welding heat will also allow a certain amount of carbon migration into the surfaces of the plates. With at least four weld sequences, each containing two uses of welding temperatures, there would have been certainly some infusion of carbon along the surfaces. The combination of carbon modification and slag inclusions is what is creating the subtle patterning.

One question was the location of two small bright shine patches just at either end of the finished knife. My best guess is that these mark some material from the filler wire on the MIG weld to the handle bar. This bar was cut away before the finished layered billet was forged to the finished shape, but it appears some of the quite different metal alloy was incorporated into the blade.
A number of decorative possibilities suggest themselves from this test piece. One thing that has surprised me is that the blade surface shows the distinctive finger print discolourations from being handled while on display. I would have thought a soft iron relatively immune from this problem. Again this points to a slightly higher carbon content to the metal than I first expected.


1 comment:
Normally I find folded steel knives to be pretentiously butt ugly, but this is beautiful. Truly, truly beautiful.
So would you case harden it at that point (and only sharpen one side) or do you think just leaving the blank in the bottom of the forge for a few weeks would bring the carbon content up to scratch?
Post a Comment