Tuesday, May 29, 2012

Pushing VA Air - Smelter Bellows Test

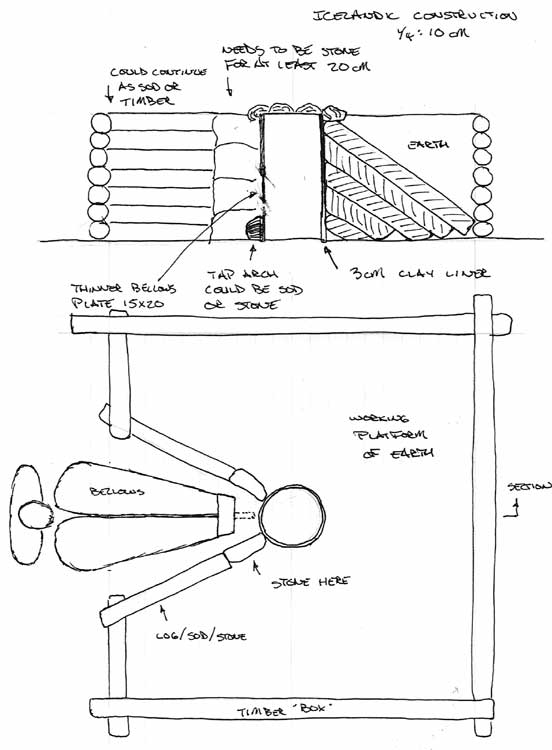
Air Volumes - Theoretical Viking Age Smelter Bellows
Tested May 26, 2012

Ken Cook on the Smelter Bellows - Vinland 3
Operator
strokes
velocity
volume
pressure
km/hr
litre/minute
ounce/inch2
psi
inches H20
mm mercury
low
high
average
Richard
76
38.5
41.5
40
327
1
0.06
1.7
3.2
86
37
41
40
327
1.5
0.09
2.6
8.4
Mark
86
36
40
38
310
1.5
0.09
2.6
8.4
90
47
52
47
384
3
0.19
5.2
16.8
Darrell
86
41
43
43
351
1.25
0.23
2.2
7.0
86
39
42
41
335
1.5
0.09
2.6
8.4
Neil
86
43
45
44
359
1.75
0.11
3.0
9.8
84
46
48
48
392
1.5
0.09
2.6
8.4
averages
85
41
44
43
348
1.6
0.12
2.8
8.8
area
27 dia
572 cm2
ideal volume
at 1.2
686
at 1.5
858
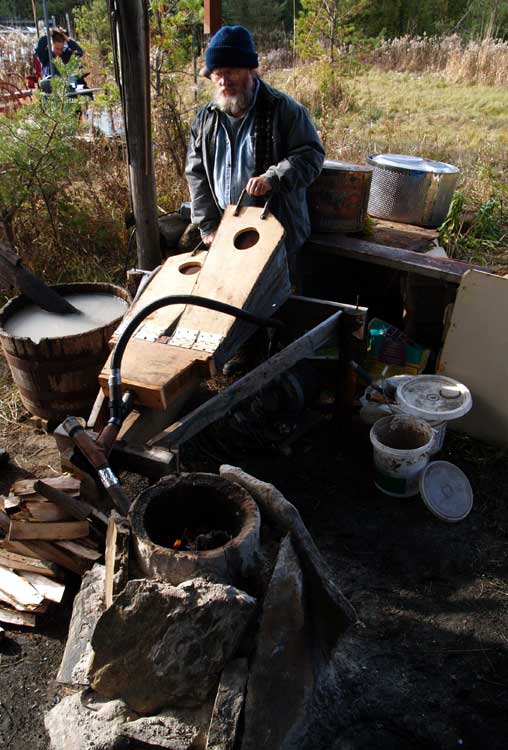
This test done at the start of 'Icelandic 5', with full charcoal inside a 27 cm ID furance x 58 cm tall.
Individual operators worked a roughly 5 minute cycle on the bellows with measurements made over 30 seconds.
Figures in itallics were generated mathmatically. Richard & Darrell have past experience with this unit.

Sunday, May 27, 2012

Icelandic 5 - Results

This is a short overview of the iron smelt at Wareham on Saturday May 26.
For details on the experimental objectives, see Hals / Icelandic 5 - Furnace Construction

Ore : 31.8 kg DD 1 Analog (48% Fe content)
Charcoal : 49 kg (graded fuel)
Time : 5 1/2 hour main sequence (plus 1 hour pre-heat)

At the beginning of the smelt sequence, showing the air system layout.

Our test furnace is dug into a bank rather than raised above the surface as at Hals. The V shaped slot is here lined with concrete blocks to retain the earth bank. The size of the slot was dermined by the space required to hold our Viking Age style iron smelting bellows.
Later in the smelt, tapping off excess slag

Needing to tap slag illustrates one potential problem with our suggested Hal's based layout. With the bellows in the slot, how do you get access to the front of the furnace for tapping? At the very least, the bellows would have to be connected to the tuyere via a short length of hose. This made of leather?
The hot bloom during initial consolidation with hand hammers, which also serves to knock off any remaining slag 'mother'.


Bloom : 13.8 kg
Yield : 42 %


Secondary compression, then cutting, under the hydraulic press.
The typical planno-convex shape of the bloom was roughly compressed to a flat disk using two compression cycles under the hydraulic press (heating between steps via the propane forge). This disk was then cut in two, the step seen above.


The roughly compressed pieces.

Friday, May 25, 2012

Hals / Icelandic Five - Furnace Construction

As I had detailed in Wednesday's post 'Return to Iceland', Saturday May 26 will mark our return to the Hals / Icelandic series, based on excavations and insights from Kevin Smith.
Our smelts # 38 , # 39 in Fall of 2008 had tested the general work dynamic around the Hals style construction, plus use of a bellows plate and blow hole system. (This method does not use a tuyere, and has been researched and tested by Michael Nissen of Denmark.)

Field drawings of Icelandic Three & Four
 Because of too much going on and too little time (brain power!) this will be a fast overview - primarily in images.


Icelandic Five will serve two purposes:
1) To re-acquaint the team to the Icelandic system
2) Reduce the furnace wall thickness to 3 cm.

I cleared out the remnants of the 2008 furnace and built a new furnace yesterday (Thursday).
At the end of the last smelt, a plastic pail had been placed down the interior of the furnace. A metal cover was placed over the top. Normally liquid water seeps through the earth bank every spring. 

Remains of the 2008 furnace. The upper portions consisted of smaller pieces of sintered clay held in place by soft raw clay (on the earth side). The lower portions had little heat effects visible, and were still soft clay.
Portions of the lower part of the original solid clay walls. Roots have grown into the clay over the last three summers, actually helping to re-enforce the portions of the walls that remained.
The hole remaining in the earth bank after all the previous wall material had been removed
The first layer of the furnace wall. The metal rule is 3 cm wide, and was used as a gauge to set the rough thickness of the walls. Note how the shape is determined by the hole in the earth bank.
Finished construction, with old sand/ash packing fill. This will both help dry and stabilize the soft clay. The two boards placed against the front surface hold the exposed wall in place


Today (Friday) later in the day, I will remove the packing material. Then a small tap arch will be cut in the front. For this smelt the standard ceramic clay tuyere will be used, mounted above the taping arch. Extraction will be from the top.

Finally, a small wood splint drying fire will be started. The ideal would have been to have constructed the furnace much earlier, and allowed it to air dry for several days.

For smelt day tomorrow, roughly 20 kg of DD1 (red oxide bog ore analog) is already on hand. A small amount of previously prepared (crushed and sized) charcoal is on hand. The remainder required will have to be worked up while the furnace is pre-heating.

Stay tuned!


Thursday, May 24, 2012

Forging 'the custard'

Edited from my ongoing on  Don Fogg's Bladesmithing Forum

Darrel so when you say 'weld in all the edges'... do you mean basically turning it on it's side and hammering down all the little bits at welding heat?   I'm assuming this is easier with lower carbon steel and iron.  On my very high carbon stuff.. those little bits just fall off.  
Scott

I would most certainly *not* hold my working methods up as the ideal!

That being said, I'm just coming off a two month research / learning project called 'Bloom to Bar'. So for while there all I was doing in the shop was working up some of my big pile of blooms (!)
So, that being said, take a look at :
'A Typical Work Session' (on Bloom 2 Bar)

Jesus Hernandez also has a good visual tutorial over on his web site.


I have also seen on this forum some good advice given by Lee Sauder on this same topic.

Blooms have a structure that Lee describes as 'like a custard' - think of a lemon meringue, turned upside down.
The centre is a hard 'nut' of iron, often quite dense, with a spongy layer, often with a lot of air spaces and more slag included around the outside. As you might guess, a larger bloom might be cut apart, so more like a wedge of pie than the whole thing like you see on a small bloom.

(There is a variation in carbon content within a single bloom as well. Lets just leave that one. If anything, this carbon variation exaggerates the effects.)

Of course, the two different densities of metal move at different rates. That's one reason a press, squeezing in one direction does work more effectively than hand tools. The raw size of the mass also works against anyone attempting this process working alone. With excellent skill and co-ordination between a master hand and striker, of course the compaction process can be carried out by hand. (Watch Lee and Mike McCarthy work some time!)

So your first step is just pressing downwards at welding heat, collapsing the air spaces of the outside 'meringue' and forcing them on to the hard nut in the centre.
This does help on the edges however, which remain ragged. I have had some luck placing the then flat disk on its edge and pressing in / down. Its a tall thin shape, with soft edges, so the press tends to slide it sideways and I certainly find that process hard to control. Also the press works in a flat plane, and most often the bloom disk is round or oval.

Taken together, I had found it just as effective to hand hammer the edges in. I would place the disk flat on the anvil, then lean way over so I can fire blows almost dead horizontal from the far side of the anvil back towards the disk and my tong hand. This also allows you to both heat and forge on section of the bloom disk at a time.

Clear as mud?

Wednesday, May 23, 2012

Return to Iceland - Iron Smelt

Sorry for the extremely short notice here. (Life, the Universe, you know...)

Iron Smelt at Wareham
Saturday May 26
Return to Iceland

Directions - http://www.warehamforge.ca/directions
(that's roughly 2 1/2 hours NW of Toronto, 45 minutes N of Orangeville, just off highway 10)

In 2007, the DARC team had started working on developing a working system based on the archaeology by Kevin Smith at Hals in Iceland :
http://www.warehamforge.ca/ironsmelting/HALS/index.html
We got side tracked from the Hals / Icelandic series when we concentrated on the LAM / Vinland series, then preparing for CanIRON 8.
We had run four experiments in the Iceland series, testing use of stone slabs, general work arrangements, use of the bellows plate and blow hole system.
Theoretical Hals working layout

The next point in the series would be to construct another earth fast furnace, but this time with thin (3 cm) clay walls. It will use a ceramic insert tuyere, we have enough DD1 bog ore analog prepared for a smaller sized smelt.

I also want to use the smelting bellows for enough time to at least get 'in line' air volumes recorded. Bulk of the smelt will be with the electric blower (!)

I'm a bit pressed for time this week, but will attempt to get the furnace constructed over the next two days. There may be a bit more discussion before starting the pre-heat cycle than normal

Schedule:
8 A : start equipment set up
9 - 10 A : start pre-heat
11 A : estimated start for main sequence
11 - 11:30 A : bellows volume tests
12 N : estimated first ore addition
3:30 - 4 P : estimated start for extraction
4:30 - 5 P : estimated consolidation
5:30 P : pack down

For those new to Wareham:
1) Bring a lunch if you plan a day of it (its a 15 minute drive to the nearest town)
2) Park along the north side road (less traffic, they just laid fresh gravel here!)

There is always some dirty work to help with! Those wanting to get directly involved should dress for work, I will have extra safety glasses on hand.

Hope some of you will be able to make it up

Darrell

Monday, May 14, 2012

Papers, Publishing & Research Sources

(modified from Bloom 2 Bars)

I'm just back from delivering an academic paper to be delivered at the International Congress on Medieval Studies at Kalamazoo Michigan. The conference ran from May 9 - 13, with my specific paper to be presented Thursday May 10.

I've referenced the paper itself in an earlier postings. I had given a first draft version at Forward Into the Past at Laurier University on March 31. Obviously I consider the various public presentations of both research and practical method, plus ongoing communications like blog postings an esencial part of the entire Bloom to Bar project.

The revised text of my paper 'An Iron Smelt in Vinland' will be eventually be published. Session organizers Ken Mondschein and Michael Cramer are working with Freelance Academy Press to collect a number of papers from the past 'If Those Bones Could Talk' sessions into a volume. 

Not to get too (!) side tracked, what I wanted to detail here was some other excellent reference sources for those seriously interested in bloomery iron smelting.


Method :

A Practical Treatise on the Smelting and Smithing of Bloomery Iron
Lee Sauder & Skip Williams

Historical Metallurgy, vol. 36 (2). 2002
A version will be available by hunting around on Lee's Iron Smelting site

 
If You Don't Get any IRON...
Darrell Markewitz
EXARC. vol. 2012-1
Available on line (with subscription)

Experimental Iron Smelting at the Wareham Forge
Darrell Markewitz
Available on line


References :

Iron in Archaeology - The European Bloomery Smelters
Radomir Pleiner
80-86124-26-6
David Brown Books in the US is currently (Mid May, 2012) contacting the original publisher to see if they can acquire some copies of this volume. They are also attempting to get some of Pleiner's 'Iron in Archaeology, Early European Blacksmiths / 808612462-2'


Prehistoric & Medieval Direct Iron Smelting in Scandinavia and Europe 
Lars Christian Norbach
13 9788772887746
Available from ISD Distributing
The book costs $60 plus shipping

Iron and Steel in Ancient Times
Vagn F. Buchwald
8773043087
Available from the Danish Royal Academy
The book costs 60, 56 Euros plus 21,4 Euros (to Canada).
Contact Katrine Hassenkam Zoref

Sunday, May 06, 2012

'Production Smelt' - RESULTS

I would refer you back to yesterday's post for the details of the set up for this smelt.

Furnace in use
The first thing is don't do this alone.
You *can* run a successful smelt as a lone individual. It is however a massive amount of work.
- I spent a half day clearing out an old furnace and preparing the area and laying the base.
- Then a fairly long day preparing, mixing clay and building the furnace.
(Roasting ore was done separately, but the two batches there could have been undertaken during the work sessions above).
- Another half day gathering up the roasted ore, setting the tuyere and running a slow drying fire. I broke up 3/4 of the ore at the same time.

Smelt day, I broke charcoal while the first stages of pre-heat (with wood) was taking place.
I started that day at 8 am gathering tools and getting them out and arranging the work site.
The pre-heat was extended to allow time to break that charcoal (64 kg worth / 8 bags).
The main smelt sequence itself ran over 7 1/2 hours, from first charcoal fill to start of the extraction. In the end I decided to use all of the 'Jamestown Brown' ore that I had roasted and crushed. The total ore added was just under 42 kg. The total charcoal consumed was 55 kg (7.5 full 8kg bags, before breaking). I had a real hard time getting this bloom free. I ended up having to break way 2/3 of the slag mass by chiselling it off in small pieces. I really have no clear concept of how long this took, but working down inside the hot furnace was absolutely exhausting. My guess is that I was at it at least a half hour.

The total smelting session took 13 hours!

Slag mass, the furnace just opened.
So by the time I pulled the bloom free, the bloom had cooled considerably. I did try to work over the surface with a 5 lb hand sledge. This did knock some of the clinging slag 'mother' free, but really was not effective in compacting the metal itself. I tried a fast weight measurement, but frankly I think the reading was not all that accurate. (What I recorded was 12.27 kg). Frankly, this is a much larger bloom than I normally make.

Hot bloom mass - after hand hammering
I rushed the bloom back from the rear yard into the workshop. I had started my two burner gas forge before I started the extraction, but there was no way the mass would fit. Although the bloom was closer to a red heat at this point, I quickly started the hydraulic press. I made a partial compaction, but it was obvious that the bloom was far too cold, and several larger pieces broke free. I swapped in the cutting head and made a cut from both sides, most the way through. At this point I might have been able to get the individual 'half' sections into the gas forge, but frankly, I was way past too beat to work.

Main bloom, cold and after sectioning
This morning, I was able to pull the scored bloom off the floor, and sweep with a magnet to recover any fragments.
The main bloom itself now weighs a quite respectable 8.83 kg.
I recovered another 1.46 kg of fragments. Two pieces are a good size (at 501 and 324 gms) and look solid enough that I should be able to work them down to smaller bars.
The overall yield (using the 10.3 kg total recovered) comes to roughly 24 %.

The furnace itself, despite all the pounding and prodding, was found to be in remarkably great shape the next morning. There is one very small crack right near the top edge, but otherwise the shaft is in perfect shape.
The copper tuyere might have melted just a tiny bit. I'll have to measure it to be sure. The wall around the tuyere did errode a slight amount, but it does not look more than a centimetre or two.
After a small amount of cleaning up, I'm certain it will be quickly ready for another use (Thanks Lee!)

(very) Tired but happy
(but let's get more of the gang here *next* time I decide to try this...)

Saturday, May 05, 2012

Production (?) Smelt

Although technically I am past the end date for the OAC Project Grant, one of the things I wanted to include was building a more production type furnace and running a test smelt.

As I had detailed in an earlier post, this furnace would include a number of features 'borrowed' from the furnaces that Lee Sauder has been using recently. (This a nice switch, as had focused primarily on clay construction earlier in my development.)
 The main features of this new furnace are:
use of a copper tuyere 
base area built of fire brick
metal sheathing over the shaft
use of sand / horse manure / clay mix


Layout with dimensionsBefore drying fire.
You can see the layout includes a very deep base area, a total of 28 cm from the centre of the tuyere tip to the hard base. When set up for a smelt, the lower 12 cm or so will be filled with charcoal fines. The furnace also has a much larger tap arch. Taken together, this should allow for possible bottom extraction of the final bloom.

The furnace is set on the upper level of the normal smelting area at Wareham. This does make it a bit tall for top extraction (top of the furnace is chest high on me). The advantage is that the bottom of the furnace is set about 18 inches off the ground, making it easier to work tapping or slag bowl modification.

Furnace interior, showing tuyere tip
This furnace will use the new forged copper tuyere (detailed here). The interior view above was taken before the drying fire was started. You can see the usual insert tuyere position, 5 cm proud of the interior wall and set to 23 degrees down angle. The flat brick seen the bottom is supporting the tap arch at this point (the clay was still damp).

 
Ore Roasting
Earlier in this week I had spent part of two afternoons roasting up ore. I still have a quantity of 'Jamestown Brown', a water deposited ore from that location in Virginia. A number of years back, a group of us were invited to pick some of this material that lay in a large sand bank at the rear of a rural blacksmith/gunsmith's property. Sheldon Browder & Steve Mankowski (from Colonial Williamsburg) have used this ore repeatedly since with good results.

Late yesterday afternoon and early evening I started preparing the smelting area. I started a gentle drying fire using small wood splits inside the furnace. That process continued for several hours. At the same time I sorted out the work area for today's smelt. As well I continued crushing the ore I had roasted over the last week. The ore does seem a bit 'sandy' to me, with a visible variation in iron concentration and form. At worst this may mean some extra slag tapping, but the new furnace layout should provide for this.

Its looking like I may be running this smelt today single handed. Although I have done this (once!) before, I'm expecting a hard day. Lets hope nothing goes seriously wrong with this new furnace.

Stay tuned...
 

February 15 - May 15, 2012 : Supported by a Crafts Projects - Creation and Development Grant

COPYRIGHT NOTICE - All posted text and images @ Darrell Markewitz.
No duplication, in whole or in part, is permitted without the author's expressed written permission.
For a detailed copyright statement : go HERE