Thursday, February 25, 2010
Geek 'Baba O'Reily'
Blame my old friend Nick Russen...
(hmm, is there some kind of sub-theme going here lately?)
Sunday, February 14, 2010
Considering the Evenstad Furnace
The following is adapted from an ongoing e-mail conversation I am currently having with professional metallurgist turned archaeological researcher Arne Esplund. He is referring to a Norwegian patterned furnace, described in some detail by writer Ole Evenstad in a manuscript from 1782. Readers interested are directed to "Iron Production in Norway During Two Millenia" by Arne Espelund, 1995 (ISBN 82-992430-3-3)
The Evenstad furnace was intended for small scale commercial production in a rural setting, using a direct process bloomery furnace.

If I could hazard a guess on the Evenstad method?
A couple of things come to mind, looking over the system in the manuscript:
1) Use of straight wood.
This saves a lot of physical labour. Making charcoal correctly (!) is at least half as much labour as mounting the smelt itself. The Evenstad process lets you skip that. (see a recent post : 'On the Economics of Making Charcoal')
2) More durable structure.
Although its going to be more work to build the brick structure for the Evenstad furnace, that expenditure is going to be reflected in just what kind of operation using this smelter would be. This aspect is rarely commented on by various researchers.
In the Viking Age, one system is that of seasonal iron production on family farmsteads - for household use primarily. This might be no more than one smelt a year. Even a simple furnace will endure a single smelt. My own experience here, where we smelt only 3 - 4 times a year, is of use. The damage due to weather most often exceeds the damage due to the smelt itself. So if you were a householder, it might prove just as easy to build a brand new furnace every year - if one or two smelts was all you needed to undertake. Not too surprisingly, such locations are not going to be marked by much by way of archaeological remains. We have one solid clay construction furnace here that has been out in the weather since 2003 at this point. It is little more than a ring of slumped clay with fragments of sintered ceramic and slag pieces inside.

Most ancient sites excavated are in fact 'industrial' level production. Large numbers of furnaces built by groups that make their living from smelting over and over as the primary activity. Here you would want physically robust furnaces, able to withstand a dozen or more firings. It would be worth building massively to ensure this. Individual furnaces would show repairs between uses. (We have run a single half banked clay cobb furnace FIVE times before it failed).
So I see the Evenstad furnace as a 'semi professional' equipment. The Evenstad system was intended for use on household sized farmsteads, but as at a significant production level, those blooms to be sold for straight cash (ie, not for direct use on the farm itself). So this places it in between the older 'once a season' and the full scale (year round?) industrial level. Again, the expected use cycle requires more durability, and the expected reward makes the more elaborate construction a good investment.
Coupled directly with this is the suggested use of double, perhaps even triple (?) end to end smelt cycles in Evenstad. There certainly is a significant gain in charcoal expenditure and time against production when you take an already full temperature furnace and after snatching out a first bloom, immediately re-fill and run a second smelt. I personally have only done this twice, the first time more or less by accident, the second time quite deliberately. That would the the 'hot swap' , June 2007 - http://www.warehamforge.ca/ironsmelting/double0607/index.html These experiments do not illustrate the best numbers, but in terms of charcoal consumed against weight of bloom resulting, the second smelt was significantly more efficient.
3) Ability to utilize one structure for both smelting and as a re-heating hearth for bloom consolidation steps.
Although it is possible to use a smaller cylindrical clay furnace to re-heat the bloom after its initial extraction temperature has faded, this has proved quite difficult.
The funnel shape of the Evenstad furnace would certainly be much easier to operate inside of. Controlling the exact location of the bloom mass within that furnace, as if it were a giant forge, would be much more simple. As the bloom is compacted into the final puck shape, it also expands in diameter as it collapses downwards. Inside a cylindrical furnace, it easily can become too wide to even fit. The clay furnace walls are also not that durable or stable. As the bloom is reheated, it must be constantly adjusted for position to achieve an even heat. It is very easy to critically damage those thinner clay walls.
All these practical reasons, (things we have directly experienced in our own smelts), certainly suggests to me that the Evenstad furnace structure would provide most definite advantages if your goal was a yearly round of repeated smelts aimed at even limited commercial bloom production. Fitted with a simple wooden lid, this type of furnace would certainly over winter well, and would likely require only minimal repair for the next season's use.
I don't see anything here that reduces the wisdom of the Evenstad system - considered against the application it was intended for.
The Evenstad furnace was intended for small scale commercial production in a rural setting, using a direct process bloomery furnace.
" Another point: why was the Evenstad method established if people could use a simpler method, a sort of prolongation of the medieval method, as it was perceived? There are some 500 slag heaps from Evenstad smelting in Norway alone, in Sweden probably more. "
Arne Espenlund
(from a private e-mail - 2/13/10)

If I could hazard a guess on the Evenstad method?
A couple of things come to mind, looking over the system in the manuscript:
1) Use of straight wood.
This saves a lot of physical labour. Making charcoal correctly (!) is at least half as much labour as mounting the smelt itself. The Evenstad process lets you skip that. (see a recent post : 'On the Economics of Making Charcoal')
2) More durable structure.
Although its going to be more work to build the brick structure for the Evenstad furnace, that expenditure is going to be reflected in just what kind of operation using this smelter would be. This aspect is rarely commented on by various researchers.
In the Viking Age, one system is that of seasonal iron production on family farmsteads - for household use primarily. This might be no more than one smelt a year. Even a simple furnace will endure a single smelt. My own experience here, where we smelt only 3 - 4 times a year, is of use. The damage due to weather most often exceeds the damage due to the smelt itself. So if you were a householder, it might prove just as easy to build a brand new furnace every year - if one or two smelts was all you needed to undertake. Not too surprisingly, such locations are not going to be marked by much by way of archaeological remains. We have one solid clay construction furnace here that has been out in the weather since 2003 at this point. It is little more than a ring of slumped clay with fragments of sintered ceramic and slag pieces inside.

Furnace Remains - June 2003 solid clay construction, as it appeared in early Spring, 2009
Most ancient sites excavated are in fact 'industrial' level production. Large numbers of furnaces built by groups that make their living from smelting over and over as the primary activity. Here you would want physically robust furnaces, able to withstand a dozen or more firings. It would be worth building massively to ensure this. Individual furnaces would show repairs between uses. (We have run a single half banked clay cobb furnace FIVE times before it failed).
So I see the Evenstad furnace as a 'semi professional' equipment. The Evenstad system was intended for use on household sized farmsteads, but as at a significant production level, those blooms to be sold for straight cash (ie, not for direct use on the farm itself). So this places it in between the older 'once a season' and the full scale (year round?) industrial level. Again, the expected use cycle requires more durability, and the expected reward makes the more elaborate construction a good investment.
Coupled directly with this is the suggested use of double, perhaps even triple (?) end to end smelt cycles in Evenstad. There certainly is a significant gain in charcoal expenditure and time against production when you take an already full temperature furnace and after snatching out a first bloom, immediately re-fill and run a second smelt. I personally have only done this twice, the first time more or less by accident, the second time quite deliberately. That would the the 'hot swap' , June 2007 - http://www.warehamforge.ca/ironsmelting/double0607/index.html These experiments do not illustrate the best numbers, but in terms of charcoal consumed against weight of bloom resulting, the second smelt was significantly more efficient.
3) Ability to utilize one structure for both smelting and as a re-heating hearth for bloom consolidation steps.
Although it is possible to use a smaller cylindrical clay furnace to re-heat the bloom after its initial extraction temperature has faded, this has proved quite difficult.
The funnel shape of the Evenstad furnace would certainly be much easier to operate inside of. Controlling the exact location of the bloom mass within that furnace, as if it were a giant forge, would be much more simple. As the bloom is compacted into the final puck shape, it also expands in diameter as it collapses downwards. Inside a cylindrical furnace, it easily can become too wide to even fit. The clay furnace walls are also not that durable or stable. As the bloom is reheated, it must be constantly adjusted for position to achieve an even heat. It is very easy to critically damage those thinner clay walls.
All these practical reasons, (things we have directly experienced in our own smelts), certainly suggests to me that the Evenstad furnace structure would provide most definite advantages if your goal was a yearly round of repeated smelts aimed at even limited commercial bloom production. Fitted with a simple wooden lid, this type of furnace would certainly over winter well, and would likely require only minimal repair for the next season's use.
I don't see anything here that reduces the wisdom of the Evenstad system - considered against the application it was intended for.
Friday, February 12, 2010
Spreading 'the Fire'
50 years of history in 3 minutes... Turn your speakers on....
Whether you are a Billy Joel fan or not, you probably remember his great
song, "We Didn't Start the Fire." Here it is, set to pictures.... very,
very cool.. I never did know the words. Turn up volume, sit back and enjoy
a review of 50 years of history in less than 3 minutes! Thanks to Billy
Joel and some guy from the University of Chicago with a lot of spare time
and Google. Top left gives you full screen.....top right lets you pause
Bottom left shows the year. The older you are, the more pictures you
will recognize. Anyone over age 50 should remember over 90% of what they
see. But it's great at any age.
http://yeli.us/Flash/Fire.html
This has probably gone totally viral by this point, so at worst I'm just adding to the clutter. Put up with the initial text inserts, its worth it.
I had heard a friend of mine say she had been using 'Start the Fire' as an introduction to 20th Century American history course she was teaching. I've long been a fan of Billy Joel (from the first time round), and this song is one of my favourites of his.
The suggestion that this represents '50 years of history' is a bit dated - and one sided. Maybe history from the period from 1950 through 2000 - for someone from the USA. Notice that the first image, Harry Truman, gives a fixed date in 1949. My own memory (in the form of re-runs!) starts kicking in at the 1955 references. I think the first event listed that I truly remembering as it happened was Kennedy assassinated. The Cold War and the War in Vietnam (although not a direct participant) certainly shaped my life.
It might be interesting for those involved in living history to consider this in light of another commentary I wrote, on Motel of the Mysteries. This video brings things even closer - what do you really remember of what is listed, and what oral history would you be able to pass down about your own 'life and times'...
'been there - saw that'
Tuesday, February 09, 2010
BASSOON - Baba O'Riley
Dig this!
The player here is JEFF BURKE.
I know him (slightly) from when we both were a lot younger and I still lived in Toronto.
Now I had just finished a long (brain numbing) day working on iron smelting details. I stumbled on this via Facebook. The Who's classic version of Baba O'Riley has been one of my all time favourites (since back when it was new !) I remember being mesmerized by the Toronto band FM with well known session player Nash the Slash performing the tune live (with Nash on violin) at concerts while I was at art school.
But Jeff, wow!
If you really pay attention, it is clear that as great as this version is (converted to BASSOON no less) that he is doing this pretty much off the top of his head.
Amazing.
Concerning the shape of blooms:
Here in North America it is rare to be able to view an actual artifact iron bloom, even more so one from the Viking Age (circa 800 - 1000 AD, my focus of interest). This being the case, my research observations have been limited to photographs. I have only been able to personally observe one such historic bloom, and that through the museum glass. From my readings, the actual number of post Roman to Early Medieval blooms from Scandinavia (true Viking Age) is actually quite small. (1)
On the other hand I have had the ability to directly handle a great number of modern blooms, perhaps as many as one hundred. For at least 3/4 of those, I was present or directly involved in the physical process that created them. So its safe to say I have some insight into how the final condition of a specific bloom relates to its actual production.
I would consider it quite unusual for a completed bloom to have remained to be deposited and discovered by modern day archaeologists in the first place! The process of creating an iron bloom involves a considerable expenditure of resources, time and effort on the part of those ancient workers. First, wood needs to be harvested, cut, baked to charcoal, then the charcoal correctly sized. Ore needs to be gathered, roasted and sized. Clay and other materials need to be gathered, prepared, mixed and a furnace built. Running the smelter itself is a day long process, with considerable extra labour required to operate the bellows continually. Once the bloom is in hand that large mass needs to be repeatedly heated and hammered to compress it into its final shape. All this effort means a finished iron bloom had considerable value, never to be casually tossed aside.
From a private letter by Arne Espelund (which provoked this article).
Vinland 1 (June 2009) : This bloom had gone through at least two additional heating and hammering sequences after its initial consolidation, and has taken on the classic compressed puck shape. Another significant change was in density, calculated at 7.7 grams/cc. This compares with Vinland 2 (seen below), which was not hammer worked, and has a density of 5.5 grams/cc. (4)
Now the puck is not the shape of the developing bloom inside these smelting furnaces. (5) The initial shape of the bloom, as it is extracted, is (understandably) the product of the environment in which it forms.

A simplified diagram of the shape and position of an iron bloom inside a short shaft furnace.
To provide a simple analogy, the natural bloom produced inside a this type of smelter (with high air volume) is a 'flattened football' shape.
The hotest spot in the furnace is located just beyond and just above the tip of the tuyere. As slag forms, it runs downwards, congealing as it cools at the bottom of the furnace. Depending on the exact size and shape of the furnace, how much slag is produced, just how hot the furnace has been running and for how long; will all combine to determine the shape of the bottom of the slag mass. The top layer of the slag mass, closest to the hot spot, will remain as a liquid.
In this idealized furnace, the tuyere directs the air blast slightly downwards, but heat and charcoal creates a swirl curving upwards, and actually back towards the front wall. This shapes the upper portion of the slag mass to a tilted, shallow bowl, higher at the rear of the furnace than at the tuyere. In an operating furnace, it is inside the pool of liquid slag that the iron bloom develops, starting to form at a point just below the tip of the tuyere.
The bloom itself starts small and lacy and slowly increases in both size and density as the reduced iron accumulates. (So one caution is that larger blooms will display a different shape than smaller ones. ) As the front edge of the bloom tends to hug close to the furnace wall at the tuyere, the bloom will take on the curvature of the inner surface. As the core temperature is driven by the air blast, the opposite side of the bloom is generally a curve that forms as some radius from the tip of the tuyere. This means the bloom often forms twice as wide as it is deep, especially noticeable with mid sized blooms. Truly large blooms can grow to fill the entire slag bowl / furnace bottom area.
In cross section, the bloom is often thicker at the front of the furnace, again just below the tuyere. The thickness will taper off towards the rear. This results in a kind of table spoon shaped cross section, with a steeper angle to the front and more of a gradual slope to the rear. The air blast is of course aimed directly at the top of the slag bath and developing bloom. This generally results in the upper surface being more or less flat, but often with a shallow depression where the force of the air blast hits it. Too steep an angle, and the air blast functions like a cutting torch, slicing into the bloom itself. Blooms with a distinctive lobed shape on the top surface have been seen as the result.

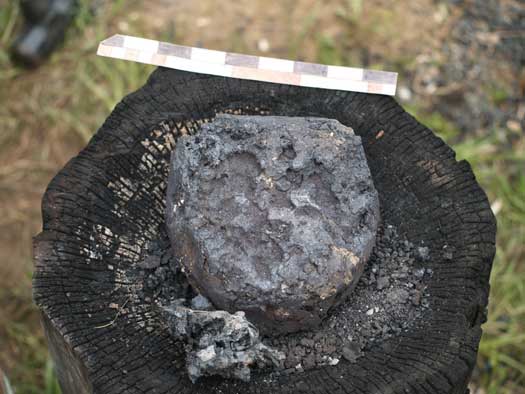
Top View : The curvature of the bloom echoing the inner furnace wall can be clearly seen. The shallow depression in the upper surface was caused by the air blast working directly on the iron's surface.

Side View : Although not quite the classic 'spoon' cross section, this was a fairly large bloom for the small size of smelter that created it. The bloom would have sat higher up inside a slag bowl, and the tuyere would have sat somewhat higher above the mass than is indicated here.

Bottom : Showing to a certain extent, the difference in texture between the bloom's bottom and the upper surface view.
The bloom used in the illustrations above is Vinland 2, produced by the DARC team in October 2009. The paper circle represents the approximate internal diameter of the smelter used to produce this bloom (25 cm). The rough position of the tuyere is marked by the thick marker.
This bloom weighs 5.6 kg, and represents a 27% return from the ore used in the smelt. It was hammer worked only for the initial heat available after extraction. This means that although the surface has been slightly compressed, it still has not been fully consolidated, as the cracking visible on the bottom surface indicates. There was a single short attempt made to slice the bloom on the upper surface, but this effort was aborted before much depth had been achieved (Primarily because the bloom had cooled too much to make further working impractical) .
Of course, no situation in reality is likely to duplicate any theoretical ideal!
The working dynamics inside an individual smelter are just too complex. Regardless of how the illustrated bloom may not fit the ideal pattern, it is certainly clear that this bloom is not the flattened puck shape seen in many artifact blooms.
Notes and References:
1) Radomir Pleiner, 'European Iron Blooms'
In 'Prehistoric and Medieval Direct Iron Smelting in Scandinavia and Europe', Lars Nørbach (editor) - 1999
2) Arne Espelund, "Blooms / Darrell 0210" Feburary 8, 2010
Private e-mail message to the author.
3) For an example of this process at work, see the following video segment:
Darrell Markewitz, "Vinland Iron Smelt", June 1, 2009
http://www.youtube.com/watch?v=VapWvn23iQI
4) Both blooms are the products of quite similar furnaces, inside the same experimental series. Both used similar content ore analogs, with Vinland 1 from 18 kg ore and Vinland 2 from 20.7 kg.
Darrell Markewitz, "Vinland 1", May 30, 2009
http://www.warehamforge.ca/ironsmelting/LAM/LAM-one/report05-09.html
Darrell Markewitz, "Vinland 2", October 10, 2009
http://www.warehamforge.ca/ironsmelting/LAM/Vinland2/report10-09.html
5) Quite specifically, the furnace type being referred to is the 'short shaft' type:
- A simple clay cylinder, roughly 30 cm internal diameter, with walls 60 plus cm tall.
- An inset tuyere, set roughly 15 cm above the base, with a downwards angle of approximately 20 degrees.
- A furnace using high air volumes, 500 - 800 litres per minute. (Note that these volumes are possible to achieve using human powered bellows of the norse 'double bag' type.)
For a fuller explanation of this furnace type, its historic prototypes and smelting sequence, see:
Darrell Markewitz, "Continuing Adventures in Early Iron", December, 2008
http://www.warehamforge.ca/ROMiron/V2/V2.html
A note to my regular readers: You may notice this piece is a more formal style than normally seen here. In this case I did include footnotes, a process I don't normally bother with on 'Hammered Out Bits'
On the other hand I have had the ability to directly handle a great number of modern blooms, perhaps as many as one hundred. For at least 3/4 of those, I was present or directly involved in the physical process that created them. So its safe to say I have some insight into how the final condition of a specific bloom relates to its actual production.
I would consider it quite unusual for a completed bloom to have remained to be deposited and discovered by modern day archaeologists in the first place! The process of creating an iron bloom involves a considerable expenditure of resources, time and effort on the part of those ancient workers. First, wood needs to be harvested, cut, baked to charcoal, then the charcoal correctly sized. Ore needs to be gathered, roasted and sized. Clay and other materials need to be gathered, prepared, mixed and a furnace built. Running the smelter itself is a day long process, with considerable extra labour required to operate the bellows continually. Once the bloom is in hand that large mass needs to be repeatedly heated and hammered to compress it into its final shape. All this effort means a finished iron bloom had considerable value, never to be casually tossed aside.
From a private letter by Arne Espelund (which provoked this article).
" The Medieval blooms are flat, looking like French cheese, mostly split, and weighing from 2 to some 10 kg... (2)I have used the term 'puck' to describe this specific shape (as this is a shape similar to that well known Canadian icon - the hockey puck). This is a shape that results only after a primary consolidation sequence, repeatedly working the bloom with heavy hammers after it has been extracted from the furnace. (3)
Vinland 1 (June 2009) : This bloom had gone through at least two additional heating and hammering sequences after its initial consolidation, and has taken on the classic compressed puck shape. Another significant change was in density, calculated at 7.7 grams/cc. This compares with Vinland 2 (seen below), which was not hammer worked, and has a density of 5.5 grams/cc. (4)
Now the puck is not the shape of the developing bloom inside these smelting furnaces. (5) The initial shape of the bloom, as it is extracted, is (understandably) the product of the environment in which it forms.

A simplified diagram of the shape and position of an iron bloom inside a short shaft furnace.
To provide a simple analogy, the natural bloom produced inside a this type of smelter (with high air volume) is a 'flattened football' shape.
The hotest spot in the furnace is located just beyond and just above the tip of the tuyere. As slag forms, it runs downwards, congealing as it cools at the bottom of the furnace. Depending on the exact size and shape of the furnace, how much slag is produced, just how hot the furnace has been running and for how long; will all combine to determine the shape of the bottom of the slag mass. The top layer of the slag mass, closest to the hot spot, will remain as a liquid.
In this idealized furnace, the tuyere directs the air blast slightly downwards, but heat and charcoal creates a swirl curving upwards, and actually back towards the front wall. This shapes the upper portion of the slag mass to a tilted, shallow bowl, higher at the rear of the furnace than at the tuyere. In an operating furnace, it is inside the pool of liquid slag that the iron bloom develops, starting to form at a point just below the tip of the tuyere.
The bloom itself starts small and lacy and slowly increases in both size and density as the reduced iron accumulates. (So one caution is that larger blooms will display a different shape than smaller ones. ) As the front edge of the bloom tends to hug close to the furnace wall at the tuyere, the bloom will take on the curvature of the inner surface. As the core temperature is driven by the air blast, the opposite side of the bloom is generally a curve that forms as some radius from the tip of the tuyere. This means the bloom often forms twice as wide as it is deep, especially noticeable with mid sized blooms. Truly large blooms can grow to fill the entire slag bowl / furnace bottom area.
In cross section, the bloom is often thicker at the front of the furnace, again just below the tuyere. The thickness will taper off towards the rear. This results in a kind of table spoon shaped cross section, with a steeper angle to the front and more of a gradual slope to the rear. The air blast is of course aimed directly at the top of the slag bath and developing bloom. This generally results in the upper surface being more or less flat, but often with a shallow depression where the force of the air blast hits it. Too steep an angle, and the air blast functions like a cutting torch, slicing into the bloom itself. Blooms with a distinctive lobed shape on the top surface have been seen as the result.

Top View : The curvature of the bloom echoing the inner furnace wall can be clearly seen. The shallow depression in the upper surface was caused by the air blast working directly on the iron's surface.

Side View : Although not quite the classic 'spoon' cross section, this was a fairly large bloom for the small size of smelter that created it. The bloom would have sat higher up inside a slag bowl, and the tuyere would have sat somewhat higher above the mass than is indicated here.

Bottom : Showing to a certain extent, the difference in texture between the bloom's bottom and the upper surface view.
The bloom used in the illustrations above is Vinland 2, produced by the DARC team in October 2009. The paper circle represents the approximate internal diameter of the smelter used to produce this bloom (25 cm). The rough position of the tuyere is marked by the thick marker.
This bloom weighs 5.6 kg, and represents a 27% return from the ore used in the smelt. It was hammer worked only for the initial heat available after extraction. This means that although the surface has been slightly compressed, it still has not been fully consolidated, as the cracking visible on the bottom surface indicates. There was a single short attempt made to slice the bloom on the upper surface, but this effort was aborted before much depth had been achieved (Primarily because the bloom had cooled too much to make further working impractical) .
Of course, no situation in reality is likely to duplicate any theoretical ideal!
The working dynamics inside an individual smelter are just too complex. Regardless of how the illustrated bloom may not fit the ideal pattern, it is certainly clear that this bloom is not the flattened puck shape seen in many artifact blooms.
Notes and References:
1) Radomir Pleiner, 'European Iron Blooms'
In 'Prehistoric and Medieval Direct Iron Smelting in Scandinavia and Europe', Lars Nørbach (editor) - 1999
2) Arne Espelund, "Blooms / Darrell 0210" Feburary 8, 2010
Private e-mail message to the author.
3) For an example of this process at work, see the following video segment:
Darrell Markewitz, "Vinland Iron Smelt", June 1, 2009
http://www.youtube.com/watch?v=VapWvn23iQI
4) Both blooms are the products of quite similar furnaces, inside the same experimental series. Both used similar content ore analogs, with Vinland 1 from 18 kg ore and Vinland 2 from 20.7 kg.
Darrell Markewitz, "Vinland 1", May 30, 2009
http://www.warehamforge.ca/ironsmelting/LAM/LAM-one/report05-09.html
Darrell Markewitz, "Vinland 2", October 10, 2009
http://www.warehamforge.ca/ironsmelting/LAM/Vinland2/report10-09.html
5) Quite specifically, the furnace type being referred to is the 'short shaft' type:
- A simple clay cylinder, roughly 30 cm internal diameter, with walls 60 plus cm tall.
- An inset tuyere, set roughly 15 cm above the base, with a downwards angle of approximately 20 degrees.
- A furnace using high air volumes, 500 - 800 litres per minute. (Note that these volumes are possible to achieve using human powered bellows of the norse 'double bag' type.)
For a fuller explanation of this furnace type, its historic prototypes and smelting sequence, see:
Darrell Markewitz, "Continuing Adventures in Early Iron", December, 2008
http://www.warehamforge.ca/ROMiron/V2/V2.html
A note to my regular readers: You may notice this piece is a more formal style than normally seen here. In this case I did include footnotes, a process I don't normally bother with on 'Hammered Out Bits'
Friday, February 05, 2010
Smelting with Sven & Yorgi

Now, this is what I remember from smelting with Uncle Sven and Uncle Yorgi:The notes indicated in the text will be included in the final paper.
You first will need to build a bellows, one larger than the one a blacksmith uses.
This bellows should have each plate about one span wide at the hinge and a span plus a hand at the handle end. The plates should be three spans long. The lift on the bellows needs be about two spans (A). A bellows such as this will make the right kind of air for a smelter.
There are a few other special tools that you will need to forge out before smelting iron:
- A long rod, about the size of your little finger with flattened corners. This needs to be long enough clear down the inside of the tuyere tube, at least three spans long.
- A heavy rod, about the size of your thumb with a short chisel tip on one end of it. This needs to be long enough and heavy enough to drive down inside the whole smelter from the top, perhaps two ells. It may be needed to pry free the bloom.
- A heavy rod with a short flat hook on one end, that about the length of three fingers. This can be set to a wooden handle, but the last two or three spans must be of iron. It is used to hook under the hot bloom inside the furnace.
- Very large tongs, with good long handles. This needs to be big enough to pick up the bloom, and to do so down inside the smelter.
You will need a good pile of charcoal, depending on how big a bloom you want to make. As the charcoal for the smelter can not be too big, make your charcoal using sticks about two fingers wide. After it is cold, break the pieces so they are no longer than that same width. You will need at least 30 or 40 buckets (B) of charcoal, double that much for a big smelt.
You will need to gather some bog iron ore. Not all ore is as good as others. You need a bucket of ore to get any iron bloom at all (C) , so it is best to have two or even four times that much on hand.
It is best if you roast the ore first. Make a wood fire on a fresh bed of sand. Once the fire is well lit, put a row of wood splits across the fire. On to this pile your dry ore. Once the fire has burned cold, you can pull out the roasted ore from the ashes. The pieces should not be too large, break apart any much bigger than the thickness of your thumb. When you start adding charcoal to the furnace, make sure you add from the top of the pile. (D)
You need to build the furnace out of clay. It should be at least a span wide on the inside, maybe a bit wider. The walls should stand so tall that you can just touch your knuckles to the floor of it, with the top of the wall to your arm pit when you reach inside (E).
Now, depending on just how you build it, will tell you how thick to make the walls. If you do not have much clay, you can dig back into a bank of earth. Then your walls just need be thick enough to hold the fire in, about two fingers thick. If this furnace is to stand up on its own, it is better to make the thickness of the walls at least three fingers, even better four.
If you want this furnace to last for several smelts, or to keep from cracking, it is best to mix your clay with some chopped straw. Cut your straw with a hand axe to pieces the width of your hand, and mix the same amount of clay and straw. If your clay is too wet, you can add some beach sand to make it stiffer.
The best thing to do is let your furnace stand for a day or two to let the clay harden. To keep the walls from sagging, fill the new furnace with dry sand or ashes. This is easy to scoop out to clear the furnace before you start the smelt. If the furnace stands on its own, laying some flat stones around the outside will make it keep its shape. Put some sand mixed with ashes into the spaces between the stones and the walls.
Once the walls have started to harden, two holes should be cut. One is a door right at the bottom of the furnace. It should be about the size of your hand with fingers outstretched. The other hole is for the air pipe, which should be part way around from that door. This hole is made just big enough for your bellows tube to fit. It should be two hands above the base. It is best if this hole is cut so the pipe will sit at an angle, pointing down inside the furnace, roughly one quarter off from square (F) It is best to set your air pipe in place before the clay is too dry.
Now this tube is best to be separate from that which comes out of your bellows. The tuyere can be made separately of clay, forged from iron, even hammered from copper. (G) It is best if the tuyere is the shape of a long narrow taper. The smaller end, inside the furnace should have an opening about the width of your thumb or a bit less . Your tube should sit so it is about two fingers proud of the inside wall of the furnace. Pack soft clay around it to seal the hole tight.
It is best to warm the furnace gently with small pieces of wood to dry all the water out of the clay. This works best if you open the door in the base to let the air in. This fire may burn a good part of a day, until no more steam comes off the outside walls of the furnace.
Once the furnace is dry, it is time to set the bellows in place, attaching it to the tuyere. The furnace door is shut, and the furnace filled with charcoal. Now the bellows man will start to pump, and keep pumping with the same strokes for all of the smelt. (H) The furnace will burn slowly at first, but still it should be kept full to the top with charcoal constantly.
You will know when it is time to start adding ore by looking for the fire to come up to the top of the furnace. The glowing charcoal should be seen about one hand down from the top before you start.
Now you add ore by the double hand full, one measure for each bucket of charcoal. Do not place the ore on in a big pile, but add it a bit of a time, all through the charcoal. For the first four or five buckets, add only one measure of ore. Once this has been done, and if your fire is burning hotly, you can start adding a bit more ore to each bucket of charcoal. (I)
As the smelt grows, it is important to listen to the air in the tuyere. If the sound becomes faint, check to see if the tube is starting to be plugged. Quickly break away the slag with a rod if this happens. If you hear a bubbling sound, look to see if there is too much liquid slag forming. You may need to open the furnace door and poke a hole in the bottom to let the extra slag run away.
This all continues until all your ore is done. Make sure to keep a couple of buckets of charcoal for the last steps.
Once all the ore is used, add at least one more full bucket of charcoal to cover over it as it falls inside the furnace. Then you let the furnace burn down inside until most all the charcoal is gone.
The best way to pull out the iron bloom is out of the top of the furnace. You might have to scoop some last burning charcoal out of the furnace, until you can just see the liquid pool of slag. Then take a log to hammer on the top of the bloom, which you will see sitting inside the slag pool, just under under the tip of the tuyere. This should allow you to use the bloom hook to grab under the free edge of the bloom and pull it loose from the slag. (J)
Now reach down quickly and pull the white hot bloom over to the stump, where your hammer men are waiting. Quickly hammer over the surface, knocking off any slag, which cools quickly. Then stronger blows will compact the bloom to a solid lump. If you have not broken your furnace, and if you added fresh charcoal when the bloom is pulled, you should be able to re-heat the bloom as you need to keep working it. Often the last step is cutting the bloom with an axe.
This is part of the ever expanding work I am doing related to the Vinland iron smelt. For a number of reasons (wait for the paper) I believe that the smelt uncovered at L'Anse aux Meadows Newfoundland is the work of 'tool using farmers'. This as opposed to a smelt carried out by anyone truly well experienced in the methods. This should not be too surprising, considering that 'Leif's Houses' represent an exploration base camp, not a true settlement.
So this begs the question : 'Just what DID they know?'
Most likely these men would have taken part in a seasonal round of iron smelting, perhaps many years past. They would be limited to what they might have observed - and what they could remember.
The instructions above are perhaps too detailed, and they do represent a translation from memory to written record. They might best be considered also as having come from a much more experienced source (What Ketill told me about smelting iron).
A possible physical test of this concept (I remember from smelting with Uncle Sven and Uncle Yorgi) may make up a later experiment here at Wareham. Put three people in front of a pile of raw materials, then have them build a furnace and run a smelt. Ideally these would be people who are generally good tool users, and have been present at a number of past smelts here. Since the normal cycle for DARC is at best three smelts a year, these people would represent a fairly good substitution for those Norse farmers.
Subscribe to:
Comments (Atom)


