Saturday, December 26, 2015

Pressure in a Bloomery Furnace?

 (I had made a detailed response to a question on the Bladesmith Forum - 'Bloomers and Button's'. This is edited from that conversation...)

What I haven't seen though is any talk about the internal pressure of the furnace and what effect it has on a bloom. I was thinking of modifying one of the Rockbridge furnaces to increase the internal pressure as a way of increasing the temperature.

Has anyone tried doing this? If so, was it helpful? Hurtful? Aside from a different way to regulate temperature, I'm speculating that the rate of reactions inside the furnace would increase at a higher pressure, so I wanted to try it to get a better yield.

Byan
(link to complete thread)

My team here has made some input pressure readings. Honestly using fairly cobbled together instruments. This primarily to counter criticisms (largely from theoretical academic commentators) that all the current work is not 'scientifically rigorous' enough.
(But like Lee Sauder says : 'If you don't get any iron - whatever you have done *has* to be wrong'.)

The first thing we tried (cheap and only a relative measure) was a simple U tube with water in it attached to the tuyere side. This gave us some rough ideas - at least between individual smelts.
Eventually I got a small guage (off E-bay) that measured 0 - 30 psi range. (The trouble I had was finding something in the right range, at a price I could manage.)
Some of the individual smelts in our series here have the input pressures measured. You would have to check through the individual 'smelt data' records one by one - there is no centralized table with all the variables charted from all the experiments. (Neil and I am working on that however - with plus 60 smelts, and so many measurement points, its pretty ugly.)

Overall, the average we recorded for input pressure at the tuyere was 3 - 5 PSI.*

We also were using a rough guage for input volume. This consisted (budget again) of a wind surfer's speed guage placed across the input pipe. The volumes were calculated mathmaticaly from the flow speed. Again not the ideal, and it turned out fatigue in the vanes at the high speeds measured really effected instrument performance with time.

gage185.jpg

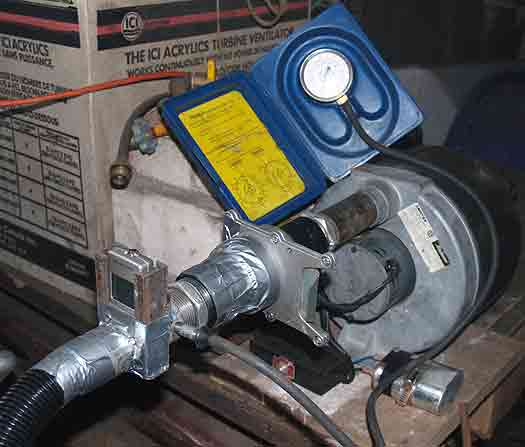
I have been using a different method than Lee uses for controlling the input air from the electric blower. (I've managed to purchase one of the same high end blowers he uses by the way). You can see the sliding plate gate (from a dust collection system) located just at the exit from the blower. So I'm limiting the amount of air into the entire downstream system. (Lee uses a moveable plate just in front of the tuyere set up, venting off excess air.) Both of us have some rough calibrations on these valves that let us have some rough approximation of the air we are providing to the overall system. Mine is marked (very rough approximations!) of 100's of litres / minute (based on earlier measurements). Lee's (was) marked in fractions of total possible (1/4 - 1/2 ...)

My smelting partner, Neil Peterson, is driving an experimental series investigating Viking Age glass bead making furnaces. (Even *less* archaeology than for iron smelting furnaces!). He has deeper pockets than I certainly do (!) and has recently invested in a multi input data recorder system. Along with high temperature probes, he has purchased some modules that will record pressure, and a better quality vane type air speed (so volume) instrument. We still have to assemble the fittings and run some tests, but we have good hopes for better (more consistent) measurements into the future.

You may have gathered from all that - my thrust here has been to researching possible historic *process* - with less concentration on *product*.
I have to agree with what Mark Green has said : That historic air delivery systems may not result in the most efficient utilization of ore = not the best quality blooms. You most certainly can *make* iron in lower air systems (and this most certainly was the method for much of human made iron production). What many researchers miss is the second stage - of bloom to bar. What you may gain in simplicity from ore to bloom is competely lost by the extra labour / materials converting a lacy bloom into a working bar.
Lee has much better experience / notes / observations about this aspect.

Ok

Lee and Skip experimented and documented and then introduced to all the concept of high volume air = better ore to bloom conversion, both in terms of size and density. (Historic note, look at the impact of water powered systems circa 800 - 1100 AD in Europe  - pretty much the same thing!)

Although some experimenters have produced measurements of input air pressures, I am uncertain that anyone has attempted to measure pressures inside the actual furnace itself.

As Mark as mentioned, delivery air needs to be considered in terms of not only *volume* but also in terms of *pressure*.
This is why people attempting to use rotory blacksmith's forge blowers as air sources often have less than the best results. Those equipments produce a large volume - but at virtually no pressure. The air simply does not penetrate through the tuyere diameter into the charcoal mass. Increasing the diameter of the tuyere might assist this. Using multiple tuyeres would certainly help (and both methods are seen in historic systems.)

But in actual fact, none of us need to really worry so much about absolute pressure measurements, or even with measuring air volume. The best 'working' measurement is via charcoal consumption. Rate of charcoal consumption is also the effect of internal temperature and size of the effective heat zone. Bigger and hotter = faster charcoal burning.

Most of us are working on some variation of the 'Sauder System', what historically I would call the 'short shaft' furnace. Most typically our working furnaces have an internal diameter of closer to 10 - 12 inches.
This is quite important when discussing measurements and working methods.
As you have seen, there is a dance between ore / charcoal / furnace  / air. My own experience is that there is no *absolute* 'perfect' furnace. Any basic design will have to be modified based on changes to those four primary elements. Hematite will not produce the same results, even in identical furnaces and method, as the bog iron ore analog I typically use here.

I'm (educated?) guessing that any attempt to modify the internal gas pressure in what is a very rough and simple furnace will prove far more effort than effective in result.
Past experience has proved the simplest way to effect the reaction ability of a furnace is just to increase the total stack height. (Nice example there, Mark gave 40 inches as his ideal stack height - I usually build for closer to 24 - 30 inches. My standard furnace diameter is larger, rarely below 10 inches, to his reported 8 inch minimum. I know we are working with quite different ore types, and maybe charcoal as well.)
There are just too many other variables for a 'one size fits all' design. (So many things that can, and often do, go wrong!)

Monday, December 14, 2015

Carbon Loading

After Paris, there is a lot of talk about Carbon Production, leading perhaps to a Carbon Tax here in Canada.

I had looked at this a couple of years back:
Carbon and the Forge
At that point I was primarily interested in the amount of C02 loading from the various fuel options in a blacksmithing operation. I used my own consumptions and choices at that time for the comparisons.

I (attempted) to run the numbers for a 'typical' year of operations, using the totals from my own 2015 records

Gasoline = approximately 3000 litres
(this worked back from actual $$ spent, using $1 CDN per litre as a very rough average cost)

Coal - approximately 1000 lbs
(this very rough, as I purchase in 1500 lb lots, as needed only)

Propane - close estimate 800 lbs
(this fairly accurate, based on the number of 40 lb tank fills made)

Charcoal - approximately 300 lbs
(this a bit of a WAG, based on three iron smelts per year, each at 100 lbs each)

Ok - Now the fun starts.
There may be some simple chart out there converting fuel type and amount into 'best possible' CO2. I certainly could not find one. In the end I had (again) to make several conversions between pounds / litres / US gallons * ....
What I came up with:

Gasoline - CO2 lbs per US gallon = 19.6 : use total = 15,523 lbs CO2

Coal (Bituminous) - CO2 lbs per ton = 4931 : use total = 2465 lbs CO2

Propane - CO2 lbs per US gallon = 12.7 : use total = 1070 lbs CO2

Charcoal - CO2 lbs per lb (dry oak, molecule based) = 2.9 : use total = 880 lbs CO2

There is a small amount of Kerosene and split dry firewood used around the shop, but here considered too small to add.

TOTAL CARBON DIOXIDE LOADING = 19,938 lbs / about 10 tons ( just over 9 metric tons)


I note that this year I did not make as many long range working trips (driving). Even still, gasoline use is by far the majority (roughly 3/4). As a rural resident, and involved in a small business, I'm not sure how I could easily reduce there.**

As a comparison, I did take a look at a 'Household Footprint' calculator (which is almost so vague to of little use). Outside of the workshop, the major 'carbon' expense here would be related to heating. At Wareham, this is primarily electric - which plugging in the total $$ last year suggests a CO2 load of 12 tons (At this location is mainly via Bruce Nuclear. Wareham is at the north end of the Shelburne wind turbine complex, but honestly I have no idea how much that actually contributes to the local power grid.
I also burn about a full bush cord of locally cut firewood every year for additional heating. ( An estimate on that is 6,670 lbs CO2 produced)

This suggests a total of 15 + tons CO2 from the Household side.
(There would be some additional amount from the food purchase made over the year. Economics here dictate there is very little 'new' purchasing - Used items and 'from the dump'  are the norm.)


So - what this all comes to is that the actual forge fuels contribute by far the smallest  portion to my own personal 'carbon load'


* I had originally stumbled on a USA Environmental Protection Agency set of tables, but through doing one thing after another, lost the specific link. These totals are taken from my working notes (sorry to the 'evidence' hounds)

** I own two (virtually 'classic') vehicles :
2003 Chev Astro, cargo, with a 4.3 L six cylinder
1997 Honda Odyssey, basic, with a 2.1 L four cylinder
This year 3/4 of the distance has been using the smaller engine Odyssey - and it is virtually all highway driving.
Question :  Admittedly an older version is most likely to be less efficient, and thus generating more CO2 per litre / kilometer. But against that is the 'production' energy / carbon cost of a new vehicle. Which is, in the final accounting, the lower carbon impact?

Thursday, December 10, 2015

Blacksmiths Captured...

The Blacksmiths

A personal photography project about blacksmiths and their craft.

My name is Dan Bannister, and I’m a commercial photographer based in Toronto, Canada. My day to day photography work is mostly advertising and fashion for retail brands but I like to add variety to my photography and exercise my creative muscles by pursuing personal projects alongside my commercial work as much as I can.
 
... a man named Lloyd Johnston, who has this incredible resume as a blacksmith, including being the person responsible for the historically accurate restoration of the iron gates on Canada’s Parliament Buildings.
This eventually led me to meeting other blacksmiths and photographing a number of them as well as making a mini documentary of Lloyd working in his shop ...
Lloyd Johnston Image by Dan Bannister

Link to  The Blacksmiths

Link to Dan Bannister


Dan started this series a number of years back. My memory is that he had taken some of his first images at CanIRON 8, back in 2011. I vaguely remember having someone taking images of a number of us, especially his focus on 'object in the hand' - which you see expanded on in the published series.
Reguardless of that, I highly recommend that you take a look at 'The Blacksmiths'. These are simply wonderful character captures - many of people I know from here in Ontario.

Great work Dan!

Wednesday, December 02, 2015

'Forged in Fire' - 2

Update:

Yesterday I ground the rough forged blade to what is more or less its intended shape

Rough Forging
Ground to Shape
Compared to the rough forging, you can see the first modification is cleaning up the blade outline. This was not changed very much, really just smoothing out the lines from the forging.
The main modifications here were changes to the shape of the handle. I decided to put a slight inside curve to the top side. I have also slightly straightened the lower side, and steepened the front end to increase the 'catch' to the index finger.
Likely I will put a short unsharpened area (riccasso) just at the base of the blade side in the final polishing.

Additional time spent = + 5 minutes
(total time to this point = 70 minutes)

See the earlier full review of 'Forged in Fire' on this earlier post

PS - On the Photograph
The flow of ice that frames the blade was a completely natural formation on my deck!


Tuesday, December 01, 2015

Quad State 2015 - Gallery

Every year, I attend the regional blacksmith's conference put on by the Southern Ohio Forge and Anvil - QUAD STATE.

One of the features of the gathering is a gallery of participant's work. This is an open display, but awards are given in specific categories. Every year there is a specific theme for a special award. Over the years the quality of the objects submitted has increased amazingly. (More and more pieces that are 'I wish *I* had made that'!)

Although this is a bit delayed, here are the pieces in 2015 that really caught my eye...


Table by Micheal Bendele 
forged copper with wood plank top

I have always loved Micheal's work - and have been a bit in awe of the scale and the lines of it.
This piece was fairly large, about five feet wide by about eight feet long, standing at 'dining table' height. The legs were all different, forged from bundles of about 3/4 inch diameter solid copper. The overall theme was 'octopus'.


Copper Vessels by Franco Ruffini 
raised copper sheet, gold leaf, sterling silver

In contrast with Micheal's table, Franco's work was quite small in scale. Most of the pieces were roughly fist sized. The detailing here was nothing short of amazing. The gold leaf applied to the interior surfaces of many of them caught the light in a spectacular fashion. Some might quibble that strictly speaking this is not hot forging work, but the quality of the series was exceptional.
(I was able to have a long conversation with Franco about this work, and came away quite impressed with his attitude to art metalwork in general, and this series specifically.)


'Devil in the Details'
forged steel, copper details

This piece, by an artist who's name I did not record, simply blew me away. The overall size here was about 30 inches long. As the title suggests, the fine work and degree of forged sculpting in the individual elements was incredible. (These images hardly do the piece justice, I wish I had taken a close in view.)
In the end, this was the piece I voted for as 'best of show'. 


Sunday, November 22, 2015

Winter Hits Wareham

a picture worth a thousand words...


Best guess is roughly 10 inches   20 cm (was not quite over the tops of my rubber boots).

Wednesday, November 11, 2015

The Room Empties

" Year after year
more old men disappear.
Soon no one
will march there
at all..."

2015.
No one is left from the First World War.
The end of the 2nd War is now 70 years past.
Given that about the youngest anyone could have lied their way into serving in that conflict was 16, that puts the 'youngest' likely veteran of WW2 at 86.
The Korean War ran 1950 - 1953.
Make the 'youngest' having enlisted in the Regular Forces at 17. That puts a veteran of this one at least 75.
Viet Nam spanned 1955 (depending on who you count) to 1975. Again use the 17 year old soldier. That makes the veteran of this mess at least 57.

For Canadians, add years of Peacekeeping - all over the place.
What seems an endless repetition in the Middle East, bleeding one into the other down to this morning (and certainly yet to come).

I personally never knew a family member who endured WW2.
I joined the Canadian Armed Forces Reserves in 1972.
The Regular Forces Adviser in the Regiment had served in Korea.
Viet Nam was still happening. Of the instructors on my Junior NCO course, two had somehow enlisted in the US Army, and served a tour in the jungle.
One of my closest friends had also jumped to the USA, and served *two* tours in the 101 Airborne there. 

I turned 60 this year.
For me, 'the War' is Viet Nam. As a young man, I came to meet many people who had been marked by that event.
Many friends to fled to Canada to avoid the draft.
A man who had been the second person to set foot into the village of My Mia.
Those that had fought there, willingly - or in terror.
Those who protested. Those who heaped abuse on me because I wore a uniform.
I have an opinion after all this,
but that is not the point today.

'The Band plays Waltzing Matilda.
And the (young) men answer the call.'
...
'Year after year,
more old friends disappear.
Soon no one
will march there
at all.'


********
'And the Band Played Waltzing Matilda'
written by Eric Bogle in 1971
Although of the many, many versions of this song, this one is still the one I consider the best.

Saturday, October 31, 2015

Forged in Fire ??

So - I started watching 'Forged in Fire'
http://www.history.ca/forged-in-fire/

"Each week, the best blade makers go head to head…"

Well, maybe not so much 'the best'…

I have started watching these mainly for a number of reasons:
1) I am getting a rush of requests for 'beginner to bladesmith' courses. Kind of 'can I come make a sword in two days' things. Needless to say, I was wondering where that particular brand of misconception was suddenly coming from.
2)There has been a general buzz about this. I have been getting a large number of general 'have you seen it and what to you think' comments.
3) I had been contacted about a year ago by a production team putting together a new program for the History Chanel, which was described as 'seeking professional blacksmiths'. (The exact name or theme was never described by the way.)  Then it turned out they did not want a copy of my actual CV - but wanted me to send an 'audition tape'!  I knew this was not something I really wanted to be involved with. Forged in Fire might have been the result?

I should preface this by stating that I think 'reality TV' is nothing like real life - and is basically stupid.

Contestants are given 3 hours to forge a bar into a blade profile, which then is supposed to be 'tempered' (as I will elaborate on, this is in fact quench hardening only).
Sometimes they start with a fixed material not shown until they start, sometimes they can select from several types.
At this point the rough blade blanks are examined for required size, checked to see if there are major flaws. One individual is eliminated at this spot.
The remaining three then have an additional three hours to potentially correct forging errors, finish polish, and apply a handle from provided materials.

What I have watched so far:
E1- Katana
http://www.history.ca/forged-in-fire/episode-guide/japanese-katana/
E2 - Chakram
http://www.history.ca/forged-in-fire/episode-guide/chakram/
E3 - Viking Axe
http://www.history.ca/forged-in-fire/episode-guide/viking-battle-axe/

(A note on the links : History Channel has decided that to view any of these clips, they want you to have virtually the latest version of Flashplayer to have them play correctly. I was assisted here by my friend Neil Peterson, who ended up having to provide me several different file versions before I had one I could view on my 'not newest and greatest' computer.)

In these programs the amount of time when actual forging is seen is extremely limited. There is more time allotted to polishing, especially if there are sparks involved. Stress is placed on bad working process, especially if mistakes or flares of anger are involved. Most of the footage is of the 'function' tests - one picked for 'hacking', one picked for 'slicing'.

Two individuals of the four are eliminated during the in studio segment (total 6 hours available) making a 'blade of their own design'. First goes after three hours, when the rough forged to first polish and heat treating (?) is checked. The next goes when the 'finished' knives are subjected to the functional tests mentioned above. (Exactly what test is used changes every episode.) The final pair then go to their home workshops and have five days to complete a version of a historic weapon type. This is hardly an even playing field there! Episode three was the most dramatic example of this, one individual was fully equipped with a power hammer and a lot of specialized tooling - the other was working with a forge made from a cast iron pot with a hair drier.

Forget actually *learning* anything about actual bladesmithing. Everything is paced and created for drama - including almost anything people are seen to be stating.

Generally I find the language used by the 'experts' vague and often incorrect.
The commentary / narration is even worse. (A mechanical hammer using for forging is NOT a 'trip hammer' - certainly not the small mechanical hammer used!, etc, etc. etc.)
Some particularly bad repeated examples:
a) Substituting 'temper' for 'hardening'
This comes up continually, when contestants are being told they need to submit a 'working weapon' which needs to be 'tempered'. Yet the process looked for is quenching from high temperature - which is *hardening*. (more on this under 'methods').
b) Incorrect description of carbon content in 'found object' source materials.
Primarily here in E3, when 'rail car spring' was described as 'high carbon tool steel'. Coil springs, especially 'old school' types like the ones shown, are in fact a *middle* carbon steel, most typically a 1045 (so roughly .5% carbon).

Heat treating? What heat treating??
- Near as I can tell from the video, *none* of the twelve so far has been seen to pre-anneal their starting material. This is especially a problem since most contestants are working with 'salvaged' materials - which are sure to have unknown (undesirable?) qualities as they start. (To be fair, it did appear that in E1 and for some in E2 they were able to use 'standard bars' - but did they know if those came pre-annealed? It was never stated this was so.
This, coupled with the error of forging cold bars, has most certainly been the result of cracks to failure seen so often part way through the first 3 hour forging segment.
- Only one of the twelve has been seen to 'heat cycle' or otherwise anneal their finished forgings. They almost without exception are seen to plunge right into the grinding and polishing phase (This might mean a limited attempt to air cool?).
Only one contestant has been shown to use a kind of 'zone quench' - carefully quenching the cutting edge and letting the back air cool (E3).
At least once someone did the quench and pull out flaming move - which certainly is dramatic, but is just bad method period.
Usually exceptionally aggressive grinding as well, suggesting to me at least over heating of the forged blanks. (Yet again another possible reason for major cracking, and certainly destroys hardness.)
Not one of the contestants has been seen to actually draw the temper back after the initial flattening and first polish step.
It should be remembered that for fully SIX of the initial 12 contestants in the first three episodes, major cracking to total break failure has occurred.

In the first three episodes, in my opinion, only ONE of the 12 contestants shown has illustrated clear understanding of the actual *forging* process (E2)
 - Almost uniformly, the hammer techniques used fall into the 'bash the crap out of it with a big hammer' method.
- The designs being chosen are straight line, typical, 'heavy hackers' - which might as easily be ground out of the starting bars as forged at all. This suggests to me very conventional concepts about design. Almost all the blades being produced are standard bowie / clip point or hunter types. The two variations from this have been one seax and one tonto profile.
One of the prime strengths of forging instead of straight grinding is the ability to create more dramatic blade profiles. I am not seeing this done.

It is very difficult to judge working forges (temperatures) via video. (Cameras see deeper into the infra red / heat than your eye does, so any estimate on temperature via colour is most certainly incorrect in video. The forges used appear high efficiency, three burner models. These certainly appear to be running flat out - at the highest temperature they can produce.
Two things are clear however:
1) Several contestants have been seen to have overheated and burned their metal bars. This is a non recoverable error. It happens when you have the forge set too high - or you just plain are not paying attention. As this is happening during the primarily forging phase - there is absolutely no reason to be this sloppy.
2) Several contestants - about *half* in the first three episodes, have had major cracking to their blades. When forging processes can be seen, many times metal is being worked with no visible colour. Forging any carbon based alloy 'below critical' results in this same non recoverable error. Again - there is no reason to have done this. (This assuming the worker has any experience with or knowledge of, correct working methods with blade making materials in the forge.)


Look - I have yet to see *any* of the first 12 finish their forging process in less than 90 of those 180 first minutes. Most are taking closer to 120 minutes.

What?

As a comparison ...
I undertook this exercise / demonstration for my co-op student as an illustration.
- My chosen starting material was a standard farriers rasp - so 1095 carbon steel. This was the same as was offered in E2 as a possible choice (and was selected by the contestant who won that round btw). The starting piece (not counting the small tang) was roughly 14 x 1 3/4 x 1/4 inches.
- As with E1 & E2, my  required blade length between 9 and 11 inches. (This requirement given by my student btw.)
- My design was chosen to be based on the historic 'kopis' - originally a bronze weapon used by the ancient Greeks. I wanted a full tang with an integral wrap around the hand, which would use flat slabs for the handle. (Design phase, three minutes.)
- My stated objective was to forge the blade to rough profile, including some 'heat cycling' and shortened annealing - in no more than 60 minutes.
(It should be noted that my gas forge does *not* produce the same high temperatures as the competition models. It can get basically a 'bright orange' temperature. The hotter the metal, the faster it can move - and the longer it remains at correct forging range each heat cycle. Both result in more work accomplished in a shorter time.)

This is the result:
At the end of the forging process.
As you can see, the total blade length at this point is 10 inches. There is the desired length to the handle - which will end up being about 4 1/2 inches (intentionally tight fitting) when grind profile is completed. So the total length of the finished forging is 14 1/2 inches long. It is about 1 7/8 inches at the widest point (which may be reduced slightly when the edge is ground to a smooth curve.)
I intentionally did not add any taper in thickness over the blade, which will serve to increase the weight forward for a heavier strike. I decided on this material also to leave the surface markings from the original file remaining - as a design feature. (This to add to the overall 'historic' appearance of the finished knife.)

My process (so far)
- The starting file was air annealed for about five minutes.
- It was then MIG welded to a longer handle to ease forging. (Note that several contestants have been seen to to this.
- To speed the process, the rectangular tip was cut off at about a 45 degree angle using a zip disk on an angle grinder.
- The required  blade measurements were marked in chalk to the side of the anvil. this allowed for rapid check for correct length during the forging.
- The blade was forged *first*. This was done to ensure the required length. (Noting that the tang type could easily be modified if additional material would be required.
a) the point was forged
b) the base area of the blade was reduced in width / converted to length
c) the overall shape was curved to the edge side by an estimated amount.
d) the cutting edge was carefully forged down.
e) after checking for correct blade length, the arc of the handle (front area) was forged down (using a combination of a crowning hammer and the base of the horn).
f) the overall shape (curvature) was adjusted as desired
g) the welded handle was cut off at an angle with a zip disk
h) the curved hook at the base of the handle was forged out and curved
- At this point the overall blade was checked for rough accuracy, and several small wobbles in the edge were corrected.
- the finished forging was taken through two heat cycle / partial annealing phases.
Total elapsed time - 60 minutes.
I was working effectively - but not *rushing*.

I decided to undertake one longer anneal phase, from just about critical (magnet check) and air cooled on the top outside of the forge. Elapsed time here - another five minutes. (If this was the actual competition, I would used this time for a drink and to gather the needed polishing equipment.

My normal practice would be to let the finished forging cool until I can handle it with bare fingers. I then give the edge and back a very fast 'smooth profile' on the grinder. This allows me to examine a bright smooth edge against the fire scale darkness of the meat of the blade. This makes spotting any major flaws in the forging much easier. If required (seldom is) I can then quickly re-heat and tap the distortions out.

A small amount of twist to the edge through to the back remains, but this slight enough that I am not intending to fuss with it. 

Complete expenditure of time from selecting material, design, forging, simple annealing : 65 minutes.
click for life sized image

Now I do *not* have a $2000 high speed knife sander / polisher  - like the ones seen in the competition. Even so, I am quite sure I can profile, and surface grind, sand flat / first polish, quench, *correctly* temper, and sharpen the bare blade in the remaining 115 minutes.

stay tuned for hours two and three...

Friday, October 16, 2015

Viking to Crusader - on line?

Those interested in the Viking Age in general will find this especially helpful.

The combination catalogue and commentary from the 1992 international exhibit 'From Viking to Crusader' has long been almost totally unavailable. As with many exhibit publications, only small numbers were originally printed. This was compounded by the fact that it was printed in many languages - for the countries that hosted the exhibit as it traveled.
I have long considered this volume to be almost the perfect exhibit companion volume. It had a very good overall summery of the historic period and cultural overview. Additionally, it had a small image and short description of every one of the exhibit objects, along with measurements and museum reference number.
This volume is worth its weight in gold to the serious re-enactor, especially those of us making replicas.

It is almost *impossible* to find a copy.

Neil Peterson shared this link:

https://maritimeheathen.sharepoint.com/Documents/From%20Viking%20to%20Crusader_The%20Scandinavians%20and%20Europe%20800-1200.pdf

This is a direct scan of each page of the full text.
It also is set up so you can download a PDF of the entire contents.

The presenter here is 'Maritime Heathen'
I freely warn you that I know absolutely nothing about this group - its slant or its intentions. They do appear to be based on Asatru - rather than living history specifically.
A fast look over their reading list does show a number of texts related to general Viking Age history topics - as downloads of various types.

Any way you slice it - you have to thank Maritime Heathen for making Viking to Crusader available.

Saturday, October 10, 2015

COMMUNICATIONS DOWN

Readers:

My faithful Mac G5 suffered a 'non recoverable error' yesterday morning.
For the technocrats out there, that means that it appears some hardware element quickly overheats and freezes the machine.
So I am struggling to recover the current working files since my last major backup - about the last 6 weeks worth.

This with a grant application due in 4 days and a potential project I'm quoting on deadline for Oct 15. Third quarter HST also due (like right now).

I am working on transferring over everything on to my MacBook lap top. Which, although having a broken screen, does mate with various external pieces to give me something like a functioning system.
This is running OS 10.5 however, which puts me over the 10.4 threshold. I had held at 10.4 for a long, long time, as that is the 'latest' Mac OS that allows running still older OS 9 in parallel. And in turn, all the software I have acquired and have depended on for roughly 20 years now.

This is most certainly going to create a major gap in many of my normal computer related work into the near future...

Friday, October 02, 2015

2016 COURSE OUTLINE


Tentative Course Offerings - 2016

(Visit the web site as details are finalized!)

Introduction to Blacksmithing

Typically the second weekend each month
February through December

Basic Bladesmithing

June 28 -29

Forge Welding

March 26 - 27

Introduction to Layered Steels

August 27 - 28

Basics of Metal Casting (Pewter & Bronze)

February 27 - 28

Build a Zombie Killer

July 23 - 24

Forging the Viking Age

October 22 - 23

Basics of Bloomery Iron Smelting

May 21 - 22

Working with Bloomery Iron

November 26 - 27
NEW program!

Additional Courses Possible 
(based on demand)
Forge to Blade (one week)
Blacksmithing for Re-Enactors


Instructor: Darrell Markewitz
Darrell has been working with forged metals since the late 1970's, starting as a student at Ontario College of Art. Early work included 5 years at Black Creek Pioneer Village, finishing as primary interpreter/artisan blacksmith. In 1992 he started the Wareham Forge, full time as artisan, trainer and museum consultant. Since 1993 he has held a regular series of workshops at the Wareham Forge, as well as sessions at folk festivals, community colleges, and universities. A recognized specialist in the objects and techniques of the Viking Age at an international level, he has also trained staff, undertaken workshops and presentations at numerous museums, living history programs and academic specialty conferences. Since 2001 he has been involved in, and and instigator of, the "Early Iron' / bloomery iron smelting movement focusing on experimental archaeology related to the Northern European ' Dark Ages'. His personal work employs his signature 'Rivendale' design style, and ranges from pattern welded blades, sculptural objects, through to intermediate scale architectural commissions.

Facilities: the Wareham Forge
The shop combines traditional and modern equipment. employing both coal and propane forges. Powered equipment includes an air hammer, hydraulic press, MIG welder and oxy-propane torches, drill press, grinding and polishing machinery. There is also fully equipped fine metals studio available.
The Wareham Forge is located in Grey County (Central Ontario), about half way between Orangeville and Owen Sound. We are about 5 miles SE of the village of Flesherton, just off highway 10, (about 2 hours drive NW of Toronto).

Note that only 4 students will be accepted for each session. Each student will be provided with their own work station with two students sharing a single forge. Taken together this means close personal supervision and lots of hands on working time!

Available courses start with 'Introduction to Blacksmithing', to second level and advanced programs like 'Basic Bladesmithing', 'Forge Welding' and 'Layered Steels'
Unique are specialist historic metalworking programs such as  Iron Smelting', 'Aristotle Furnace' or 'Forging the Viking Age'.

Also available
Private Session (per day)
Group Session (discount plus custom content)
Remote Session (at your location)
Educational / Institutional Programs
Demonstrations
 
For more details visit the Wareham Forge web site:
www.warehamforge.ca
Course Details :
www.warehamforge.ca/TRAINING/train.html
e-mail : info@warehamforge.ca


Tuesday, September 22, 2015

Aristotle Furnace Demo - at Quad State

 This coming weekend holds the annual Quad State Roundup blacksmithing event held at Troy Ohio by the Southern Ohio Forge & Anvil group.

http://www.sofablacksmiths.org/
 I have attended Quad State as a participant for a good number of years now (since the early 1990's). I was one of the featured demonstrators in 2008 (iron smelt - overview).
The event has grown to one of the largest regional blacksmithing conferences, attracting 800 + people. In the past the core demonstrations have centred on four primary areas : traditional joinery/ forging : bladesmithing : contemporary via air hammer : non ferrous metalworking. In recent years the range and number of demonstrators has expanded greatly. One of the features of these demonstrations is that most typically individuals are chosen for their ability to *communicate* - as well as displaying good skills and wide variations in approaches to forge work. The 'tailgate' sales area has become nothing short of massive, making Quad State an excellent place to pick up everything from small sundries, hand tools, raw materials to large equipment like machines. All this for an extremely low entry fee (US - $55 pre-registered, camp on site for $10 per night).
I strongly recommend Quad State to anyone interested in forged metalworking.

This year, the organizers have shifted from a smaller number of featured demonstrators to include a larger number of smaller scale demonstrations :

One of the things we are trying to do this year is to give as many of the schools that include blacksmithing in their curriculum, the opportunity to do a demonstration during Quadstate 2015. Our thought is to have each institution do a full three-hour demo that will be geared to show what was typically covered in a cource at their institution. It could be done by their "resident smith" or someone that they may be using as an instructor. We see this as a chance for these schools to advertise and promote their programs as well as a chance for all attendees to see a broad range of demonstrators that would otherwise not available at many of the smaller conferences.
I'm happy to say that I have been selected to present one of those demonstrations:

Demonstration Description:

The Aristotle Re-melting Furnace.

The Aristotle is a small (table top) furnace which provides an alternative to larger scale bloomery iron smelters. Using roughly 5 lbs of charcoal, in 30 - 35 minutes it can convert *any* iron based material into a roughly 1 lb 'puck' of unique material. The resulting puck has the physical structure and texture of ancient bloomery iron. Importantly, but controlling the base structure of the furnace, the resulting carbon content of the metal can be modified.
This makes the easy to build and operate Aristotle Furnace the ideal method for those wishing to investigate the properties of bloomery iron - in a size easy for standard forging methods. The ability to vary the carbon content (either increasing or decreasing) is of special interest to the bladesmith.
Darrell Markewitz was part of the 'Smeltfest' team which originally developed this furnace. He will explain the working principles and construction of the furnace. Then he will demonstrate several operation cycles, including forging one of the produced pucks down into a working bar.


School / Workshop description:

Blacksmithing and Specialized workshop programs at the Wareham Forge

Since 1992, Darrell Markewitz has been offering weekend to week long training sessions, primarily from his home shop located about 2 hours drive NW of Toronto in Ontario. Classes are small, limited to four students, each with their own full anvil / tool set, with both coal and propane fired forges used for general blacksmithing programs. Currently there is one basic level (2nd weekend) and one specialized course ( 4th weekend) offered each month. As well as more standard blacksmithing workshops (such as Basic Bladesmithing, Forge Welding Tools, Introduction to Layered Steels) there are a number of historic metalworking programs (Bloomery Iron Smelting, Aristotle Furnace, Viking Age Forgework). Private sessions, either for individual instruction or project related, can also be provided.
see : http://www.warehamforge.ca/TRAINING/train.html
Darrell is also available as a demonstrator or workshop leader at your location, be it museum, college or blacksmith's group.
see : http://www.warehamforge.ca/school.html


Personal Description:

Darrell Markewitz first picked up the smith's hammer while a student at Ontario College of Art in the late 1970's. His keen interest in history continued as his forging skills developed, he was the blacksmith / interpreter at Black Creek Pioneer Village in Toronto during the 1980's. In 1992 he started full time as an independent artisan as 'the Wareham Forge'. For over 20 years this work has been multifaceted, with architectural projects, custom bladesmithing, and individual objects all showing a stress on design and hand forging. A significant additional area has been work on museum projects based on the Viking Age. This has included interpretive program design (Parks Canada), stand alone exhibit creation (Cranbrooke Institute of Science), and work on major exhibits (Smithsonian, Newfoundland Museum). In 2001, he started research into bloomery iron smelting, becoming a core member of the 'Early Iron' group with Lee Sauder. He continues to undertake an extensive series of experimental archaeology projects related to Northern European iron smelting and other fire based physical techniques. He has published a number of DVDs related to blacksmithing and historic methods, as well as journal articles and delivering academic papers. He has demonstrated and lead workshops at blacksmithing events, universities and museums in Canada, the USA and in Europe.

web site : http://www.warehamforge.ca
iron smelting : http//www.warehamforge.ca/ironsmelting
blog : http://warehamforgeblog.blogspot.ca


Thursday, September 17, 2015

Forge Blowers for Sale

As part of the ongoing structural repairs and general clean up at the Wareham Forge, I will be selling some of the extras of equipment I have stock piled over the last two decades.

First up - two forge blowers:


One is a 'Champion - No 1/2'
This blower is mounted on a wood base with an attached electric motor.
The unit is excellent working condition (if a bit noisy in operation). The drive motor has a standard electrical plug attached.
Price $100


Second is a 'Champion - 400'
This blower is in very good working condition (don't let the minor surface rust fool you).
It has the original three legged stand.
Price $150

Both have been stored inside at the Wareham Forge since I purchased them.
Either would be ideal for setting up a home forge set up.

Prices quoted are Canadian Dollars.
Payment via major credit card / paypal / cash at Wareham. (contact me)
A deposit will be required to hold either unit for purchase.
Units to be picked up at the Wareham Forge.


Tuesday, September 15, 2015

DARC at ICMS?

Have you been doing Experimental Archaeology?

DARC (the Dark Ages Re-creation Company) is hosting a session at (the International Congress for Medieval Studies ) Kalamazoo in May where we are looking to have people speak about their recent experimental archaeological work.

Expect some details forthcoming over on the DARC blog


If you are interested in speaking please reach out to me - I'm happy to talk over what is involved, the expectations and so on.

Session Chair / Organizer is Neil Peterson (e-mail)


modified from an original posting by Neil
Refining the Bloom - 2013 ICMS demonstration (image by Michigan Live )
As many readers are likely aware, both Neil and I have been presenting papers related to applied experimental archaeology at the International Congress for Medieval Studies at Kalamazoo for the last several years. This has included several (well received) physical demonstrations, themselves a further departure from the typical ICMS focus on manuscripts. This will be the second year that DARC has directly sponsored an individual session.

DARC is calling on serious independent researchers to present their ongoing work as part of the session : 
Archaeology & Experiment: Moving beyond the artifacts
Session Type: Papers
Archaeological sessions tend to focus on presentation of results from
excavations or preliminary analysis. Experimental archaeology moves
beyond the artifacts, allowing researchers to examine the underlying
question of "how" related to artifact finds. Ideally, experiments can
provide a preliminary answer to the question "Does this theory of how it
was done actually work". A keystone of experimental archaeology (and a
differentiator from reenactment/recreation) is that it follows the
scientific method of question, setup, and result - whether that result
is positive or negative. Presentations in this session will be expected
to review all three key elements in the discussion of their paper.
Papers submitted for these sessions would be good candidates for
publication in the EXARC Journal.
• Although DARC itself is focused on the Viking Age, presentations into any experimental archaeology project centred on roughly 450 - 1650 AD, ideally within Europe, is welcome.

• Remember that you need not actually write / submit a document. (Although DARC would love to have some, and these could easily be published on the 'Articles' part of the DARC web site.)  
• Many Re-enactors who are enguaged in serious long term experimental archaeology research happen to also have extensive experience communicating before the public! Often years of careful background study and practical trials remains hidden, despite the massive effort it often entails. Our individual strengths are as *presenters* and in the past Neil and I have found our presentations well attended and received - based on our long experience working a crowd.
• Individual presentations are limited to roughly 20 minutes (with time for introductions and follow up questions). Ideally one session would include three presentations.
• The submission deadline is September 30.


I can imagine the travel distance and related costs might pose more of a limitation to participation for many reading this (Kalamazoo is in mid Michigan, west of Detroit). As DARC is at best a loose collective of individuals, I'm afraid there is no institutional support for expenses that can be offered to participants.
 

Tuesday, September 08, 2015

Considering Ash in Bead Furnaces

This is a cross post from the DARC blog ...


One of the recurring problems the DARC bead making team has experienced is ash scars on the beads we make with various Viking Age type bead furnaces.

If readers are not familiar, you should spend a bit of time over on the main DARC web site - the area detailing our ongoing experimentation into Norse glass bead production :

http://www.darkcompany.ca/beads/index.php

It should be noted that Neil Peterson is the primary lead on this experimental archaeology project. (I only contribute as the 'fire guy', primarily on furnace design, with at least a basic level of skill with glass bead making itself)

As a (very!) brief overview :
• Plentiful archaeological remains at several Viking Age trade centre / town sites show that the Norse certainly made glass beads.
• 'Waste' remains do hint at some of the possible methods used to make individual beads.
• Raw glass itself does seem to be an imported material.
However :
Artifact remains are almost entirely limited to completed beads (graves) or waste products.
• There are only a very few actual glass bead making * tools * that have been recovered.
• There are no compete bead making furnaces. All that have been found are a very few clay 'bases' - that may (or may not!) suggest possible furnace dimensions.
All this, as practical workers, leaves us with a huge number of unanswered questions. (Summary of 'Questions & Answers' by Neil )

The experimental series has mainly concentrated on a couple of primary concerns:
• How do you build and operate a small charcoal fired furnace that allows you to effectively make beads similar to the ones known from the Viking Age?
• What is the superstructure for that kind of furnace - as defined by the remaining 'base plates'?

I have commented before concerning possible *effective* furnace design. (Admittedly, these based on my understanding of iron smelting furnaces and charcoal blacksmith forges.) :

Wednesday, October 10, 2012


"Bottle" Bead Furnace

*******************

The following is taken from an ongoing conversation Neil and I have been having about furnace design with an eye to reducing ash scarring. (As further background, Neil is proposing a series of tests that will produced measurable records of ash loading in the working area of the furnace.)

On 31/08/15 2:26 PM, Neil Peterson wrote:
... In passing on Sat you mentioned that chimney shape shouldn't impact ash.

Would you care to elaborate?  Feel free to suggest chimney ideas you think I should look into for this cycle.
You asked - much of this may be obvious to you

the ash produced ?
A given volume / mass of charcoal will produce a fixed amount of ash.
This will be a variable related I suspect most directly to wood type.
It may be effected by available air supply. (ie complete vs incomplete combustion)
It may be effected by actual temperature inside the furnace.

Wiki gives : "Typically between 0.43 and 1.82 percent of the mass of burned wood (dry basis ) results in ash " (this is talking about *wood* - not charcoal however). Likely this exact number can be researched (or close enough).
Given that in our case the wood type is not highly variable (usually oak or maple, standard sources).
The volume of the furnace is fixed (although changes between builds)
We are attempting to maximize temperature - kind of. Here we are balancing between duration and a fixed high temperature. To date we have been adjusting air volume to create what we consider an optimal temperature - of the exhaust gas (not necessarily the core burning temperatures, which I am not sure have been measured?)

So - we have an element to consider, which is particles over time.
1 kg charcoal yields 10 gm of ash (WAG) / complete burn time
Divide that by limited time that it takes to make a bead.

More important here is 'lofting' - how much ash is lifted into the expelled gases.
Generally we should have air input = gas output. (Scientifically there is some waggle here, based on relative volume of the elements in air against elements in the hot gas. I would think that not significant!)
Not *all* the ash produced is lofted. Much is trapped inside the remaining pile of charcoal inside the furnace.
This is especially true if there is a volume of 'non reacting' charcoal above the burning zone. This will be acting somewhat as a filter to trap particles.
Honestly, I think this is likely the major consideration. Bench test - compare ash visible in exhaust between start and end of a load cycle. Comparison test - how much ash is expelled from a smelting furnace (with about 40 cm of charcoal 'filter' above the combustion area)
Design implication? Build furnaces with a larger 'reaction area' - basically increase the bottom chamber height. (I did notice most of the builds others did on Saturday were very low furnaces - I expect these will have short effective working cycles, need more frequent loading, result in more ash in the exhaust.)

The other possible effect would be ash expelled from the reaction area, but because of height of the chimney below the working area for bead making, ash can settle back down into the chamber.
The core idea here is possibly increasing the chimney height.
I'm not so sure about this, as the ash particles are extremely light - and the air flow input is likely more than enough pressure / volume to still lift those a long way.
Increasing the distance or the complexity of the pathway of exhaust gas on its way out of the furnace may present a solution. The core problem here is doing this without loosing so much heat that the exhaust temperature drops below our needs.

The simplest way to construct a 'long chimney' would be with a tall, cylindrical furnace.
Primary problem is heat loss. There is the surface area (radiation loss) over internal volume ratio problem.
You might also use an internal set of baffels. This would in effect create an upper chamber with the
baffels above a lower chamber which in effect becomes a fire box. The upper chamber would suffer less heat loss - especially since one surface would be directly above the burning charcoal.
Primary problem here is complexity of construction.

Standard Bellows - actually based on that for Blacksmith's Forge.

In either case, one other consideration might be the air source. I'm not sure we are getting the correct balance between force and volume. Again our historic use is via a blacksmith's (speculative) equipment. I have certainly noticed massive variations in force and regularity of stroke between users. I think this is significant in terms of ash movement. What you desire is a slow, extremely even blow of constant pressure. It may be that a bag as a kind of regulator might be indicated.

It also would be valuable to have measurements 'in line' for air volume and pressure.
I would also suggest that input air from mechanical sources be controlled via an electrical controller (light dimmer) or a sliding gate of some. Both with markings at least relative - and repeatable.

What I meant about  'chimney shape not mattering' was an oversimplification and  short form. I think the elements given above are much more significant. There are theoretical considerations on shape (round / square) that likely do not come into play on this scale.
To my understanding, in large scale buildings, this is more to do with construction abilities than effects.
There is the 'passive draw' effect - which is a function of height, and does not apply here (scale again).
There will be some 'settling effect' - ash falling down after a certain distance. I think this also relates to reduced temperature due to cooling effects of the stack walls. Certainly NOT what we want here.
There is a 'lofting' effect - basically a tall stack distributes the same ash over a wider fall area (so reducing the individual point by point impact). Again not our concern.

We are more concerned with heat concentration - maintaining  a specific temperature at the stack mouth. A much wider chimney opening would certainly reduce the amount of ash present at a specific point location inside that opening. It would also be spreading the available heat energy out - certainly not a desirable effect in this case.

Without guidance from archaeology, anything we do is so speculative anyway.

Monday, September 07, 2015

Lost (& Found!) Commentaries on BLACKSMITHING!

One problem with the internet is that is is subject to variations, modifications, take-overs and other random losses of published materials.
In preparing to  answer an e-mail query this morning, I ended up (spending several hours) replacing 'lost' materials I had written and published as much as decade earlier.

These are the descriptive commentaries now back available on the 'On Blacksmithing' area of the main Wareham Forge web site:
Defining the Artist Blacksmith

A commentary on Terminology and Tradition
Originally on the Ontario Artist Blacksmith Association web site.
"Will you take an Apprentice?"

A commentary on the reality of the single person studio
Originally Seen on my blog Hammered Out Bits
A Career as an Artist Blacksmith?

Considering a Life as an Artist
A short article originally published on the Squido web series .
Teens as Students?

Some wisdom on the physical demands - and hazards, of working in as a blacksmith.
Wrought Iron Work?

What it really is - and what it really means!
On Buying an Anvil
Some information on what to look for
From my original GeoCities blog

If readers are not familure - I highly recommend (and thank!) the Internet WayBack Machine :

http://archive.org/web/

Saturday, September 05, 2015

HEAVY work - just not PAID work

... if any reading were wondering why there has been a gap in postings lately?

Right now I am undertaking a major structural repair here at Wareham.

The original 'Wareham Church Shed' was converted from its original purpose (built late 1930's) into a residence from 1987 - 1989. I purchased the property in November of 1989. (At that point the residence interior was basically 'unfinished' - raw plywood floors and only primer on the drywall.)
View from SE corner - 2005.
For some reason that defies my understanding, the two main structural beams that span the interior of the workshop were being supported by lengths of rail tie - set directly on to the *bare earth*. These beams sit on top of the poured concrete walls, and basically help hold the roof up. This interior framing is made of hand hewn hardwood (hemlock I think) - timbers salvaged from a still older barn. As the residence conversion was new construction when it was done, and thus must have been inspected, I can not imagine how this ever passed a proper certification.

Since the workshop space is unheated, the ground freezes, expands, then shifts the base level of each of the eight upright supporting posts - every year. At this point some of the individual supports have effectively dropped as much as 8 - 10 inches *below* the timbers they are supposed to be supporting. I have been placing blocks and driving wedges in every spring in an attempt to at least keep those supports carrying some of the intended load.

Workshop interior - Winter 2015.
In the image above, you can see a heavy (8 x 8) wood block inserted on top of one of the vertical supports (look just right of the ladder, along the horizontal beam)

More importantly, the image above shows just *why* I have left this necessary (!) repair so long before attempting it. You are looking at 25 years of accumulated materials stacked up on the storage racks attached to those same support uprights. On this side are stored tent poles, tents & overheads, hardwoods, plus various extra forge equipment and other potential project pieces.

Clearing the shop floor for the work, then moving all that stuff out took almost a full week just on its own.
Shop floor and rack contents removed.
A day to clear away the existing shelving and flooring (rail ties & stone slabs). A day gathering the project materials. A final day replacing the existing supports with temporary ones and pulling the old ones out.

7 days later - with temporary supports in place.

The image above actually shows where the *new* supports are going to be placed. In the image I have greyed out the far left temporary support, which will be removed as the work is undertaken and completed. You can see the new right side is going to be placed directly under the upper support - and under the combined original timber and new 'sister' beam. (That mess is another story into itself!)
Next is hand digging holes for the concrete foundations - which should have been done in the first place during the 1980's construction. These need to be large and deep enough to contain the 14 inch diameter by three foot long metal cylindrical ducting I am using for a concrete form. Then each is filled with (by my estimate) about 500 + lbs of concrete mix. Then the new steel support pillar (which I will be custom cutting and fitting) is installed on the left side. On the right a wooden timber will be used.

So :
One day to dig the hole
Half day to set form, mix concrete, pour (small mixer, hand carry), then backfill around form.
(Concrete allowed to set for 48 hours)
While first concrete sets, repeat for second foundation.
Half day to construct steel post, set in place.
(An additional couple of hours at some point to set the second wooden beam support, remove temporaries)

Repeat that whole process for the second cross beam at the rear end of the workshop.

Figure out how to rig up a new set of storage shelves (figure a day's work is likely there).
Put everything *back* on to the new shelving.
Re-configure the interior workshop space - back into some version of a working floor plan.
(I did mention that I am using the dirt from the dug holes to fill in a 'vehicle work pit' I had installed 15 years back - and never used? An additional 1/2 day was spent clearing the concrete block framing of that. This leaves a roughly 4 x 6 x 2 foot deep pit to the rear centre of the workshop floor.)

I did mention that this is just *one half* of the required structural repair?

Oh - there is a deadline! I have a course to teach over September 11 - 13 weekend. Ideally all the structural parts need to be completed by then (at least in the front half of the workshop).
The space will need to be cleared, sorted and set up to allow two students to work in the front half of the space.

As you might guess, this all is physically exhausting. And taking up my entire working day (no 'paid' work possible)
So much for the 'carefree life of the artisan'


Believe it or not, I do have some material in rough shape for a posting related to Viking Age glass bead making furnaces - hope to get that up here over the next couple of days...

Monday, August 31, 2015

Railroad Spike Knives - WHY?


On 19/08/15 1:51 PM, Steve wrote:
I have numerous rail spikes that I was hoping I could bring to you to heat and pound the ends into steak knives and or cheese knives?

Short answer - no

see : http://www.cartercrafts.com/carbon_myth.htm

The problem with rail spikes as a starting material is that the highest carbon content available is only 1030.
Regular mild steel is usually 1020
For a machette, you might use 1045

The second number of those specifications is 1/100 of percent carbon. Any knife expected to hold a decent working edge should be at least the range .5 % (1050), but ideally closer to .7 to 1 % carbon.
This refers directly to what I at least call 'the Bladesmith's Dilemma' :
As you increase * hardness * (via more carbon), you also increase * brittleness *.
Compare a typical machette at about 0.50 % carbon. You can hack down a tree with it, but it does not stay sharp all that long.
With a box cutter, which is razor sharp, but breaks with the least amount of force to it.
The amount of raw material on a rail spike will limit the finished cutting edge to something in the range of 4 - 6 inches. At that size limit, normally use of a higher carbon range is indicated.
Do also remember that you can make a piece of paper 'sharp' enough to cut your finger. The question should not be 'how sharp is it?' (a function of care with polishing). More important is 'how long will it *keep* that edge?'.


I personally consider making knives from rail spikes as a kind of a beginner's trick.

Go and search Google Images : 'railroad spike knife' ...

'Typical' rail spike knife - here by Salem Straub (shows as #2 on search)

If you also take a fast look on etsy - the average price for the 'standard' designs seems to start about $50 and maybe to $75 each (US).

Mind you there are some nice looking examples showing in the general search :

...by RplRaven / Robert Lindsay (shows as  #10 on search)
... by Mainline Steel Works / E. Sievers (?) (shows as #19 on search)

 As far as you can tell from a photo on Etsy - those both look like very nice pieces,  in terms of design, forge work and finishing. (And both have sold btw.)


Another thing to consider : New or Used material?
All these makers stressed in their description these were HC marked spikes. Even at a 'low medium' carbon content, a *used* rail spike has been subjected to stress in its normal working life.
• The process of hammering it down into a hardwood (typically oak) rail tie does involve in the application of considerable force as it is driven in *. This may produce shearing force to the area joining head to body of the spike.
• The purpose of a rail spike is to secure a section of rail track. Which is repeatedly pounded by passing trains. Certainly this must produce considerable shock / stress into the same area (joint of head to shaft. The body of the spike would certainly be cushioned by the surrounding wooden tie. Of course this is the part of the metal spike being forged into the blade itself.

It does make me wonder why anyone would put so much time and effort  - into what is an inferior material??


Taken all together, the only reason I can envision for using a rail spike as starting material for a blade may be the knob of the original spike's head. If you like that kind of thing. (I don't.)

Or more likely - it is because rail spikes are easily picked up along the tracks for free.
This may be a consideration for the cheapest / simplest (usually also least skill employed) versions. The more elaborate (higher skill and attention to detail) versions run into the $100 - $200 (US) range however. At that price, 'saving' the small price of brand tool steel bar stock, (at roughly $3 - $5) honestly just does not make any sense.


Do check my general information on custom bladesmithing:
http://www.warehamforge.ca/knife.html


* Believe me! I worked one summer in my early summer building rail track switches for Canadian Pacific RR out of Thunder Bay. Handling a specially designed spike driving hammer is trickier than it may look - especially when seen in the (skilled!) hands of someone who does it all day, every day. A slight shift in aim puts the striking force to one edge of the semi-spherical shaped head. This produces sideways force (and shock) to that 'hard' metal.
 

February 15 - May 15, 2012 : Supported by a Crafts Projects - Creation and Development Grant

COPYRIGHT NOTICE - All posted text and images @ Darrell Markewitz.
No duplication, in whole or in part, is permitted without the author's expressed written permission.
For a detailed copyright statement : go HERE