Monday, May 31, 2010

Bellows Stone in early forges

Bellows stone to keep the bellows from igniting?
Is there archaeological evidence for the bellows stone?

Steve


I had been meaning to work up a fuller article on this.


This is an image of the BACK side of the well known 'Loki' bellows stone / bellows shield from the Viking Age. The image was poached from the (quite excellent) 'Don Fogg's - Bladesmith's Forum Board'.
(For the life of me, I can NOT find the original photographer / contributer of this image!)

The more standard layout for a blacksmith's forge during the Migration / Pre Conquest period appears to be set on the ground, rather than the elevated type most of us are more familiar with. Archaeological evidence for this is found at most of the town / trading centre sites (York, Dublin, Ribe, Birka)


My own reconstruction of a ground level forge - from World of the Norse.

Sunday, May 30, 2010

an Anglo Saxon Forge (?)

On Saturday I was at an event that, much to my surprise, included Sam working away at his interpretation of an Anglo Saxon 'portable' forge. Sam is a member of Wynmerestow the local Regia Anglorum chapter).


The starting point is much the same as my own interpretation of a Norse upright forge. The bellows stone is based on a number of known artifacts. The bellows is based on two illustrations only.
Sam chose durability as his main construction influence. The fire box is lined with standard fire brick, held in a solid (oak?) plank box like frame.

Friday, May 28, 2010

Layered vs Pattern Weld / Forge vs Foundry

This is another commentary arising from a discussion on Norsefolk about weapons making technology of the Viking Age - wandering well off that historic mark!

I wanted to ask you about your use of terminology with regard to pattern welded and damascus steel. You said that modern bladesmiths use the term 'pattern welding' incorrectly to refer to all layered or patterned steels. Why do you say this is incorrect? Also, my understanding of the term 'damascus steel' is that it only refers properly to the wootz steel sold in medieval Damascus, Syria, which developed a pattern not from layering but from striation in the crucible. Am I mistaken?

The history of modern work with layered steels is confusing of itself!
This is how I make the shape of it:

There was a body of existing objects in museums, primarily weapons:
• Swords (mainly) from roughly 200 - 1100 AD in Northern Europe with low layers, twisted rods
• Blades from roughly 1200 - 1500 in the Middle East with medium to high layers, cut to create geometric designs
• Blades from Persia and India (have not looked as close here, so dates??) with mottled appearance (actually a crucible process)
• Blades from roughly 1300 - 1600 in Japan with extreme layering to the point layers disappear

The problem was that outside of Japan (and maybe something in India) the actual methods used to produce these objects was pretty much totally lost as working techniques into our modern times

In the 1960's, two independent efforts were made to relearn the methods:
• One team working out of the British Museum, focused specifically on North European swords (most specifically Sutton Hoo). Any illustrations you see around suggesting the use of braided round rods comes from these early attempts (those methods do not really work all that well, by the way)
• In the USA, Bill Moran pioneered variations on the Middle Eastern 'flat stack to geometric' methods.

So the initial problem on language is that two entirely different groups, the Museum / Art Historians and the Bladesmiths, working quite independently, developed similar (but different) terms. Often the same language had different meanings (and just close enough together to really confuse the issue).

I personally tend to lean to the museum set.

The first point : 'Pattern Welding' vs 'Layered Steel' :
Any method where a alternate layers of metal is welded into a block is Layered Steel. This could include completely modern methods, like fused powder and sheet. Pattern welding most specifically refers to Northern European method of twisting low count rods, then welding those rods to a block. So it is correct to say that all Pattern Welding is Layered Steel, but NOT all Layered Steel is in fact Pattern Welded!
Elaborated in an earlier blog posts :
Re-inventing Layered Steels
More on Pattern Welding - What and Why
Layered Steels 3 On Materials
(plus who knows how many other pieces, try a search here under 'layered steel')

One nice case in point 'Damascus' and ' Damascene' :
• 'Damascus' steel here refers to a method of creating quite even, flat stacks, with medium to high count (200 - 500 layers). These flat stacks are then cut or punched, then flattened, to create regular, geometric patterns. (Many modern bladesmiths call this method 'pattern welding' - even though that specific term is a museum definition for the N. European method of twisting rods.)
• 'Damascene' really should apply to the foundry / crucible methods. Often however. Damascene is used interchangeable (and incorrectly) with Damascus - and also to refer to steel blades with inlaid precious metals (to really confuse everything).

Now, just to mess everything up even more (!) - there are two main ways to use foundry / crucible methods:
• One is to seal some mid to high carbon metal in a crucible, bring it up to molten temperatures, then slowly let it cool. As the metal cools, the carbon selectively migrates to the first cold areas (the outside of the mass). What you get is a shape like this : O : where the dark lines are the highest carbon, the blank centre is low carbon. If you compress that into a blade you get : V : where there is a packing of the high carbon into the cutting edge.
• The second is to take a pile of lower carbon plates, and wire them tightly and place them into a bath of molten very high carbon. Capillary action then draws a thin film of the high carbon up between the plates. Now grind for effect.
Other terms that get inserted into *this* confusion are : 'Watered Steel' / 'Persian Steel' / 'Wootz'

I am the first to warn you that I have not studied the possible foundry methods in any detail. I'm pretty sure those few that do work in these techniques (also just recently 're-invented) would be just as picky about use of language.

I would refer you to an excellent article on line by 'H. Foll' :
Damascene Technique in Metal Working


I'm not sure that any of this may clear up the terminology confusion!

Darrell

Wednesday, May 26, 2010

Visiting the 1800's

Over Victoria Day weekend, we travelled to Ameliasbug Ontario, to take part in the annual 'Gathering of Friends' living history event.

As part of the (very) loosely organized 'Buckskinning' circle of events, the theme is based on elements from the Settlement period, most focusing on the Fur Trade era. Vandy and I portray a recently immigrated 'trades' couple, with me working the blacksmith shop at the museum.

This is always a great change for us. We are not 'in charge' of anything, and get just the respect we have earned through long years at this event and our past interactions with the other participants. Its a great chance just to relax and do just about as much as we feel like (for a change). One of the more amusing elements (for us anyway) is that we are one of the 'youngest' couples attending! (Which may say more about the popularity of history with the newest generations that anything else.)

Some images from around camp:
(The first is our rather modest set up, with a 7 x 7 wall tent)


Sunday, May 16, 2010

DARC - June 12 Presentation : Press Release

Release date: Immediate
Dateline : Wareham, Ontario

the Viking Age comes to LIFE on June 12!

Nothing can bring the past to life like costumed historic interpreters surrounded with the personal goods and tools of an earlier age. Artefacts that seem puzzling when seen in a museum exhibit or book suddenly become clear when seen in actual use, or in placed directly in your hand. Your questions are answered when you can speak directly with someone acting as a 'voice from the past'.

Some 1000 years ago, the first Europeans to explore North America would travel from Greenland to what they called Vinland, modern day Newfoundland. These Norse of the Viking Age were not the raiders of legend, but instead farmers, fishermen and bold sailors. At today's L'Anse aux Meadows, at the tip of the Northern Peninsula, they built sturdy turf walled houses to over winter, and most certainly explored further into the Gulf of St Lawrence region.

The Dark Ages Recreation Company (DARC) is inviting those interested in history to come visit us as we illustrate daily life during the Viking Age. You are most welcome to join us on Saturday June 12, from 10 am to 4 pm. The location is at the small Hamlet of Wareham, located about 15 km from Dundalk, Ontario.*

There are no fees to attend this special event!

Over the course of the day, a wide range of domestic and crafts skills will be demonstrated, including:
Food preparation
Textiles - dyeing, spinning & weaving
Carving - in wood, soapstone, bone & antler
Woodworking - both 'green' and using a spring pole lathe
Games & Music

A truly unique feature of this presentation will be the operation of a Norse type iron smelting furnace, a process which will be ongoing over the day. Expect the white hot mass of bloom iron to be extracted near the end of afternoon. DARC is the only group in Canada smelting iron using Viking Age techniques!

* Wareham is located about 2 1/2 hours north west of Toronto, just off highway 10 (45 minutes north of Orangeville). The Civic Address is : 307377 Centre Line A, Grey Highlands, ON N0C 1L0 (for those using MapQuest ) A simple map is available at : www.warehamforge.ca/directions/shopmap.gif)

Living History - What does it look like?

DARC focuses on daily life in the Viking Age. The presentation will centre on a 'camp', with costumed interpreters surrounded by a collection of replica objects consisting of domestic goods, tools, and storage. At the rehearsal, simple overhead covers and tents will mimic the buildings which we will use at L'Anse aux Meadows. Individuals will be outfitted with the tools of their various trades and arts, all representing our real interests and skills. (We really are weavers and cooks, blacksmiths and carvers.) All of the objects seen, from clothing to tents, are based on specific artifact prototypes.
To the public, the members of DARC present themselves as actual voices from the past, with shared experiences as a group and direct personal histories. Individual members of DARC have prepared detailed characterizations based on their personal research into the Viking Age, developing considerable expertise in specialized areas. These characters are the 'common man': artisans, merchants or farmers typical of the Norse of the North Atlantic circa 1000 AD. Any conversation is likely to begin at this 'role playing' level of historic interpretation. The interpretive level used is then shifted to suit the needs of individual visitors. Some people delight in talking to a character from 1000 years ago, others are more comfortable with more of a modern commentary. These experienced interpreters are able to handle a wide range of topics and level of detail.

A team with proven experience!

Members of DARC are drawn from throughout Central Ontario, and are serious amateur living history enthusiasts, most with decades of experience. DARC has provided skilled and well equipped interpreters for special programs for all of the major events and exhibitions that marked the 'Viking Millennium' in Canada. No other group of Canadian re-enactors has as much accumulated museum experience. As a group and as individuals, members have worked both throughout Canada and the USA. Personal research has taken members to museums and archaeological sites across Iceland, the United Kingdom and Scandinavia. DARC has once again been invited by Parks Canada to come and demonstrate at L'Anse aux Meadows NHSC in Newfoundland. The June 12th event is part of our preparation for this full scale presentation in August (from the 16th to the 25th).

- 30 -

For More Information: Turn to our extensive web sites:
The DARC Web Site -
http://www.darkcompany.ca
The DARC Blog -
http://darkcompanyca.blogspot.com
The 'Norse Encampment' -
http://www.warehamforge.ca/ENCAMPMENT
Experimental Iron Smelting -
http://www.warehamforge.ca/ironsmelting

Interested in Discussing Details?

Darrell Markewitz - organizes DARC's museum presentations and serves as the museum contact. Not only one of the original founders of DARC, he brings extensive museum experience as a consultant on educational programing and staff trainer for Parks Canada and other major institutions.

email: dark@warehamforge.ca

Darrell Markewitz
- Interpretive Program Designer
Hamlet of Wareham
- RR # 2 - Proton Station, Ontario
(519) 923-9219

Wednesday, May 12, 2010

a Pattern Welded Heavy Camp Knife

I had started in an earlier post to talk about a current commission, for a heavy camp knife made in the pattern welded style. (see : 'Some Layered Steel Billets')

After getting dragged into some pieces talking about the application of layered steel technique in the Viking Age, I wanted to detail the final production steps of the actual project underway.
(see : 'Reinventing Layered Steels' / ' More on Pattern Welding' / 'Layered Steels - On Materials' )

Note: a number of the images here are fairly large, as they are direct scans shown at life size.

The customer had originally asked to have a knife based on this commercial one, the 'Kalinga' by well known manufacturer Buck Knives. He wanted the blade composed of pattern welded material, with olive wood slabs on the handle.
Now, those who have checked my past work, or other commentaries here on Hammered Out Bits, know that I will not duplicate the designs of other artists. So I cautioned the customer that although I would use the Buck design as a starting point, both the forging process and my own ideas about blades and design would result in a finished knife that would be 'inspired' by, but not duplicate, the reference.

After a false start (read 'screw up wasting three days work') I produced a large flat bar of pattern weld.
The starting stack of plates was : M/H/L/M/I/M/I/M/L/H/M . The finished construction was two twisted rods plus two flat layers with carbon core, with a total layer count of 265.

The process of forging up the starting billet took me three forge sessions (basically three work days). The next day I forged the blade out to rough shape. After drawing a basic point, I cut into the bottom edge (this time!) and lifted forward the material that would form the integral guard. Next the hilt end was forged to shape. Finally the actual bevel for the cutting and false edge where forged. The last step was to even up the overall profile, and ensure the blade was flat and square. The finished forging was then placed back inside the (gas) forge and allowed to sit overnight as the containment cooled, providing the annealing stage.

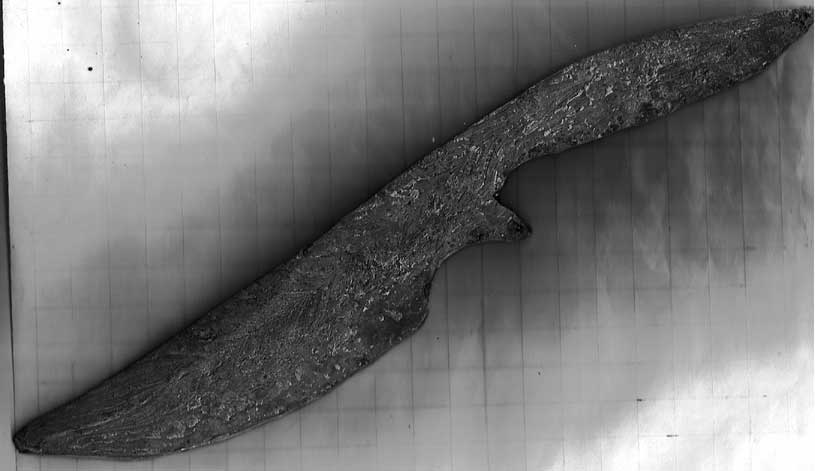
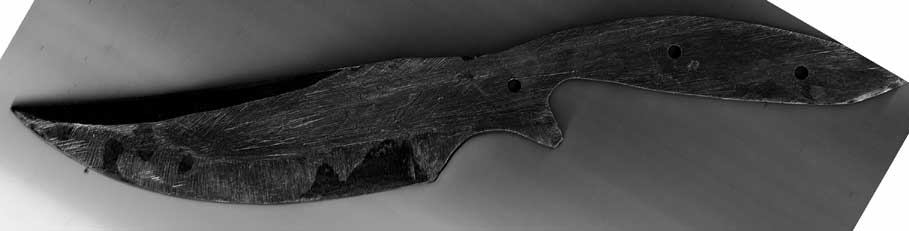
The next work is the fairly tedious process of grinding and polishing. First the rough forging was cleaned up with grinders. A bench grinder was used to even out the profiles. The blank was clamped and a hand angle grinder was used to first clean off the heavy scale from the annealing process. The work with angle grinder was then continued to both generally flatten the various surfaces, but also to cut down to remove any surface flaws. Holes for the final attachment of the wood slabs were made. Add another afternoon work session.

At this point any serious flaws from the welding process are visible. You always hope that there are either none, or that these are superficial cracks that will be removed by polishing.
From here, the next step is to completely flatten the various surfaces, polishing these smooth. I don't have a professional knife grinding machine (several thousand dollars). I do have a 6 x 48 inch belt sander 'hopped up' with a 2 x speed electric motor. Even still, the process of the first polishing step, at 60 or 80 grit, is by far the most tedious. At the same time you have to stay attentive. One slip of angle or position of the blade on the sander gouges the metal. Then the whole surface has to be reduced even further to remove that error. Add another full day work.


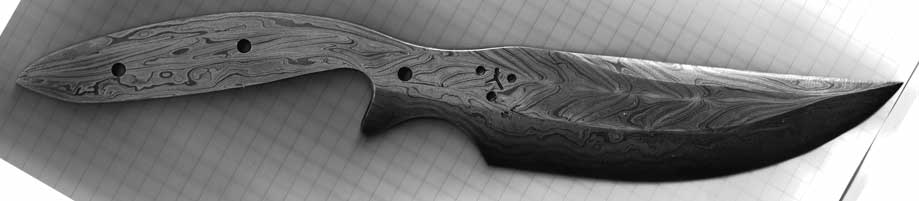
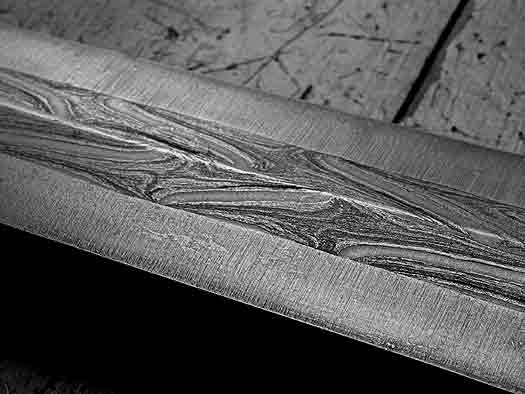
This first polish step is then followed by others. I personally do not find high polish surfaces functional. It also seems pointless to create a mirror polish, requiring many steps, then acid etch that surface off. So I made only one second polish, to 100 grit in this case. The image below shows the right side, with my makers mark clearly hot punched into the base of the blade.


Once polishing is complete, the next step is to harden the blade. The normal for me is to oil quench, as the core of the cutting edge is most typically a simple high carbon tool steel (in this case a 1095 file).
If there are any serious, but hidden, welding flaws, this is when they will appear. Often dramatically!


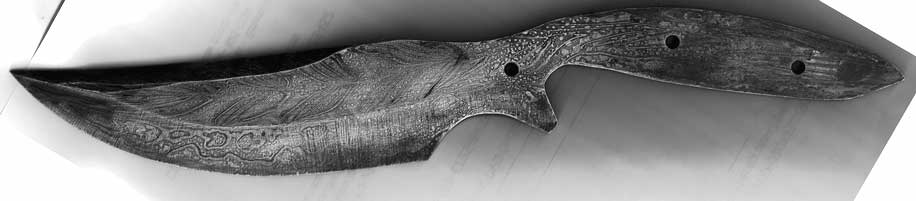
One other thing that becomes clear at this point is a first idea what the final patterning will look like. The differing alloys in the layering oxidize during the heating before quenching at differing rates. The mottled effect seen just back of the blade / hilt line is an effect of oil splashing up on the parts of the metal not submerged in the quench. This is just a surface effect.

The next step is to prepare the blade for tempering. As the temper colours are the effect of a subtle oxide film on the surface, you now have to polish the blade once again. I normally step up one grade, in this case polishing the blade itself to 120 grit. I find it easiest to control the application of heat on tempering with a hand propane torch.


This is a direct scan of the final temper colours. The dark band along the flat of the blade is an effect of the scanning process, and the colours are not terribly accurate. The temper is only really significant for the lower half of the blade, as the carbon core is what is critical to effect here. (Remember the blend of hard and soft layers in the twisted bars along the back automatically create flexibility there.) The bulk of the cutting edge is pulled down to a dark straw, with just a hint of blue to purple at its top. The point has been left at quench hardness.
Now, if this was a plain single alloy knife, there would have to be yet another polishing step to remove the temper colours. Because the knife will now be etched, this extra step would serve no purpose.


Now, those you you who have been following my recent work will realize that normally I like to make one piece knives, where the hilt is just an extension of the pattern welded material. Left to my own choice, I would have skipped the addition of wood slabs. (These of course will cover up the expensive patterned metal!) An extra day's worth of fairly complex steps have been added to reach this point.
For this commission however, the customer wanted to have wooden slabs attached.


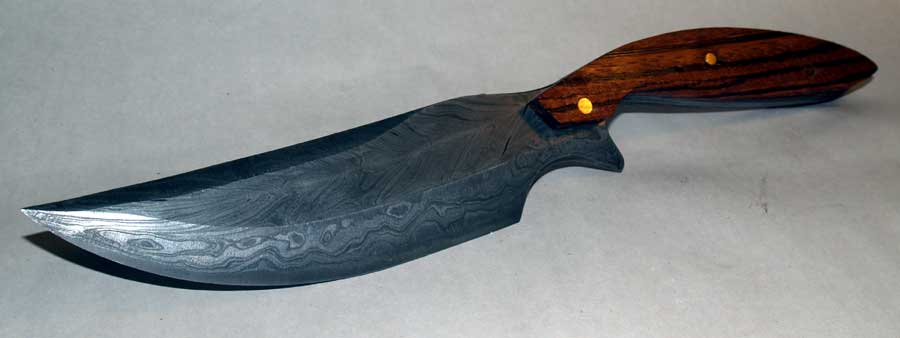
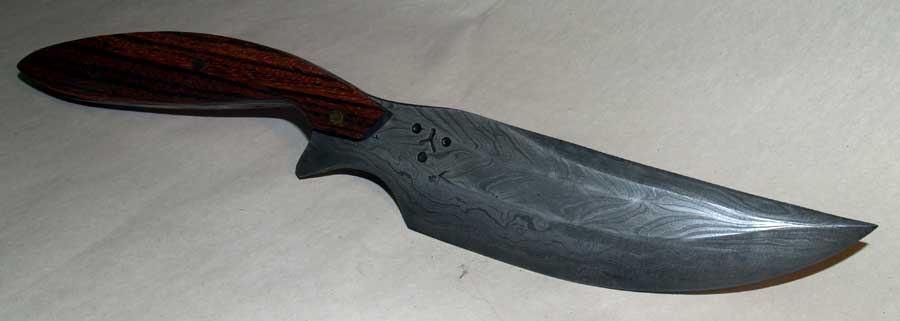
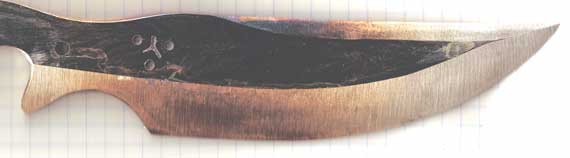
So this is the finished knife, the pattern on either side. Originally the wood slabs were to have been olive wood. It turned out that I did not have enough of that material, and the piece I did have had an extremely un-interesting grain pattern. I replaced the olive with more dramatic African Zebra wood, which had a similar colour range (tan with dark brown grain lines). The supporting pins are bronze. Add another three hours work.

One last thing:

The change in lines from the commerical source pattern allowed me to make a significant change in the handling of the completed knife. You see that the angle between hilt and blade is a bit different, the blade is heavier and longer. These combined to shift the balance points.


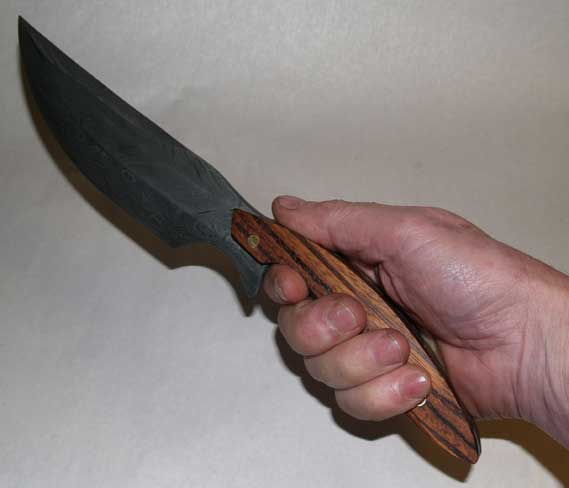
With the knife held in a more 'conventional' grip, fingers in the grooves behind the guard, the heavy blade sets the balance forward. This encourages a heavy, hacking motion, like you would use for cutting kindling. The blade is thicker than common, a full 1/4 inch, and also almost two inches wide. This produces an extremely strong blade that can produce a heavy stroke.


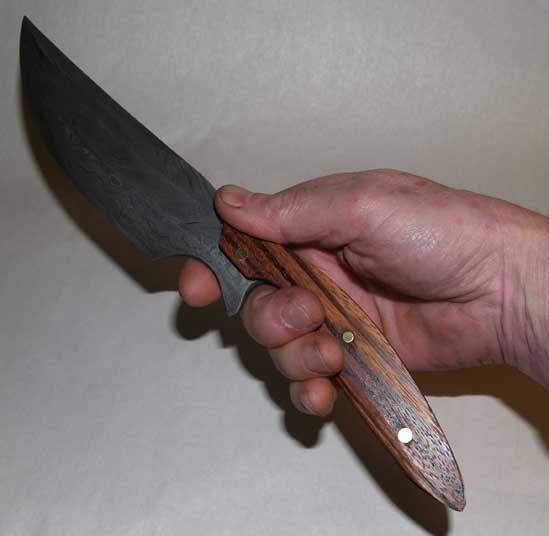
However, I deliberately not only changed the lines at the hilt, I also increased the size of the riccasso (just forward the guard). Gripped with thumb in the groove at the top, and fore finger in the riccasso, the balance shits dramatically. Now the weight sits back in the center of the hand, effectively lightening and 'speeding up' the motion at the tip. The blade ends in a sweeping curve, more typical of skinning knives. Despite the knife's large size (at 12 1/2 inches total), in this grip there is ample control of the front curve for skinning use.


I was extremely pleased with the overall results of the entire process - roughly seven 'shop days' from start to finish.

Tuesday, May 04, 2010

Layered Steels (3) - on Materials

(Part 3 in a series)

I had said in the last entry on this topic set that the pattern is a result of the differing alloy contents of the individual layers in a stack. This is primarily differences in carbon content - so differing hardness.

Right off the start, if you chose certain metals, there may also be a difference not only in chemistry, but also in texture. Wrought or bloomery iron is different not only because of relative carbon content, but also because of the microscopic inclusions of glassy slag. 'Better' wrought iron has less of these inclusions, but the material can vary widely in consistency, even within the same bar. Bloomery iron not only has the same range of slag inclusions, it also will vary in carbon content within a single bloom mass. (Again, there is a lot of material on all this stuff on both here on the blog and the Wareham Forge web site.)

'Layered Test Seax' : Bloomery iron, folded and twisted in the Pattern Welded method. The variations in carbon content within the single bloom caused the subtle lines seen.

Remember that ALL iron metals from the Viking Age would be only bloomery produced. So all have some measure of slag included. Carbon content will also vary considerably. Carbon content is the primary alloy component that determines relative hardness of individual iron metals. The result here is a blade material from this period which can be called 'steel' (iron plus carbon) but is in fact quite different in texture than modern steels. (Correctly called 'bloomery steel' ??)

In modern layered steel making, the smith will pick various alloys - and often production types, to create the maximum differences between the finished layers. Typical choices are:
- Antique Wrought Iron - considerable variation between individual pieces, quite low carbon (often virtually none), slag inclusions - very soft, produces a rope like texture on etching.
Mild Steel - extremely consistent, lower carbon content (1/5 C % typical) - medium soft, produces an even light grey colour on etching
Spring Steel - extremely consistent, but many exact contents available (1/2 % C typical) - medium hard, produces an even medium grey on etching
Tool Steel - extremely consistent, but many exact contents available (1 % C typical) - very hard, produces an even dark grey on etching
Nickel Alloys - extremely consistent, but many exact contents available, both in terms of exact mixture and also carbon contents ('L6', which is 1/2 % C and 0.5 Nickel is common) - medium hard, produces bright silver lines on etching.
'Layered Kitchen Knife' : total of 225 layers, four twisted rods applied to a carbon steel core. The dramatic lines are a result of a mixture of antique wrought iron, various carbon steel alloys, plus nickel content L6. The choice of acid mixtures in the final step also have increased the effects.

Note that the exact effect of the etching process depends to a very significant degree to the exact etching solution chosen. (On my modern work, I use two, Nitric for cutting, Ferric Chloride for colouring.) Viking Age process is limited to vinegars as actual acids, with possible use of salt water or urine more for colouring (controlled corrosion).


So right off the top, you can see that the exact choice of metals will significantly effect the relative hardness of the individual layers, thus the way that polishing would effect a layered billet, even before etching. Note that the exact way the layered block is handled (the annealing / hardening sequence) will also effect just what results polishing may have.

Of course, in the Viking Age, the exact choice of alloys chosen would be more limited than the list above. Right off the top, the only way to employ nickel based alloys historically would be through the use of meteor iron. (High nickel contents of 7 - 15 %, no carbon at all.) This may not be as large a stretch as it might at surface appear, I have seen one study (Museum of London) which suggests a good number of blades (at least in their collection, 1066 - 1400, as high as 10%) show traces of nickel content.

Detail - 'Sword of Heroes' : Two core rods, both 9 layers, with spring steel edges. The iron is the rope like texture, the mild steel the even grey colour, L6 makes the fine bright lines.

Generally however, it may be safe to say that the range of carbon contents for actual VA artifact blades is not going to be as wide as that used by modern bladesmiths. Historic blades will not be able to utilize metals that create texture differences. Although use of nickel alloys is possible, it is more likely to be unusual. All of this is going to result in less dramatic results on those artifact blades.

there is a part four to this, Carbon Migration

Saturday, May 01, 2010

More on Pattern Welding - what and why?

(See yesterday's article - same source.)

Why would you want to layer metals for a blade in the first place?

The reason is what is known as the 'Bladesmith's dilemma' . If you make something out of soft, low carbon, iron - it would be flexible and survive impact. But the edge would not last very long. If you make something out of hard, high carbon, 'steel' - it would stay sharp, but at the risk of it shattering on impacts. A problem for any long, high stress, cutting edge - read sword. Remember that the direct bloomery furnaces used to make metal in the first place DO NOT produce metals like the ones we use today. Quality was more random.

One way to solve this dilemma is combine the soft (for flexibility) with the hard (for edge holding). This basic method is understood by working blade makers in cultures the world over and through history. The simplest example is a rugged tool like an axe. Fold over a long piece of soft iron. Where the two ends meet, insert a small sliver of very hard steel. Forge weld together. When you grind to sharpen, you cut back to expose the hard metal for the cutting edge, leaving this supported by the larger mass of soft metal. (Most VA axes are actually punched and lap welded, but leave that, ok?)

A more elaborate technique (for those who have not bothered looking at the extensive articles on the blog I referenced yesterday dealing with just this topic) is to make a pile of alternating hard and soft plates, then weld those solid.
Depending just when and where you are referring too, there are different traditions of what to do next. (Independent invention in N. Europe, Middle East, SE Asia, Japan).

In North Europe the tradition is to take the layered block, stretch it out to a long thin rod. Twist the rod. Make at least two, twisted in opposite directions. Weld together. Most typically take a *medium* hard piece and weld it around the outside for the cutting edge.
The combination of hard and soft, making that set of reversed diagonal lines, effectively results in two coil springs running up the centre of the blade. This absorbs shock on impact.

Now

You are going to rough forge to shape, then polish. Remember that you have combined a hard and a soft metal. When you polish, the soft metal cuts faster than the hard metal. So in fact there is going to be a subtle difference seen between the two layers. If you are only working with a grinding stone, especially a rotatory one (either electric or hand powered) the subtle effect of hard and soft may not be seen. This gets obscured by the variations caused by irregular grinds.
Once you start to use any polishing system (hand or powered) that employs a hard and flat surface, rather than a curved surface, you will certainly see the effect of differential cutting. I personally go from hand grinder to sander using about 60 grit. Even at this first rough shaping stage, the lines in the pattern can be seen. (And trust me, I just did this exact thing on Wednesday - blog article with step by step photos pending.)

If you look carefully at the full size image (click) you can just make out the lines of the differing layers along the cutting edge. This is a direct scan from the actual blade at life size, made after the first polish step at 60 grit.

There is certainly a big question about just how finished a polish would be applied to historic surfaces. Any blade maker would absolutely require the forged surface to be ground / polished far and flat enough to remove any pits resulting from the forging process. These pits cause stress concentration points - and are most likely to be where a blade will fail (bend or break). All other things (alloy, heat treating, basic method) being equal.
Although it is certainly possible to achieve a mirror like finish with simple sand and leather polishing, I personally consider this unlikely for VA blade surfaces. Remember the bulk of polishing would be done with long bars of sandstone (the whetstones found). If you have never seen any of these, they are huge. Imagine using a bar as long as your arm, almost as big as your wrist. These also provide a long flat cutting surface (see above).

A good number of existing VA blades show quite complex arrangements of twisted bars. Alternating directions, mirror images of straight and twisted section, multiple core rods. There is not any technical reason for this complexity, in terms of function. This has to be the result of a desire for artistic use of the method. This does suggest that some method of making these patterns more visible was also employed historically. The Norse are well known for visible display of wealth / status.
 

February 15 - May 15, 2012 : Supported by a Crafts Projects - Creation and Development Grant

COPYRIGHT NOTICE - All posted text and images @ Darrell Markewitz.
No duplication, in whole or in part, is permitted without the author's expressed written permission.
For a detailed copyright statement : go HERE