Friday, May 08, 2009
HEAVY Forging!
This clip shows the ongoing work for the Reade / Maxwell House project. Part the the assemblage are two structural support beams. Each is roughly nine feet long, made of 3 1/2 by 3/16 side wall square tube. In place these will hold up the open edge of the first floor, where it is cut away to expose the stairs down to the basement - and a wide bank of windows. Rather than use standard round jack posts, I am forging a long groove into each of the flat sides of the tube.
As you see in the video, I am using a cross peen hammer as a top fuller tool. Hammering is done with a four pound hand sledge, as heavy a hammer as I ever work with. Even still, the forging progresses in roughly 16 inch long segments. This is about as long a length as I can bring to temperature in my three burner architectural gas forge. I had designed this forge so that it can be opened up along the front wall, permitting just the kind of work that you see. Each beam weighs something in the range of 80 lbs. Fortunately, last year I had invested in a heavy layout table. The top is a single piece of 3/8 thick steel, 4 x 8 feet. This allows me to forge the beam on the table surface (rather than trying to haul it, while hot!, over to an anvil).
You will notice I am wearing a glove on my left hand. Even with the circular metal shield fitted over the handle, my hand is uncomfortably hot after a forging sequence, even through the glove. In fact my right hand gets too hot, just from the limited time my fist is close to the beam while striking it as seen. The amount of radiant heat off the beam is incredible!


Thursday, May 07, 2009
A Weekend Course - 'What will I get out of it?'
... I am interested in your Blacksmith courses. What I am looking for is a business I can start that involves working with my hands and making everyday items. ... I know a blacksmith will be a life long learning process but what I would like to know is how long will it take me to make simple items I could sell at local markets (pot holders, wine bottle stands, plant hangers, etc.)? Is this a realistic goal? If I took your basic course how much additional practice would I need to produce items with consistent curves, quality etc.? ...
Once again - this article is edited from my response to the question. With the current economic trend, I have been getting an increase in this type of inquiry.
1) Estimated start up Investment - minimum $1200 (of course you may have some of this stuff)
Anvil - $ 300 plus : That assumes you can *find* an anvil, and you get a reasonable price on it. You need at least 150 lbs for any serious work, and figure about $2 per lb is typical in Ontario right now.
Forge - $350 : That's for a professional level cast iron fire pot, brand new (John Newman), and assumes you make up the actual table itself, and use an electric blower. If you use one of the shallow dish forges, those run (Ontario) anything from $100 through to maybe $200 (that's will a small blower). Note that dish forges are not for serious, sustained work. At the bottom end, a brake drum and pipe forge could be cobbled together for maybe $30. A small commercial gas forge runs closer to $450. (Check those sold by David Robertson)
Post Vice - $75 : A lot of variation on price here, assume a smaller 4 inch in reasonable shape.
Drill Press - $250 : a small bench top from some place like Busy Bee
Bench Grinder - $50 : also from cut rate tool supplier
Selection of hand tools - $100 : This assumes low quality, gives you a couple of hammers, pliers, hacksaw, few punches...
Sundry - $100 : Largely expendables, things like coal (Robb Martin), drill bits, sand paper, safety glasses...
Of course, this is just for a simple, almost hobby level set up. To work at a small business level, a suitable vehicle (van or pickup) will be required. A complete sales booth set up with storage containers. Considerably more investment in power tools (band saw, sander, torches, welder). Also the physical workshop itself, which might include a purpose built construction.
2) Time to Target - variable!
Each individual will develop hand skills at wildly differing rates.
An example: I am finding the typical student these days will take anything from 45 to 90 minutes (sometimes more!) to make their first pair of 'S' hooks. Now, when I am on form, I can do the same in roughly five minutes (that's three heats each). Why? I've done it a thousand times!
So the real truth is that you will have the raw knowledge on how to make any number of the individual *shapes* that combine to make simple objects after a weekend Introduction to Blacksmithing Course. The course will certainly not cover all the possible combination of those basic shapes into objects. Most importantly, being able to make some object, and to be able to make it consistent enough and *fast* enough for economically viable production are two entirely different things. That speed and ease will only come through practise and repetition, at a rate that will vary by individual.
3) Goals - "You can have it FAST, you can have it CHEAP, you can have it GOOD. But only ONE of those!"
You can speed your time from first training to viable production by using a number of short cuts: Simple designs requiring limited elements. Cold forming methods in place of hot forge work. Extensive use of jigs and dies.
However, speed gained at the starting end will be skill limitations in the long run. If you make up jigs for all your standard shapes, that will quickly allow you to crank out those standard shapes. You will at the same time seriously limit your ability to progress past the most basic types of objects, and even your simple pieces will have a very mechanical look.
For that reason, in my programs I stress the use of hand forming over the anvil. It makes work harder and slower *at first*. In the end however, skills will develop which allow you to be able to create any form you can imagine.
4) Meat on a *good* weekend Course
A well balanced weekend 'Basic' program, taught by a skilled (and experienced) teacher should give you almost more information than you can absorb. There should be a large amount of practical working time, under close supervision (ie - low student to teacher ratio). There also should be considerable background and theoretical discussion on tools, safety, working methods, applications. I expect my students to acquire enough raw information that it will take several months of practise to refine the skills taught.
A comparison : Students will learn as much in the 18 hours of my own Introduction to Blacksmithing course as I was able to figure out in the first 18 *months* of working on my own.
Other articles you really should read:
'Will you take an Apprentice?'
'A Career as an Artist Blacksmith'
I also refer readers to the details available on my own Courses on Blacksmithing and
Educational DVD
Tuesday, May 05, 2009
L'Anse aux Meadows Smelt - Working Area
One of the specific challenges in the recreation smelt for L'Anse aux Meadows NHSC is working inside the same physical set up that is suggested by the archaeology:
The photograph and illustration above were kindly provided to me by Dr. Birgitta Wallace.
In the photo, the arrangement of flat stones seen in the lower centre are not part of the artifact set. Those stones were placed to protect the archaeological layer by Ingstad & Stine at the close of their original excavations in the 1960's. The largest stone in that area (lower grouping, but upper left) is in fact part of the artifacts.
The illustration to the right has been slightly enlarged (to match my workspace drawing below) and I have added the 1 metre grid to it.
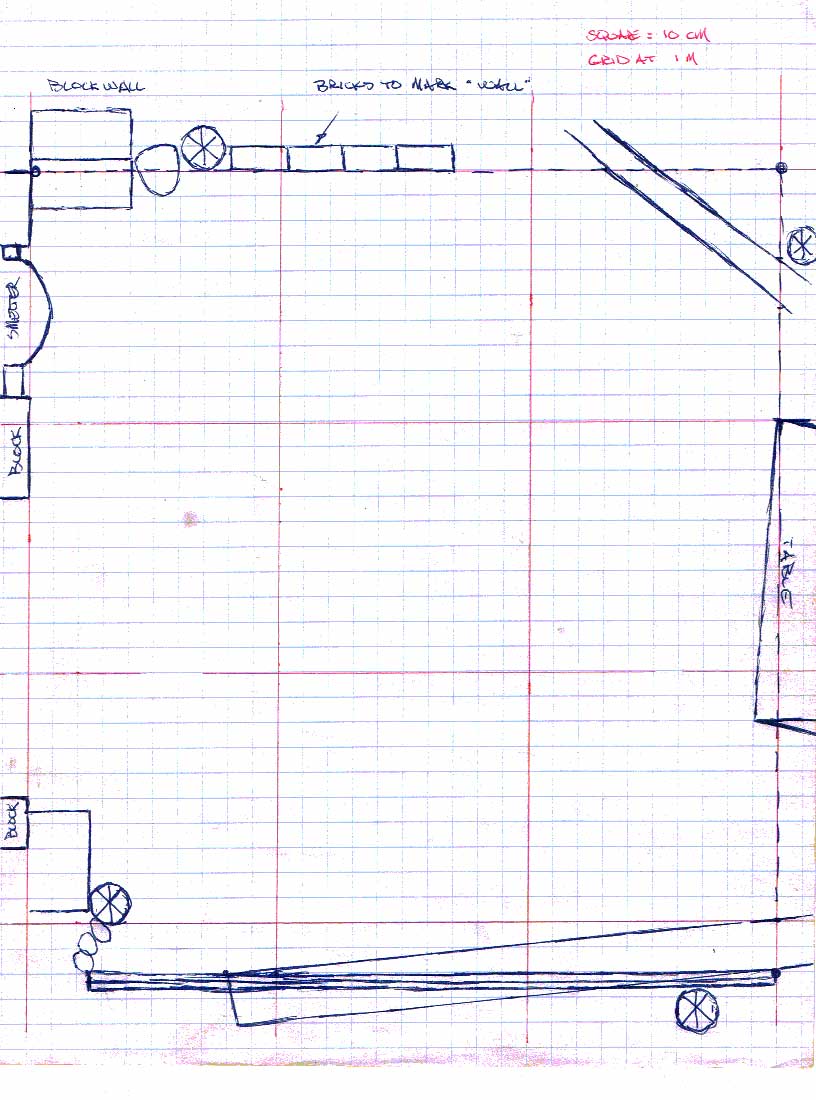
This is a drawing of the current smelt working area here at Wareham, with a scale matching the archaeological drawing above.
You can see that the overall size of building J (what is described as 'the furnace hut' or 'the smithy' in the original reports) is roughly 3 x 3 metres. The exact measurements in Dr Wallace's 1974 report is a width of 290 cm and length of 320 cm. As you can see, we can closely match those measurements under the overhead of our current work area.
In the next posting, I will start talking about just what the archaeology may (or may NOT) tell us about what happened at Vinland about 1000 AD.
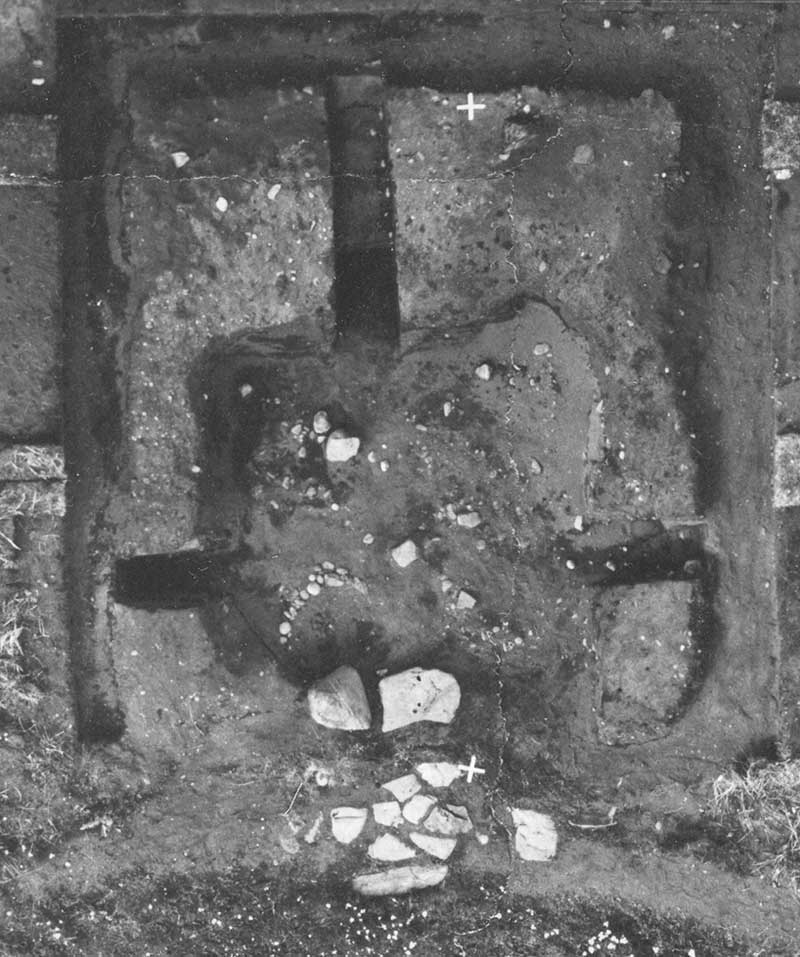 | 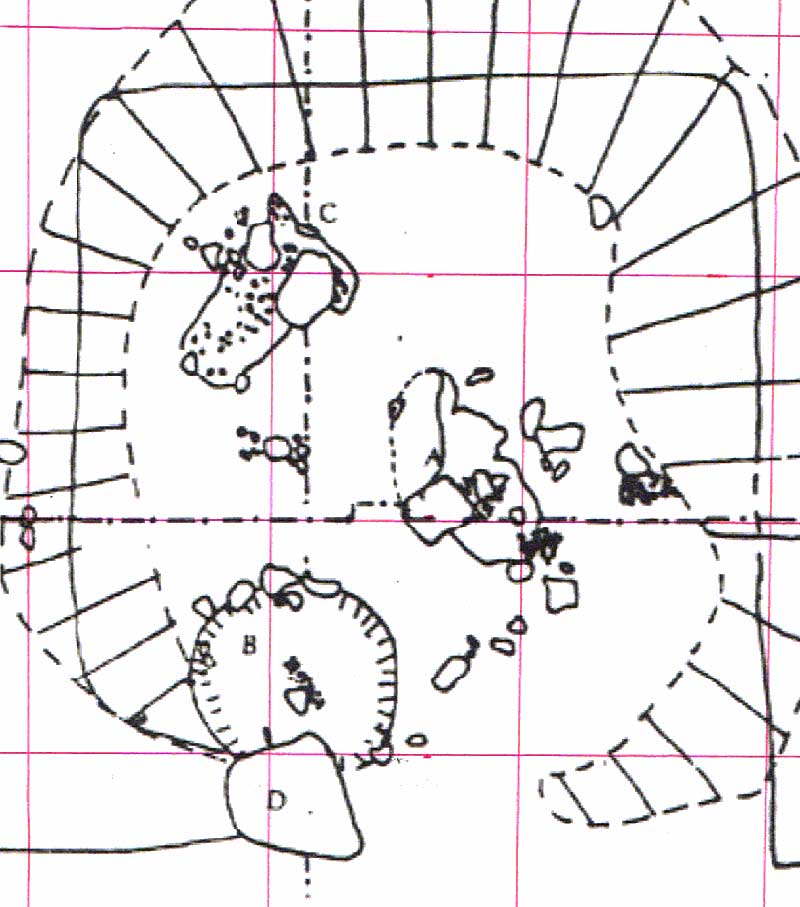 |
| Overhead photo from 1974 excavation | Scaled drawing (1 meter grid) |
The photograph and illustration above were kindly provided to me by Dr. Birgitta Wallace.
In the photo, the arrangement of flat stones seen in the lower centre are not part of the artifact set. Those stones were placed to protect the archaeological layer by Ingstad & Stine at the close of their original excavations in the 1960's. The largest stone in that area (lower grouping, but upper left) is in fact part of the artifacts.
The illustration to the right has been slightly enlarged (to match my workspace drawing below) and I have added the 1 metre grid to it.
This is a drawing of the current smelt working area here at Wareham, with a scale matching the archaeological drawing above.
You can see that the overall size of building J (what is described as 'the furnace hut' or 'the smithy' in the original reports) is roughly 3 x 3 metres. The exact measurements in Dr Wallace's 1974 report is a width of 290 cm and length of 320 cm. As you can see, we can closely match those measurements under the overhead of our current work area.
In the next posting, I will start talking about just what the archaeology may (or may NOT) tell us about what happened at Vinland about 1000 AD.
Monday, May 04, 2009
L'Anse aux Meadows Smelt - Ore Analog
A proposed mix for the DARC Dirt 2 - LAM analog:
A current project now in its initial stages is DARC working towards a possible full scale interpretive presentation at L'Anse aux Meadows NHSC in summer of 2010. July of that year marks the 50th anniversary of the archaeological site by Ingstad and Stine. Part of the presentation by DARC will include an iron smelt, replicating the one undertaken by Leif Eirikson's crew some time about 1000 AD (the first iron production in North America).
Readers can expect to see a number of commentaries and reports on this specific experimental series as the work progresses from the theoretical to the practical.
There are a number of elements that will frame the reconstruction smelt:
- Work inside the confines of the 'Furnace Hut' structure found at LAM. (a roughly 3 x 3 metre space, roofed and open one side )
- Furnace construction of free standing stone slabs.
- Air provided by human powered double bag bellows type.
- Ore used is local primary bog iron ore
- Determination of tuyere type and layout (unknown)
- (on site production of charcoal as related demonstration / project)
- (on site use of stone surface for consolidation process)
The core of the smelt process revolves around the ore. If you have been following the many notes related to experimental iron smelting, you have seen how historically it was primarily the ore that determined the location of the iron smelting. Ore also shapes the dynamics of individual furnaces.
The largest element of the Norse decision to attempt to smelt iron at Vinland around 1000 AD is the ore itself. When the boat crews cut and pulled up the peat blocks to build their over wintering houses, they would have exposed a large quantity of primary bog ore. Now, there are some differences of opinion of just why Leif's crew undertook an iron smelt, but the important fact is that they in fact did.
I had been provided with a small amount of the ore off the archaeological layer, as uncovered by Dr. Birgitta Wallace during excavations in the early 1970's. Of course there are a number of potential problems attempting to match this sample to what might have actually been available (even at exactly the same spot) 1000 years ago. As the formation of primary bog ore is a chemical process with a very large organic component, a change in physical environment could also change the material. More important for this specific series, we certainly will not use actual bog ore for the many tests. (There is a very good chance that even for the on site demonstration this may not be possible. Parks Canada does maintain a very strict 'no environmental impact' policy on all of its sites.)
The original LAM ore sample provided by Birgitta (tested by R. Hansen for Arne Espelund) shows:
Fe2O3 - 89.5
( Fe - 62 )
SiO2 - 1.24
Al2O3 - 2.45
MnO - 5.33
One of my largest concerns right now is about silica content - the components that make the slag bath. Arne had commented back then (and I totally agree) that the archaeological sample was lacking in silica - and would make for a 'dry' smelt. The silica / slag is important for controlling the final carbon content of the metal. Too little slag, and there is a good chance the metal will absorb way too much carbon, resulting in a cast iron material (which can not be forged). Our past experience is with clay structures, which at smelting temperatures melt to create a surplus of slag (if anything). The rock available in Ontario is not a perfect match for the basalt type stone in north Newfoundland. (Even at that, that source stone has to be gathered up off the Canadian Shield, considerably North from Wareham!) The temperatures inside a working smelter are high enough to melt even basalt, but the rate of melting on Ontario types, thus slag creation from the stone, may both vary and be important.
The obvious solution to the problem of available ore materials is to turn to an analog. This is in fact something we have already worked considerably on, building on Robert Gissing's early work on DARC Dirt. I have also been trying to pull together reports and data detailing the chemical components of the various ore types that have been used in past smelts. Comparing it with some of our other successful ore / smelt combinations, it looks like we have got the best results with a silica contribution from the ore of something in the range of 5 plus %, with the combined SiO2 and Al2O3 at roughly 8 %.
Utilizing a 'Black Iron Oxide' from the pottery supply:
Fe3O4 - 93
( Fe - 67.3 )
SiO2 - 3.5
Al2O3 - 3.5
MnO - 0.0
Using that as a base, and if we disregard the 10 % flour mixed in as a binder (as it will cook off anyway and does not effect the iron chemistry), I'm suggesting we add 5 % silica to make for a bit more 'juice. That would leave us with something :
Fe3O4 - 84.4
( Fe - 64.1 )
SiO2 - 8.8
Al2O3 - 3.3
MnO - 0.0
When we mix, the ratio would be 10 % flour, 85 % black oxide, 5 % silica - not counting the water weight. Past experience has shown that a good 8 kg or so of ore is required to establish a working slag bowl inside the type of iron smelting furnace that will be used here. The target yield will be roughly 3kg (plus) as that is the estimate of what was produced originally. With a fairly normal yield expected at approximately 25 - 30%, a minimum of 15 plus kg of ore analog will be required for each full test smelt.
Take a look at a table showing the major components of past ore types
A current project now in its initial stages is DARC working towards a possible full scale interpretive presentation at L'Anse aux Meadows NHSC in summer of 2010. July of that year marks the 50th anniversary of the archaeological site by Ingstad and Stine. Part of the presentation by DARC will include an iron smelt, replicating the one undertaken by Leif Eirikson's crew some time about 1000 AD (the first iron production in North America).
Readers can expect to see a number of commentaries and reports on this specific experimental series as the work progresses from the theoretical to the practical.
There are a number of elements that will frame the reconstruction smelt:
- Work inside the confines of the 'Furnace Hut' structure found at LAM. (a roughly 3 x 3 metre space, roofed and open one side )
- Furnace construction of free standing stone slabs.
- Air provided by human powered double bag bellows type.
- Ore used is local primary bog iron ore
- Determination of tuyere type and layout (unknown)
- (on site production of charcoal as related demonstration / project)
- (on site use of stone surface for consolidation process)
The core of the smelt process revolves around the ore. If you have been following the many notes related to experimental iron smelting, you have seen how historically it was primarily the ore that determined the location of the iron smelting. Ore also shapes the dynamics of individual furnaces.
The largest element of the Norse decision to attempt to smelt iron at Vinland around 1000 AD is the ore itself. When the boat crews cut and pulled up the peat blocks to build their over wintering houses, they would have exposed a large quantity of primary bog ore. Now, there are some differences of opinion of just why Leif's crew undertook an iron smelt, but the important fact is that they in fact did.
I had been provided with a small amount of the ore off the archaeological layer, as uncovered by Dr. Birgitta Wallace during excavations in the early 1970's. Of course there are a number of potential problems attempting to match this sample to what might have actually been available (even at exactly the same spot) 1000 years ago. As the formation of primary bog ore is a chemical process with a very large organic component, a change in physical environment could also change the material. More important for this specific series, we certainly will not use actual bog ore for the many tests. (There is a very good chance that even for the on site demonstration this may not be possible. Parks Canada does maintain a very strict 'no environmental impact' policy on all of its sites.)
The original LAM ore sample provided by Birgitta (tested by R. Hansen for Arne Espelund) shows:
Fe2O3 - 89.5
( Fe - 62 )
SiO2 - 1.24
Al2O3 - 2.45
MnO - 5.33
One of my largest concerns right now is about silica content - the components that make the slag bath. Arne had commented back then (and I totally agree) that the archaeological sample was lacking in silica - and would make for a 'dry' smelt. The silica / slag is important for controlling the final carbon content of the metal. Too little slag, and there is a good chance the metal will absorb way too much carbon, resulting in a cast iron material (which can not be forged). Our past experience is with clay structures, which at smelting temperatures melt to create a surplus of slag (if anything). The rock available in Ontario is not a perfect match for the basalt type stone in north Newfoundland. (Even at that, that source stone has to be gathered up off the Canadian Shield, considerably North from Wareham!) The temperatures inside a working smelter are high enough to melt even basalt, but the rate of melting on Ontario types, thus slag creation from the stone, may both vary and be important.
The obvious solution to the problem of available ore materials is to turn to an analog. This is in fact something we have already worked considerably on, building on Robert Gissing's early work on DARC Dirt. I have also been trying to pull together reports and data detailing the chemical components of the various ore types that have been used in past smelts. Comparing it with some of our other successful ore / smelt combinations, it looks like we have got the best results with a silica contribution from the ore of something in the range of 5 plus %, with the combined SiO2 and Al2O3 at roughly 8 %.
Utilizing a 'Black Iron Oxide' from the pottery supply:
Fe3O4 - 93
( Fe - 67.3 )
SiO2 - 3.5
Al2O3 - 3.5
MnO - 0.0
Using that as a base, and if we disregard the 10 % flour mixed in as a binder (as it will cook off anyway and does not effect the iron chemistry), I'm suggesting we add 5 % silica to make for a bit more 'juice. That would leave us with something :
Fe3O4 - 84.4
( Fe - 64.1 )
SiO2 - 8.8
Al2O3 - 3.3
MnO - 0.0
When we mix, the ratio would be 10 % flour, 85 % black oxide, 5 % silica - not counting the water weight. Past experience has shown that a good 8 kg or so of ore is required to establish a working slag bowl inside the type of iron smelting furnace that will be used here. The target yield will be roughly 3kg (plus) as that is the estimate of what was produced originally. With a fairly normal yield expected at approximately 25 - 30%, a minimum of 15 plus kg of ore analog will be required for each full test smelt.
Take a look at a table showing the major components of past ore types
Subscribe to:
Posts (Atom)




 Posts
Posts