Monday, March 30, 2009

Smeltfest 09 - Preliminary Overview

(Back to some iron smelting!)

Once again this year, Lee Sauder of Rockbridge Bloomery invited a small select group of fellow researchers (demented crazies) to spend a week at his home and workshop in Lexington Virginia.
(L-R: Sheldon/Lee/Dick/Skip/Steve)

This year the participants included his long time smelting partner Skip Williams, knifemaker Jesus Hernadez, Dick Sargent (Peter's Valley Craft School), Sheldon Browder & Steve Mankowski (Colonial Williamsburg) and myself.

Our focus this year was the 'Aristotle Furnace', based on vague historic descriptions which had been researched and initially tested out by Skip Williams. He had introduced us to the system at last years Smeltfest *. This year we concentrated on trying to both understand the variables and get a working method established for this furnace.
Skip's original test furnace (with our standard 'one pepper' scale!)


In brief this furnace acts as a small and quick acting re-melting hearth. Iron introduced into the top falls and melts, absorbing carbon and collecting into a metallic 'puck' in much the same way a full scale bloomery furnace converts iron ores. In this case however, the product is a higher carbon 'steel' material. The process takes from 12 to 20 minutes, and consumes very little charcoal.
Lee just about ready to extact a test mass

Over the 7 days of Smeltfest, some 30 individual tests were run. Variations in tuyere size, placement and angle were tested out. The individual pucks were consolodated to bars, and further polished and etched to determine carbon absorption into the mass.
Samples from Monday's series


Test Series
continues

Wednesday, March 25, 2009

Forging the BIG time

(Note to my regular readers: I spent from March 12 through 20 in Lexington Virginia at Smeltfest 09, hosted by Lee Sauder. Along with his long time collaborator, Skip Williams, the team also included Jesus Hernadez, Dick Sargent (Peter's Valley Craft School) plus Steve Mankowski and Sheldon Browder (Colonial Williamsberg). Expect field reports soon on this extremely illuminating week, concentrating on the Aristotle Furnace.)

Back to Wareham, and back to work!

After a long development process on the designs, I am now concentrating on the physical work for the Reade & Maxwell House project.

The first pieces under production are a pair of heavy support beams that re-enforce the first floor along the edge of an open concept stair well. Each is formed from a single length of 3 1/2 square tube, 3/16 thick - just over 100 inches long and weighing in at roughly 75 pounds.
Not to leave well enough alone, my design calls for each of these to be forged, with a shallow grove hammered down the centre line of each of the four sides. This is accomplished by using a heavy cross peen hammer as a die, striking it with a four pound hand sledge. ( I had started work using a top fuller with a more conventional 'straight peen' alignment. This put my left hand over the hot metal - which even in gloves gave off WAY too much heat as I worked along the section.)

The first trick is heating up such a long and massive piece of material. My homebuilt 'architectural' forge is designed with three burner ports along the upper surface. This forge also is framed so that one side can be removed, allowing large pieces to be inserted sideways. Placed so the propane jets wash down one side of the beam, one surface at a time, about 18 long, can be brought to a low orange. As seen in the image above, during heating the beam is supported on regular bricks to either side of the gas forge. (This keeps the weight off the more fragile fire brick insulating the forge.) It took about 5 - 8 minutes to bring each individual section up to forging temperature.
The second trick is physically manipulate the beam. Fortunately I invested in a heavy layout table last year - topped with a full sheet of 3/8 thick plate. The construction is rugged enough to allow the hammering to be done using the table top as a giant anvil. After each short length was contoured, I rotated the beam a quarter turn and levered it back up and into the forge to heat another segment.

This shows a finished section of the beam. A shallow groove has been hammered along the length of the originally flat surface. The metal has been depressed about 1/2 inch deep, and is slightly irregular in both depth and location. The end result is a far more organic contour to the entire beam. This is in keeping with the overall 'sea to sky' concept for the entire project.

More to Come!

Wednesday, March 11, 2009

Traveling with Marine Mammals

A recent discussion on Norsefolk

" I still think you can get walrus ivory from the people in Alaska. Bog
iron, would be rare as hens teeth and possibly a museum specimen."


As modern people we live in a complex world, with differing national laws and the reality of international travel and Customs Officers to deal with. Although the following is targeted to North Americans, I strongly suspect this advice may apply in spades to those living in Europe:

As Canadians, we get so used to the fact that the rules governing ownership (much less transport) of various natural materials within our country are quite different than those in the USA. There is also a further complication, in that Inuit people are legally allowed to hunt and kill some of these animals, where for others it is illegal (whales the best example. Ownership of the parts of the animals can be from beach finds - I had a small amount of whale bone for example, picked up as drift deposits. From things I had been told by my friends in Ostvik and Longship, I gather that inside the individual states, there can be a further range of limitations. Be well aware that Customs Officers have absolutely NO sense of humour, terrifying powers, and the ability to work on their individual discretion.

As Norse re-enactors, we all may be interested in three broad sources of raw materials which may prove a problem at Customs : walrus / seal / whale.

Walrus is legal to own in Canada (just darn difficult to get a hold off). It is however NOT legal to transport it across into the USA. (I was lucky enough to have brothers working up on Baffin Island for a while, so have a nice walrus tusk and a length of walrus hide rope. These stay safely at home when travelling south!) I have been given to understand the ownership of walrus products is severely limited within the Continental USA, because of the condition of the wild animals in Alaska. I can not tell you if *transport* is the problem, or if mere ownership is restricted in the USA.

I do know that transport of seal products is also limited and controlled. Some individual states in the USA have banned transport across their boarders. There is no limitation on seal products inside Canada. I can not tell you if this applies only to raw skins and parts, while allowing for finished goods (like boots or mitts). When I was working on World of the Norse back in 2002, I know I could transport finished objects, but not the raw skins (that was into Michigan).

Whale is a special case. I believe that mere ownership is permitted, but the source is extremely limited. Also almost impossible to access any.

Any of these materials may be sourced on the black, grey, or open legal markets:

Openly legal sources of supply will involve some form of government control - in the form of certificates of origin or official stamps. As might be expected, large increases in cost also occur. The most likely application of this would be seen in things like skins (fur animals or seal).

Grey market usually involves purchase from those legally allowed to hunt and kill, again most typically First Nations hunters. This gets to be a mess, as by strict definition of the laws, these materials are not to be re-sold to other Canadians unless the materials pass through the Government Agents (see above). Practically, this is hardly even enforced on a small case basis. (One example of this, fishermen in Newfoundland who sell seal skins from animals caught by accident in fishing nets and drowned. Technically they are required to destroy these bodies, and not even make personal use of them.)

Black market (white guys killing endangered animals and selling) is to be avoided - period. (yes - that is an editorial)

We should remember that at least in Canada, it is not technically legal to sell any products from a legal hunt of native game. So that includes things like deer antler. These restrictions are in place to try to limit poaching. Knifemakers, for example, are generally selling non native species (Stag from India as a common example).


I would be quite happy to be proven wrong on any of these details. Truth is, that you are taking a huge chance if you attempt to transport any natural raw material across an international boarder. The least severe punishment is simple confiscation.

This situation also applies to domestic animal products! As Canadians, we are still suffering from that single case of BSE in Alberta years ago (it was a cow from the USA to begin with).
- No meat products - like even a sandwich - will be allowed across into the USA. (And yes, I have seen submarine sandwiches seized and tossed!)
- Cheese may be questioned, as raw milk cheeses are not allowed.
- Raw fleece is generally not allowed, by strict application of the rules, these must be chemically washed first.
- Leathers are fine - but not any hide which has simply been stretched and dried. Anything with fur on is likely to be given a close look. (I have been questioned about tanned sheep skins with the wool remaining.)
- No natural timber may have the bark remaining. This applies to any tent poles. Customs Officers have been known to be sticky about anything that looks like an unworked plank (!!)

I would expect the situation in Europe to be even a more tangled mess. I have been told that with the EU, now passing from country to country has been greatly simplified. Hope some of our European readers can comment. (Iceland, for example, allows consumption of all the marine mammals.)
We all work way to long and hard to transform natural raw materials into the stuff of our encampments. My best advice - if there is any doubt, just leave the object safe at home.


There had been considerable research into these problems and limitations over the USA - Canada boarder in 2000, with members of both Ostvik and Longship traveling into Canada from their home bases in the Maryland region to Norstead. I had to become informed about transporting a large number of differing materials and objects when I created 'World of the Norse', which was delivered to the Cranbrook Institute of Science in Michigan (2002). The Dark Ages Re-creation Company has also undertook a number of large scale Viking Age presentations at the Haffenreffer Museum of Anthropology in Rode Island in the years since. I personally have found the office of USA Customs at Buffalo NY extremely helpful over the years. When in doubt, it is my strongest suggestion that you merely call the indicated Customs Office well before your trip.

Wednesday, March 04, 2009

No - I really DID mean to do it that way...

Yesterday I welded the curved elements which hold the glass in place as the last part of the Graham door panel.

Now, there was a fair amount of adjusting that had gone on to get the previously forged bracketing pieces to fit correctly. Each had to slot into the mouth of the pipe uprights, hold the glass firmly, fit into the other elements - and hopefully all look good. This was all fiddley work, made worse by the recent -15 C temperatures. The work was done on my large layout table, which sits in a part of the workshop with no heat at all, and remember the metal itself is at that temperature!

I had laid the brackets out in pairs, then carefully moved each set together into the heated 'clean studio' for painting. First the whole element was given its black paint, and allow to dry. Then a layer of plastic coating (normally used for tool handles) was applied to the inside of the curves. This would allow some flex between the glass disks and the supporting brackets. Next the disks were put in place, covered with cardboard and taped securely between the brackets. Each was carefully lettered to maintain the order I had carefully maintained through the whole process.

Then I took the brackets and welded each into its matching uprights. The image bellow is the result...

Notice anything odd? Well, the finished bracket and disk combinations just did not fit the way I had originally laid them out. I ended up moving them around at the last minute to get them to both fit and look just right.

hmmm - that reminds me of a story from history...


The Derrynaflan Paten - type of shallow metal plate for holding the bread during the Eucharist - was assembled by Celtic metalworkers from over 300 separate components. The dish is made from beaten silver, trimmed with silver wire mesh bordered by a ring of gold filigree panels.
from Encyclopedia of Irish and World Art

A good long time ago, I had attended a casual lecture by Michael Ryan, curator of the National Museum of Ireland in Dublin. He was a guest instructor at the University of Toronto, this would have been the early to mid 1980's. He had been talking about Irish metalwork, especially objects from the period of Celtic and Norse interaction in the 800 - 900's. One of his featured examples was the recently uncovered Derrynaflan Hord

In the process of examining, preserving and preparing the paten for exhibition, the individual decorated plaques set along the rim of the plate were removed. Underneath was discovered a series of numbers scratched into the silver plate, with each of the individual plaques also numbered. The kick was that the numbers did not match! For some reason, at the point of finally assembly, the metalsmith either changed his mind - or just plain screwed up. Dr Ryan also suggested another possibility, that this numbering might indicate that the silver plate and the gold filigree panels had in fact been created by artisans working in different, perhaps widely separated, workshops.

"Life imitates Art" ?

Tuesday, March 03, 2009

more on ULFBERHT...

In a conversation with Michele Smith, the question of 'How many are there?' came up. Michele (generally more 'with it' than I am) obviously did a fast Google search for 'Ulfberht' and came up with this:


Photo: Leiden, Rijksmuseum van Oudheden, Netherlands
Sword with the inscription „Ulfberht“, discovered in the Maas near Lith, the Netherlands, 950-1000 A.D.
The inscription "Ulfbehrt" does not refer to the owner of the weapon, but rather to the smith who forged it. Ulfbehrt was a very well-known Frankish blacksmith, whose products were highly coveted because of their high quality. "Ulfbehrt-Swords" were found in many parts of Europe (166 blades in 23 European countries), with an especially high number found in Scandinavia.


This excerpt is from the exhibit 'Die Wikinger' (The Vikings) at the Historical Museum of the Platinate, at the town of Speyer in SW Germany.

Although the exhibit has (just!) closed, the web site is worth a look.

Lectures - Forward Into the Past

17th Annual Symposium
Saturday April 4
Kitchener, Ontario
FITP web site

I will be presenting the following sessions:

'Exploring the Viking Age in Denmark'

In spring of 2008, Darrell undertook a two and half week trip to Denmark. The primary reason was to attend the 'Iron Seminar at Thy' - meeting and working with other experimental iron smelters. Much of the rest of the time was spent in museums, especially focused on the Viking Age collections. This illustrated talk will be an overview of what was seen and experienced, both in the museums and while traveling across Denmark.

'Towards an Icelandic Smelt'

This session is a field report on the current experimental archaeology series being undertaken by DARC. Recent excavations by Kevin Smith at the Hals in Iceland have uncovered a Viking Age 'industrial' iron processing site. Using clues from the archaeology, is it possible to re-create the physical iron smelting methods which may have been originally used?

'To build a Tent - Camping in the Viking Age'
(joint session with Meghan Roberts)http://www.blogger.com/img/blank.gif

So there you are, Norse and in need of some overhead cover while traveling. What do you do?
A 'friendly argument' presenting two alternate points of view : the A frame versus the Geteld. We will each make our case historically and practically, plus take a look at the evidence for some alternatives. Includes a discussion of plans, materials and construction tips for would be tent makers.

These are my tentative lecture topics (at this point) stay tuned for details...

For more information on the event go to the

Monday, March 02, 2009

'ULFLBERHT' - or not (a test method)

One of the oddities of history is that we know the name of a single swordmaker, most likely living near modern day Solingen on the Middle Rhine, in the mid 800's. These excellent quality blades are inlaid with that maker's name, with the earliest found dated to about 850. There are a huge number known * with deposit dates spanning more that one mans life time (the latest is deposited about 1100). The raw number of surviving samples and the spread of dates suggests production in a 'workshop' spanning several generations.
(* I was not easily able to get a total count. Peirce's 'Swords of the Viking Age' states "Some thirty to forty examples with the name Uflberht are known in Finland". Since that is some distance from the FranKish origin of the blades, and also only a small portion of the active Viking Age, the total number in existence must me quite large.)

Uflberht swords all have that makers name inlaid into the blade. The rough forged blade was engraved to create a channel. Into this channel was inlaid strips of metal. In a number of cases, this inlay was made of pattern welded material. The channels were undercut, allowing cold hammering of the inlay material to lock it into place. Then the blades were heated, and the inlays forge welded into place. After polishing, the difference between the metal of the body of the blade and this inlay would be subtly visible.

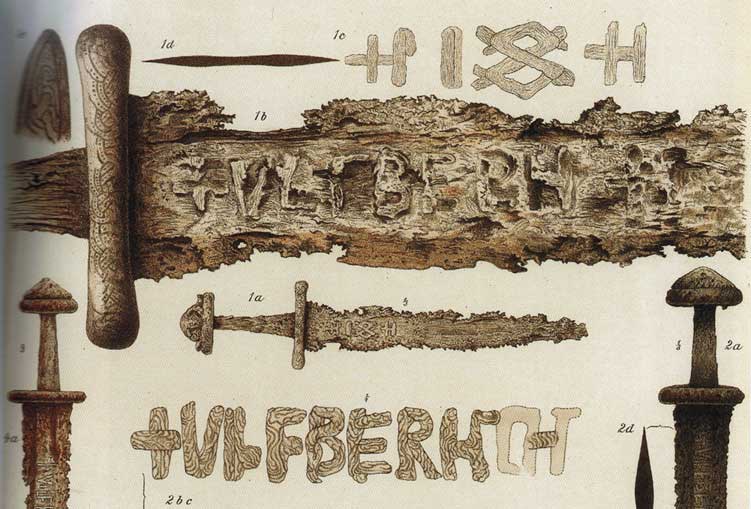
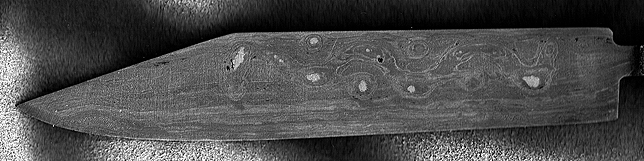
Image(right) taken from 'Swords of the Viking Age' by Ian Peirce - original caption:
'Examples from the collection of Bergens Museum, Norway of +ULFBERHT+ twisted laminated rod iron inlaid inscriptions ... Plate 1 from A.. Lorange, Den Yngre Jernalder Svaed (Bergen 1889)'

I had been contacted by Elizabeth Ward, who I had worked with on Vikings, North Atlantic saga, back in December. She was now working on a new exhibit for the National Museum in Iceland. (A project which got completely fouled up by the Credit Crunch and problems with the major banks in Iceland.)

One of the objects she was potentially interested in having reproduced was an 'Uflberht' sword. I certainly have never attempted this method! On the advice of my friend Neil Peterson, I contacted a couple of other smiths who have much better experience in sword making than I do. ( This on the assumption that I do no damage to my own reputation by knowing when its time to recommend others with higher skills than my own!)

Jake Powning is another Canadian, I met him at CANIRON 5 when I was demonstrating VA iron smelting there.
Jake's work is truly amazing. Normally he produces blades one at a time, not on commission. He personally said he had never done the pattern weld inlay technique seen on the original Uflberht blades. He called me and we pushed this around for about an hour. We both had similar ideas on just how you might accomplish this using historic methods.

He recommended yet another fellow - 
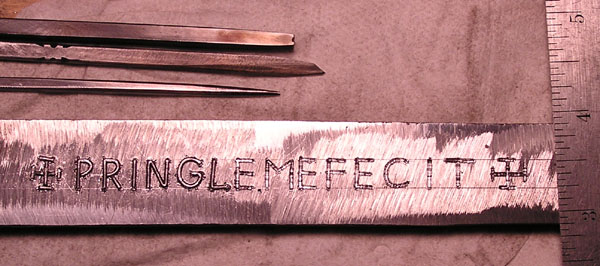
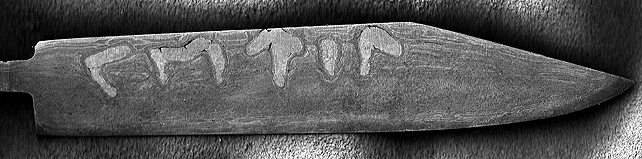
Jeff Pringle out of California (who unfortunately does not have a web site). He has actually done a number of Uflberht blades using correct methods. You can see an image on Bill Short's web site on VA swords (very good information there - Bill works with the Higgins Armoury Museum)

Near the top is a sword with the inlay copper and silver, down near the bottom is the correct Ulfberht method of welded strips on an iron core.
Jeff wrote me a short description of how he does this, along with the images below. He said
"The welding on an Ulfberht is easier than on a multi-bar composite sword, the difficulty is in the precise forging needed to make the inlay come out correctly on the finished sword..."
(Maybe easy for YOU, Jeff!)


Carving out the groves using large engraving style chisels


A finished blade, here inlaid with the maker's name 'PRINGLE'.


Knowing I was well out of my own skill depth, I considered how I might create a similar effect to the historic engrave, inlay and weld method:

First I forged out a billet from some of the good quality 'Ohio Bridge' wrought iron I have stockpiled. This material all from the same bridge, originally built in Ohio about 1860. It is wonderful material, well consolidated and relatively clear of slag inclusions. It does display an wonderful texture when surface etched. The starting billet was about 6 1/2 " long by 1 1/4 " wide by 5/16 " thick.

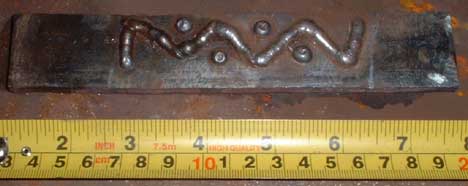
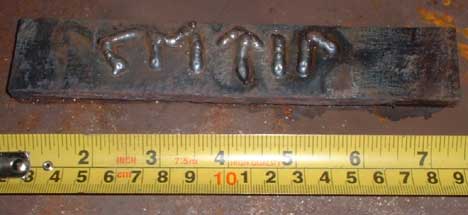
On to this surface I laid on some lines of mild steel using my small MIG welder. I tried to keep the patterns as straight and clean as I could, building up a bead about 3/16 inch above the surface.

One side had a 'line and dot' pattern.


The other had the makers name Kettil (CETIL) in runes.


Next I hammered the billet flat, compressing the raised lines to flush with the surface. In retrospect, this might not have been the ideal way to proceed. The mild steel and the underlaying wrought iron have different hardness. The raised figures did compress and spread, but also collapsed the softer iron underneath them. This resulted in significant gaps along the edges of the figures, which showed as cracks in the billet surface. The slight difference in oxidation rates between the two metals shows in the images below:

Forged line and dot


Forged runes


Once I had a flattened billet, I forged it into a large seax blade.
The cracks around the edges of the patterns came back to haunt me during the polishing stage. The blade was shaped to the classic Norse V grind, which alone generally means more polishing work to get to the final profile. I ended up taking a lot of material off both sides in an attempt to remove all those cracks.
The finished blade is 8 inches long, 1 1/4 " wide at the tang end and 1 1/2 at the start of the diagonal clip to the slightly raised point, and 3/16 thick at the back. Polishing was at 80 grit, and the finished blade was lightly etched in ferric chloride.
The images below are direct scans, reduced to grey scale. (click for the enlarged versions)


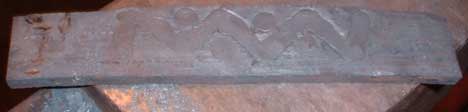
Finished line and dot (left side) : above - life size / below X2


On this side you can see that most of the flaws have been ground away. This also has removed almost all of the mild steel deposit. The pattern is still visible from the compression of the wrought iron, resulting in distortions of the linear texture of that base material. The mild steel shows as light grey patches, mainly on the dots.


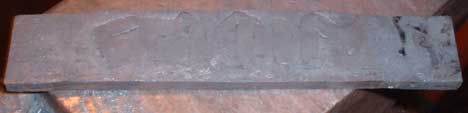
Finished runes (right side) : above - life size / below X2


On this side the surface was not sanded down quite so far, you can still see some of the remaining cracks along the tops of the first two letters. This has resulted in a thicker deposit of the mild steel remaining in place. On this side is also visible a wide band that is a result of the random composition of the wrought iron.

On the whole, I am fairly pleased with the results - at least as a test of concept. A couple of modifications suggest themselves:
- Hot punch the pattern lines as a first step. The weld beads would then be set below the billet surface. Instead of pounding in (creating cracks) the excess weld material would simply be ground flush (quickly with an angle grinder)
- Substitute stainless wire for the mild steel in the MIG welder. This would produce significantly more contrast at the final etch. It also would allow the technique to be applied to mild steel as the base material.

Obviously this is NOT a substitute for the historical inlay method. It does however suggest design possibilities of its own. Adding patterns on to plate, then forging the flat plate into bowls as one idea...
 

February 15 - May 15, 2012 : Supported by a Crafts Projects - Creation and Development Grant

COPYRIGHT NOTICE - All posted text and images @ Darrell Markewitz.
No duplication, in whole or in part, is permitted without the author's expressed written permission.
For a detailed copyright statement : go HERE