Thursday, July 26, 2018

Bellows for Iron Smelting (the measurements!)

Recently I was asked by my friend Mark Pilgrim (interpreter at L'Anse aux Meadows NHSC) for the actual measurements of the iron smelting test bellows I built for the 'Vinland' series. This unit would also influence the theoretical design of the 'Icelandic/Hals' series.

'Smelt Test Bellows' - shown as part of the Icelandic furnace layout.
As it turns out, although there are some earlier postings here describing this test bellows, I never actually published any physical measurements of the unit.
I refer you to these past postings on Bellows Reconstruction : 
ONE / TWO / THREE / FOUR
Rough Design with measurements

Depending on the operator, this bellows has been found to produce air volumes in the range of 700 litres per minute.
In practice it has turned out that this unit, over the course of a smelt in one of our 'standard' furnaces (about 25-30 cm ID), produces air = burn rates a bit on the low side (more typically in the 12 - 14 minutes per 1.8 kg charcoal burned). The net result is usually lower yields, into the range of 20 % return.

In comparison, the same furnace, with identical ore - but with the higher volume electric blower, produces higher quality results. (Both in terms of bloom density and yields into the 25 - 30% range.)

Sunday, July 22, 2018

July & August = DECK CONSTRUCTION

After a very heavy teaching rotation over May and June, I am withdrawing from forge work over the next two months.The reason is that extensive repair and renovation work is required to the second floor deck here at Wareham. (1)

My residence building at Wareham dates (I think) to the construction of the church next door - about 1930. (My building was originally constructed as a horse/drive shed for the church goers.)
The building dimension is roughly 60 x 60 feet. It is constructed of poured concrete walls to about 8 feet, with salvaged timbers as the framing for the roof, full tree lengths as the roof joists.
These timbers are hand hewn barn beams, mostly to about 12 x 12 inches, a mix mainly pine with some hemlock. These are most certainly older than the original building construction. A number of cut nails have been found embedded over the years. (This, along with local settlement dates, suggests post 1850's to about 1900, likely towards the earlier dates.) (2)


Original deck (left) and lower cantilevered section - during dismantling
The main deck structure dates to the conversion of the original Church Shed into a residence, which was undertaken from 1987 through Fall of 1989. (I purchased the property in November 1989.)
Now, there were a *lot* of problems with the construction of this residence conversion. One factor that impacted the durability of the second floor deck was that there was no waterproof flashing applied between the deck framing and the underlaying wall beam.
I had constructed a second level deck surface, cantilevered out from the main support uprights, some point about 2000.
Additionally, I had made some attempt to brace and strengthen the original upper deck framing about a decade back. Significant water damage was obvious even then.
The massive work and cost involved in replacing the entire deck structure caused me to keep putting off the required repairs.

Showing the additional framing members added about 2008 - now also failing!
Removing the top deck planking - exposing water damage to framing.
A surprise I certainly did NOT want is what I found when I pulled off the board attaching the deck framing to the upper wall beam :

Where the original deck was attached to the wall
Close up view = 20 years of water damage
To allow for the new construction, I have laid a new 2 x 10 plank over the damage surface of the main beam seen above. I wire brushed off as much of the loose wood rot as I could, then applied an insecticide (just as a pretentative measure) first. A set of 3/8 diameter lag bolts, 6 inches long (countersunk) hold this new plank in place. This gives me at least a flat extension of the wall surface to mount the new deck framing to. Some of the damage seen is also from red squirrels who have made a home through this area. You can see the 2x4 pieces set between the existing floor joists, fitted tight to both block the squirrels and also help support the second floor (made of waffer board - not plywood!) (3)

Panorama of the construction - upright bases being mounted, deck still being demolished (July 15)
Why is this a Wareham Forge project?

Long term plans for work at Wareham include finishing replacing the (incorrect) support pillars in the workshop area. Right now the pillars that help support the entire roof structure are rail ties and hewn beams - sitting on dirt. (Not even a stone base, much less actual concrete footings! Over the years, individual posts had frost heaved up, then dropped away - to a total of as much as 6 inches of gap in one case. (Blocked up with bricks and board shims on a yearly basis!) One side of this construction was undertaken three years ago (four supports) with the aid of Kelly Probyn-Smith. (4)

The long term goal, is to finish the current rough loft level in the workshop area, into a proper studio space. Right now this area (potentially about 20 x 20 feet) has some rough plank flooring laid over the support framing. It is used only for storage of long steel, wood planks, and larger pieces of things like Viking 'A' frame tents. Current access is just via a ladder (or a narrow half sized door in the corner of the upstairs living space).

Scaled plan (draft) - new deck replacement / extension (south to top here)
Part of this overall plan is to modify the roof line, along the existing south side kitchen wall. By extending the roof slope off the residence side, this will create a short 'pocket' - allowing entrance into the loft space. A door will be added to the exterior on the east side allowing access to the outside. The current small window in the kitchen will be replaced with a narrow door - allowing direct access to the loft space from the second floor living area.
The deck itself will be extended as seen above, wrapping around 2/3 of the north wall (from the replacement of the current deck off the sliding doors). Although not illustrated on the first draft plan above, the new decking will wrap from the residence NE corner, extending back to allow a for entry into the new loft exterior door. The stairs decending from the new upper deck level will run out straight from this end / door towards the east (also not illustrated).
The new deck area will be roofed over with fiberglass panels, extending the existing roof line on the north side. This will divert water *off* the wooden structure - thus eliminating the kind of water damage caused by the original construction. An added bennifit will be also shifting the snow load down away from the deck surface (not a trivial problem with snow amounts at Wareham, compounded with the metal roofing.)

Beyond the basic increase in available studio floor space, certainly the creation of easy (and much safer!) stair and level access to the loft space is important.
Both Kelly and I have become increasingly interested in the potentials of work with ceramics - and have been slowly acquiring all the major equipment required.  (Including, at date of writing, a massive 36 inch ID electric kiln and a potter's wheel!)

So - if you had been wondering why there has not been any new artisan blacksmith work being reported...


(1) Curiously, I don't know who placed the core of this reference on Wikipedia.
Especially the part related to 'It is the home of Darrell Markewitz...' (!!)
The part in quotations was placed by myself (July 22). This is based on my memory of information given to me by Susan Thompson, who was resident in the Church at the time I moved in. (The Thompson's had undertaken the conversion of the Church building into a residence, starting something about 1985.) I had some paper documentation describing the early history of Wareham - but of course can't find that as I compose this entry.

(2) Dating via objects like nails is always quite tentative. 
- Machine cut nails are introduced about 1810, the specific style found at Wareham start about 1830.
- Availability is certainly going to shift towards the later dates (especially for a rural Ontario location).
- New types (wire nails = post 1890) also take considerable time to both become available, and importantly replace existing stockpiles of older types. 
(see 'Using Nails to Date' )

In this case, there is also the dates related to both European Settlement (post about 1850) and development lag (The first structures would have been smaller, round log. With primary effort going to clearing forest for farm land, there have been considerable delay before the expenditure of effort involved in larger, more elaborate structures.)

(3) When we purchased the property, the second floor came covered in quite horrible, recycled, shag carpet. Over the first winter, I replaced the flooring with 5/8 thick solid pine planking. This also effectively helps distribute the weight loading over that 1/2 waffer board used as the sub-flooring!

(4) This proved a massive job! 
First, about 1/3 of the workshop area needed to be cleared out. 
Next, the main horizontal beams had to be jacked up, taking all the load off each of the existing 'supports'

Friday, July 20, 2018

Summer Solstice Iron Smelt : REMAINS

The objective of the regular early summer experiment was further investigation of the 'Slag Pit' style furnace - tentatively described as 'Celtic Iron Age'.

Refer back to an earlier postings for the :
build / experiment outline
conduct of the smelt itself

The upper furnace was a re-use of my 'production build' from May 2012. It not only has run through several uses, it had been sitting outside (semi-protected) for 6 years (!). When I attempted to lift the furnace body off, the metal outer can pulled free - and the interior walls completely broke apart. (1)
The details here start after the broken furnace wall pieces had been cleared away.

Note on the images :
It was blindingly bright the morning I excavated and recorded. Many of the images suffer from exposure problems because of this. For that reason, relative brightness and contrast has been altered via Photoshop on many.
There has been an attempt to mark the location of the tuyere on several (use of the scale, or via an added arrow).

Base of Furnace - broken walls removed
In the (admittedly poor) image above, you can see the shell of fused wall and slag remaining along the 'hot spot' at the tuyere (far left - indicated by scale). In this image, there is still a lot of loose, small fragments from the broken walls covering the top of the slag bowl. You can see that this bowl is sitting higher to the tuyere side, not extending completely over to the side furthest from the 'heat zone'. 

Cleaned furnace base, showing bloom and it's position

The next image shows the furnace base, with all the loose wall pieces removed and as much as possible of the fine debris cleared off the slag bowl. The bloom is shown on its side (so top side is towards the bottom of the image). Tuyere marked with an arrow. Matching up the X (centre of bloom - bottom surface) and Y (extended 'tail') indicates the location of the bloom as it formed. The slightly scalloped edge of the top left of the bloom (so closest to tuyere) suggests that into the end of the smelt, the air blast effected the deposit of iron and shape of the bloom. Slightly oxidizing to the front, the heat zone pushed further back moving higher up from base level.

Slag block as lifted clear of the pit
Close up of the slag block - X indicates bloom / arrow the tuyere
The next step was to pull the slag block out of the pit. 
The way the heat had eventually effected the clay cap, and the seeping of hot slag into the pit was clear. The slag had formed into a roughly conical shape, wider and deeper directly below the tuyere 'hot spot'. Individual 'icicles' of slag became more distinct towards the bottom. In fact these extended down even further into the pit area, but broke clear when the slag mass was lifted. The main solid slag mass extended about 15 cm below ground / furnace base level.
There was also a clear colour and consistency shift to the slag as it moved further down away from base level. The upper bowl was dark and solid, clearly the most iron rich. Slag excavated from the lower pit tended to be a lighter colour (tinges of green) and contain more bubbles.

Fragments of the clay cap
From the rear area, about ground level, it was possible to pull out some larger fragments remaining of the initial clay cap (covering and separating the vegetation packing the pit). It was easy to distinguish the upper (burned black) and lower (cleaner) surfaces. The lower surfaces had clear impressions of the plant stems and leaves the soft clay had been packed against. 
Towards the front, the clay had ether been melted away, or was completely enveloped by the slag.

'Icicles' of slag, running down from the upper bowl
Carbonized stem fragments, about bottom of slag block (1/4 inch grid)
Individual slag flows had penetrated further down into the pit. These proved not firmly enough attached, or too physically weak, so broke free as the upper mass was lifted clear. As individual runnels of slag were exposed, some were found to contain carbonized stem pieces. (2) As well, individual stem lengths had been transformed into short charcoal sticks. At this depth (15 cm +) there were no remains of the leaves found.


Moving towards the bottom of the pit, slag was found to be fragmentary, lighter and containing much more bubbles. Although clearly heat effected (surface carbonization), individual leaves remained. These were found to be damp and still pliable. 
There was no slag penetration below 30 cm. (Although partially blocked with stones left in place, the deepest part of the pit extended to 35 cm below ground level.)


(1) My best guess here is that moisture had penetrated the baked and partially sintered clay / sand construction. Even despite the wood splint pre-heat, water expanding into steam resulted in the structure pretty much fragmenting. 
There may be some indication here why the Norse would have built structures over furnaces (consider the 'Furnace Hut' at L'Anse aux Meadows). Not for the protection of the *workers* - but for the protection of the furnaces themselves.

(2) Of interest here is the potential preservation of vegetable packing materials fully inside glassy slag. At Heltborg in 2008, one of the interesting presentations was on research being undertaken on the organic materials preserved in ancient Danish slag blocks. The glass slag is virtually indestructible. Vegetation trapped inside the slag can produce information on environment / dating / crop types, even time of year for the smelt.

Sunday, July 15, 2018

Summer Solstice Iron Smelt : RESULTS

As in past years, there was a late spring / early summer iron smelt at Wareham. The date for this June 23 - 'the Saturday closest to Summer Solstice'.
The objective of this experiment was further investigation of the 'Slag Pit' style furnace - tentatively described as 'Celtic Iron Age'.

Refer back to an earlier posting for the build / experiment outline.

Near the end of the main sequence - Neil Peterson probing to determine bloom size.
Hammering on the bloom in place, using the 'Thumper'. (a)
Top Extraction of the hot bloom. (a)
ORE : 28.2 kg
DD 2B = 22.68 kg red iron oxide + 2.5 kg whole wheat flour + 2.75 kg forge scale
  / water to mix, then dried (typically about 10% remains)
CHARCOAL : roughly 62 kg
  Mix of Maple (2/3) and Oak (1/3)
AIR : via electric blower = estimated 900 LpM, increased to 1000 LpM at 4 hours
TIME : about 2 hours from start pre-heat to fill / touching off volitiles
  about 5 1/2 hours for the main sequence (to start burn down)

Initial charges : Iron rich slag (2 @ 1 kg) + Gromp fragments (2 x 1 kg)

Burn Rate : Average of 12 minutes (very consistent)
  First 7 ore additions at 1 kg each
  Next 3 additions at 1.5 kg each
  Last 7 additions at 2 kg each
  Final addition at 2.7 kg (remainder on hand)

Final Bloom, shown upside down, tuyere side to right. (b)

BLOOM : 6.1 kg
YIELD : 22 %
QUALITY : not cut at this point, but hammer feel suggests quite dense.

TEAM : Neil Peterson / Gus Gissing / Margaret Gissing /  Ben Van Eis

Next : Excavation of the slag block...

Image Credits :
a) Kelly Probyn-Smith
b) 'Gus' Gissing

Wednesday, July 11, 2018

Into a new MILENNIUM

This marks the 1000 th posting to this blog. (1)

I started 'Hammered Out Bits' back in March of 2006.

One of the primary reason I started this all was to make use of materials I was generating through answering e-mails. As frequent readers well know, I'm not (ever?) able to make a one word answer - to anything. Even if the actual answer to a question is 'NO', I feel the *reasons* are just as important as the negative response. I also feel that any statement needs some background to be correctly understood. (2) So I end up spending a lot of time on long detailed e-mails, which would end up only having a single reader. You may notice on any number of pieces here, the initial start is a quote from an email. (3)
At the time this blog was started, one of the mechanisms in play was author's intending to collect up all the (often random) segments from their blog into a published volume. Some people early into this method, and those with particularly 'hot' topics, where able to undertake this to financial success. I had some hopes along those lines, especially within the highly specialised topics of 'Viking Age blacksmithing' and 'bloomery iron smelting'. With time however, I can see that at best that volume of raw articles are far too chaotic to form into a concise whole. It would be easier to use the segments as very raw draft - and just write again from scratch.

When I started this blog, I got some very good advice from my old friend Steve Muhlburger :
'Keep to a narrow topic range'
'Try to avoid broadcasting your personal opinions (unless politics is your topic).'
I have mainly attempted to do this here. You will find the primary topic areas given through the 'Lables' list near the bottom of the left side bar (with their numbers) :

Blacksmithing = 328
Viking Age = 278
Iron Smelting = 269
Contemporary Arts = 168
Experimental Archaeology = 141 

Most the other topic labels show less than 50 attributed.
(Yes - those add up to more than 1000. Often an individual post might collect more than one topic label.)
First image published here - June 12, 2006. The 26 posts before this were text only!

Greatest Hits?

This blog, perhaps exactly because of its limited and specialised topic focus, does not have a massive readership:

Regular Reader / 'Followers' = 28
Typical Views on a new posting = 300
Average Views of any posting any day = 150

Total Views Overall = 724,400
USA Viewers (overall) = 340,000 
Russian Viewers (overall) = 71,000
Canadian Viewers (overall) = 62,000

Not overly surprising, given the use of English (although Russian numbers a surprise). Given that Canada is roughly 1/10th the population of the USA, there is a strong showing here. (But again maybe not too surprising, given that I live in Ontario - and do have a 30 + year visibility here!)

Curiously, it has been when I have stepped * outside * the normal topic framework here that I have generated the highest reader numbers.

29 May 2017, 24 comments
67276


8421


31 Oct 2015
3958


3844
 (so combined = 7802 )


1 May 2017, 6 comments
6097

After that, any individual posting averages roughly 3000 views (overall)

You can see that my very, very political entry (on being declared an 'Illegal Immigrant Without Proper Documentation') has received fully * twenty * times more views than any other single posting. Actually almost 10% of the overall total!

The next two high volume postings (over two times the average) are the result of 'hot' popular culture topics. The film 'Avatar' first, the TV 'Forged in Fire' second.
It might be safe to say the fourth high volume entry is also a result of pop culture, in this case various 'documentaries' about what proved to be a totally false Norse 'occupation' site.


So - what is my take away from all this?
I consider publishing on the internet as * real * publishing. For the Independent Researcher (my bloomery iron smelting work for example), access to academic publications is extremely limited, and very difficult. The 'self published' aspect of the internet does provide a clear alternative. (4)
I have information published on the internet in three formats:

the Book = my formal web site (www.warehamforge.ca)
the Magazine = this blog
Snap Comments (at a cocktail party) = Facebook

As an individual, I consider the sharing of knowledge ethically required.
So expect many more entries here into the Second Millennium...


(1) But well over 1000 blog postings created - all combined.
•  I also contribute to the Dark Ages Re-Creation Company blog
About 50 or so pieces there (roughly half). A number are cross posted back to this blog however.
•  I set up a separate blog to document my 2012 Ontario Arts Council grant funded project Iron Blooms to Bars.
There are over 40 pieces there, again a number are cross posted back to this blog.

(2) Hence my increasing aggravation over the development of 'personalities' / 'sound bites' / 'Fake News' over the last decade particularly. Most events and issues can not possibly be understood in 140 characters.

(3) Warning there:
If you send me an email, there is chance my own reply may be converted / expanded into a blog posting.
My standard practise is to remove identifiers, reducing the initial email to a shorter quote, usually only attributed to a first name (for sender's security)

(4) I have had many conversations with academics about the value (or lack thereof) of the internet. 
The easy access to virtually anyone who can find a computer and has even basic computer skills is clear.
With at least simple writing skills, anyone can self publish.
There are two commonly pointed out flaws to information on the internet :
1) Self published means absolutely no editing or checks for accuracy. In this the internet requires the * reader * to provide the required critical evaluation of materials found.
2) The medium is very ethereal. Often web sites disappear without a trace - that content lost forever. 
(Consider here the length of duration of this blog (2006). The main Wareham Forge web site has been stable since the late 1990's.)

Tuesday, July 10, 2018

Summer Solstice IRON SMELT

As in past years, there was a late spring / early summer iron smelt at Wareham. The date for this has been pegged to 'the Saturday closest to Summer Solstice', this year June 23. (1)

The objective of this experiment was further investigation of the 'Slag Pit' style furnace - tentatively described as 'Celtic Iron Age'.
To date I have attempted variations on this basic process three times :
October 2011 - Branton's Run limonite (?) - no iron produced
November 2011 - industrial taconite - 6.4 kg / 33 % yield
August 2017 - DD1 analog - 2.9 kg fragments / 15% estimated yield

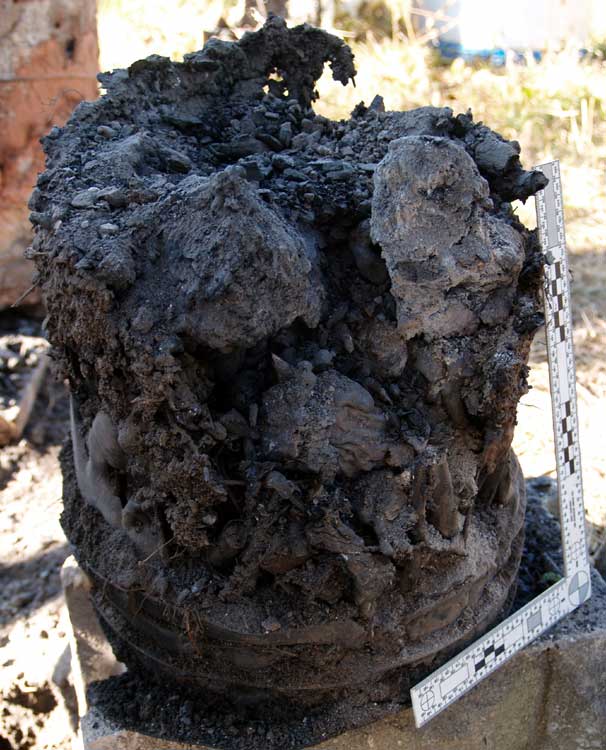
Theoretical layout - August 2017
In this series, the body of the furnace is our standard 'short shaft' design, built again of clay cobb (clay / sand / horse manure).
The primary difference is in the slag management method. Here a pit is dug below ground level, before the furnace is constructed above it.
1) The pit is filled with vegetation.
2) There is a clay cap placed above the pit, sealing this off from the working furnace above.
What is supposed to happen is that the vegetation below supports the clay cap during the drying fire and early cycle of the working furnace - until the slag bowl forms. As excess slag is generated, it is allowed to drain through the clay cap, down into the pit below. So a kind of 'internal slag tapping' (2).

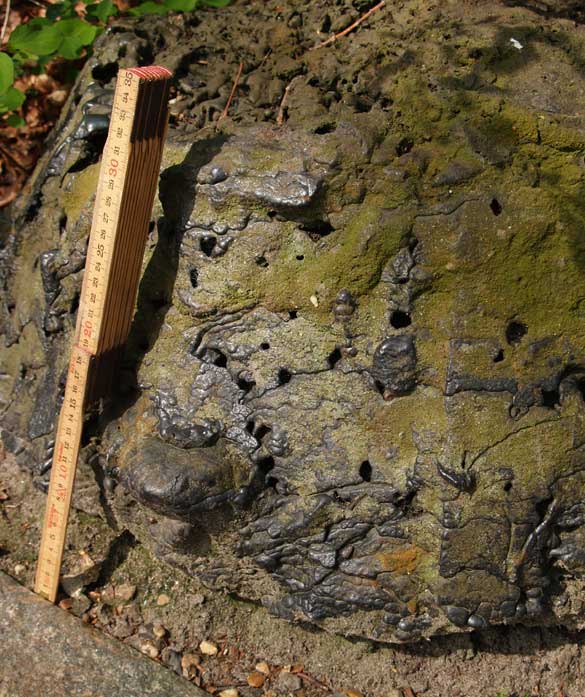
Early Iron Age slag block, Denmark
For attempt # 1 and #3, the primary failure was with the clay cap itself.
The first experiment used sturdy sticks of willow as the vegetation, but the clay cracked and broke too early in the main smelting cycle, before the slag bowl had really formed. (This compounded by use of a questionable ore - which might not proved iron rich enough for effective iron production to begin with.)
Test two used a virtually identical design, but with a proven (effective!) ore. The results here were excellent, both in terms of bloom production and the slag block remaining.
Test three was certainly a disappointment, given it took place as a public demonstration at the Scottish Crannog Centre. The first clay plate actually cracked and failed during the drying fire. (This may have been partially the result of using dried grass and not packing tight enough?) The pit was re-filled with vegetation, and a second plate installed. It too broke too early in the smelting cycle. (Not unexpectedly, with wet clay exposed to high furnace temperatures!)

Proposed Furnace Layout = 6/18
It had been hoped that one of two on hand furnace bodies from previous smelts could be re-used. What happened is that the first (from November 2016 course) proved not built sturdy enough, and it broke apart when I attempted to shift it.

The first step then was to dig a pit in the centre of our normal smelting work area.
Always a challenge at Wareham!

'Completed' Pit
As usual, the ground here is far more stones and rocks than actual dirt. The hole was intended to be a clear rough cylinder, 20 cm in diameter and 30 - 35 cm deep. What you see above is the space created is about half full of head sized rocks. My hope was that there would still be enough empty volume for the slag to accumulate. (And I did take one that size * out * of the hole!)

One of the first questions from earlier attempts was how to best select the vegetation, then how to best pack the pit with this material.

Kelly picking some of the chosen plants
Packing the Pit
Over a good chunk of the yard, there is a 'weed' plant that grows up. It has a woody stem, with closely attached long, narrow leaves along the stem. The height is roughly 60 cm, and it pulls out of the ground reasonably easy (roots are a shallow ball). It proved easy to pull up a good quantity of these, and when folded into rough thirds it was simple to pack the entire pit tight with the plants. I suspected * fresh * plant matter would better resist the temperatures of the lower surface. I had hopes the high water content of the green plants would also help the organic packing survive long enough for the slag bowl to form and support the upper weight of charcoal inside the furnace.

Forming the clay 'cap' over the pit.
The second of indicated past failures (especially at SCC in 2017) had been caused by breaking of the clay cap which formed both a lid to the pit, and a floor to the furnace itself. Earlier experiments had used a clay disk in the 1 - 2 cm thick range. This time I decided to use a more robust construction, closer to 5 cm in thickness. This was made up from straight clay, in this case a high temperature material called EPK (rated not to melt to 1750 C).

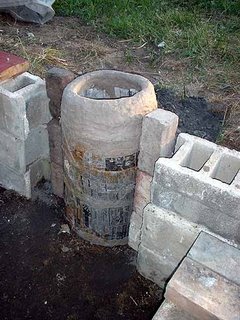
Furnace Build - tuyere in place.
The second furnace body on hand was originally built in 2012, and used at least three times already. It proved to have basically survived previous uses and the freeze and thaw over the winters. It was built of a clay / sand (50/50) mix (which is the version used by friend Lee Sauder to his good result). To improve durablity, my furnace had been built inside a steel garbage can, base cut out and turned upside down.
Originally this furnace had been mounted on a concrete block plinth. (Filled with charcoal fines, that construction allows for easy dropping of the slag bowl to produce larger blooms, and simplifies bottom extraction method.) To ensure the correct space below the tuyere, here the furnace was set on top of a number of half bricks, sealed with straight clay. The proper depth of the base was set by adding a layer of sand / wood ash mix on top of the clay cap.

Setting Tuyere Angle
You can also see the copper tuyere set in place in the images above.
I have written many times (both here, on the main Iron Smelting documentation, and in published articles) about the importance of setting the correct tuyere angle for a well functioning furnace. You can see the method I use to establish this correctly in the image above. I have simply made up a small sheet metal triangle with the 'ideal' 22.5 degrees to one corner. With a small pocket level, it is easy then to find tune the tuyere angle, which is only rough set when the hole is cut into the furnace body.

Other work on this first 'build and prep' day included hauling out all the smelting tools and equipment, setting up both a charcoal prep and the visitor's area.

Enough for one day! (And one blog post...)


(1) This event, along with the 'Thanksgiving Weekend' and 'Samhain' ones, continue to be part of ongoing experimental investigations into early bloomery iron smelting methods.
All are considered 'Open Invitational' events = meaning that interested observers are welcome to come. I do ask that you contact me before coming up however. This primarily to calculate septic loading and parking spaces.
There is usually some possibility of becoming directly involved (there is always 'dirty work' to be undertaken!). Those hoping to participate are warned to dress in suitable work clothes.
These are not intended as teaching events however (see the 'Introduction to Iron Smelting' course)
(2) The slag pit arrangement was common throughout Europe, roughly up to the end of the Roman period. The upper furnace structure itself varies, ranging from earlier smaller bellows blown to huge (Roman) natural draw types. The slag blocks created are almost indistructable, and thousands remain. In Denmark alone, over 2000 have been found. Typically these are roughly the size of a bushel basket. (Image above is from the lower Jutland area, seen on my 2008 trip.)
 

February 15 - May 15, 2012 : Supported by a Crafts Projects - Creation and Development Grant

COPYRIGHT NOTICE - All posted text and images @ Darrell Markewitz.
No duplication, in whole or in part, is permitted without the author's expressed written permission.
For a detailed copyright statement : go HERE