Showing posts with label knives. Show all posts

Wednesday, April 03, 2024

the 'French Nail' : Field Expedience

I was recently contacted by a long ago army buddy, who was looking to have some replicas made of an early World War One object. 
Image from the Imperial War Museum

'French Nail' fighting knife ['Clous Français']

The reference he provided was from the Imperial War Museumhttps://www.iwm.org.uk/collections/item/object/30003377

These were not 'regular issue' weapons, but were made at the front by blacksmiths working primarily as farriers, who's primary role was shoeing all the horses and mules used for the bulk of transport in that conflict. 

The basic raw material was supplied by converting 'screw pickets', steel posts used for holding strands of barbed wire in entanglements.

Photograph by Lt. J.W. Brooke : 1917-10-23 (IMW)

 The IWM description provides the following dimensions (of the sample pictured above) :

Depth 11 mm

Height 318 mm

Width 54 mm 

Weight 0.314 kg

As is my normal practice, I took the reference image and converted it to life size, and printed off a copy. 

My first surprise is the diameter of the round bar used. I would have expected French metric sizes at 10 mm / 3/8 inch. That 11mm is just a strange size, converting to imperial to 7/16. These knives were also made and used by both British and American troops, where I would expect 1/2 (12.5 mm) stock. Given the few clear reference images I could find of British (hence also Canadian) troops with screw pickets, I decided to use 1/2 round mild steel stock.

In use, the hand would grip inside the ring, around the blade side. The blade would point upwards from the thumb. This allows for a 'low line' stab to the gut. The heavy loop of bar thus runs over the fingers, creating a 'knuckle duster' effect for punches. The knife is primarily a stabbing tool, so the long point is more important than the cutting edges. Simple, brutal, efficient.

From the life size image, I pulled the following additional measurements :

Blade : 20 mm / 3/4 inch wide x 15 cm / 6 inches long

Handle Interior : 80 mm / 3 1/8 long x 30 mm / 1 1/8 wide

The handle interior space was a bit puzzling, being a bit on the small size. I have fairly small hands and would have found the historic sample a tight fit.

The two replicas, upper as diamond / lower as triangle (on 1/4 " grid)

As a primary thrusting weapon, the blade cross section could have been either diamond or triangle - either would produce two cutting edges. The most likely would have been a more standard diamond, but the triangle results in a thicker, and thus more rigid, central spine. None of the images or descriptions I could easily find via the internet specified which. As a forging test, I decide to make one of each cross section. The one closest to the reference sample (smaller hand grip) as diamond. The second replica was made with an intentionally larger interior grip size to fit a more modern physical build, and I used a triangle cross section. I was a bit surprised to find the forging steps required for either turned out to be pretty much the same. The diamond needed forging on four sides, but the triangle I found needed more control with the hammer blows (although admittedly not a shape I make that often).

I also made some trials working 1/2 round into a triangle bottom die. The die I had on hand was more of an equilateral triangle, so not ideal for the wider final shape required. With the proper shaped die made up, the time to forge the triangle cross section would be greatly reduced, and the forging would produce both a significant central spine as well as thinner cutting edges. This most certainly would speed the work if a smith had a large number of requests for this knife. (Worth noting that the sample does not show the more exaggerated cross section suggested by the test pieces I made.) 


Saturday, June 17, 2023

Bloom to Bar to Blade

 As might be expected, I have a large collection of iron blooms, after over 20 years of experimental smelting. With the assistance of Neil Peterson, I have been trying to get a number of at least the smaller pieces compacted down into working bars. So far this has primarily focussed on sections in  500 to 1.5 kg range, basically half or quarter sections of our typical 3 - 5 kg results. (Noting here that there are a number of much larger, still complete blooms in the 8 - 11 kg range, plus the 16 kg monster made at ’65 for 65’.)

table of blooms (2016, so only to smelt #72 of the current 92)
 
Importantly, given the various source ores used, and the many variations on furnace design and sometimes method, the actual carbon content of the individual blooms can vary widely. There is everything from soft carbon free through to ultra high carbon (even to unforgeable cast iron) metals.
Any individual bloom itself is likely to have differences in carbon concentration between the bottom and top surfaces as iron is deposited and held at high temperature, usually for hours.

As any individual bloom is built up, the amount of slag also deposited has been found to vary considerably, from very spongy textures through to quite solid masses. The amount and nature of the initial consolidation hammering is obviously a factor here too.
The process of converting a raw bloom into a working bar most typically follows a process of compressing, folding and re-welding. The normal sequence is :
- flatten to a plate (or ‘book’)
- fold and weld into a ‘brick’
- fold and weld into a ‘billet’
- draw out into a ‘bar’
The amount of force required changes as the iron solidifies. This may seem obvious, but in truth just how light the strokes may be need to be at the start of this sequence is counter intuitive without experience. Even without much force, heavier hammers are best employed, to ensure penetration through the entire mass (for me this means switching from my primary 800 gm to a 1000 gm). As the pieces are forged up, it is almost ensured that the there will be additional welds both along the edges (90 degrees to the folds) and often into diagonal flaws.

All this taken together, results in a bar that will often have a distinctive linear, sometimes distorted, physical texture. Along with potential fine lines of slag inclusions, there are blended lines of changing carbon content throughout. These variations from a uniform structure can be made visible on a final object, especially if the surface is later polished and then acid etched.

Creating a bloomery iron bar requires considerable skill, experience, much labour and expended materials. Taken together, these bars are one of the most valuable materials available to an artisan blacksmith.

So what do you make from these small bars, most in the 200 - 500 gm range?
Generally, the highest value small objects for most blacksmiths are knives.

Now I have mostly stayed away from making blades from my bloomery iron. There are several reasons for this, one being that my work here has always been geared towards understanding early Northern European historic examples, not best possible production yields or aiming for high carbon alloys. Bloomery iron in North America has become completely dominated by the knife makers, where the bloomery process itself is seen as only a first starting step, not an objective of itself (something I remain very unhappy about).

forged blades, rough grind at this stage

To be completely fair, the blade forms here were largely a secondary consideration, with the simple tube handles almost an afterthought. This collection represents objects forged up over the last two (Covid) years, many languishing as rough forged blanks until the last month. All the low polished blades (only to 100 grit) have been lightly etched in ferric chloride to bring up variation in carbon contents within the parent blooms. This shows as either lines or mottled patches, the lightest areas having the lowest carbon content (least effected by the etch). Infrequent slag inclusions that remained show as thin dark lines, especially visible in #6 (which was also the starting bar with the highest variation in carbon content throughout).

detail, #5 Tool

In keeping with my general interest in Norse objects, all these knives are V grinds (not the more modern, if stronger, sabre grind). (1) Both #1 and #2 are commissions, so are based on specific artifact sources. Several are intended for small scale domestic use (textiles or food preparation) and generally conform within Period 4B, type C series from Coppergate, York. (2) The two thick and wide blades, straight backed with sweeping curved edges, are a shape suitable for wood carving (form fitting function).

knives as finished

1) Kitchen / Boning :   20 cm blade x 3 mm thick
                    natural antler (caribou) handle
                    core from DARC 11/08 (sparks roughly 1030+)
                    side slabs from Vinland 4 / 2010 (sparks roughly 1020)
                    ‘replica’ (3) of grave find at Ihre, Hellvi parish, Gotland, Sweden (4)

2) Small Norse Domestic : 10 cm blade x 4 mm thick (distal taper)
                    (owner will apply antler handle)
                    from Vinland 4 / 2010 (sparks roughly 1020)
                    a bit longer, but closest to #2829 from Coppergate


Boning #1 (top) and Small Domestic #2


3) Small Carving :      8 cm blade x 5 mm thick (distal taper)
                    natural walnut branch handle
                    from Slag Pit 2 / 2011 (from higher carbon end of the bar)
                    no specific prototype

4) Medium Kitchen :   13 cm blade x 2 mm thick (distal taper)
                    natural walnut branch handle
                    a bit longer than the samples, again roughly P 4B / T C from Coppergate
                    from Aristotle Furnace demo at CanIRON 9 /2013 (sparks roughly 1075)


Small Carving #3 (top) and Medium Kitchen #4


5) Tool :             10 cm blade x 5 mm thick
                    natural antler (caribou) handle
                    from Slag Pit 2 / 2011(variable carbon)
                    no specific prototype

6) Small Kitchen :      9 cm blade x 3 mm thick
                    natural antler (caribou) handle
                    again roughly P 4B / T C from Coppergate
                    from Aristotle Furnace demo at CanIRON 9 / 2013 (sparks roughly 1075)

Tool #5 (top) and Small Kitchen #6

The most probable destination for these knives will be as working tools into the hands of other members of DARC, many of whom have contributed their labour during the iron smelts that created the starting metal.
I will be offering knives # 3 - 6 for sale at the upcoming SCA ’Trillium War’ event over June 30 - July 3. The prices can be expected to be steep however, in consideration of the genesis of the material.


1) I don’t want to get into (yet another) argument here about whether ‘seax’ only refers to the ‘broken back’ shape, or any Norse knife. See an earlier commentaries:
2007, ‘Knives from the Viking Age
http://www.warehamforge.ca/norse-knives/index.html
2010, ‘Knife? THAT'S not a knife…
https://warehamforgeblog.blogspot.com/2010/03/knife-thats-not-knife.html

2) Ottaway, P., 1992, ‘Anglo-Scandinavian Ironwork from Coppergate’, 1 872414 29

3) I don’t want to get into (yet another) argument here about ‘reproduction vs replica vs interpretation’. If interested, see a detailed commentary about these differences :
2020, ‘Reproduction, Replica or Interpretation’, in ‘The Iron Trillium’, Fall issue, Ontario Artist Blacksmith Assn.
https://warehamforgeblog.blogspot.com/2020/09/reproduction-replica-or-interpretation.html

4) Carlson, D., 2003, ‘Viking Knives from Gotland Sweden’, plate ‘Iron knife6’ (top), 91 973304 5 0


Friday, January 13, 2023

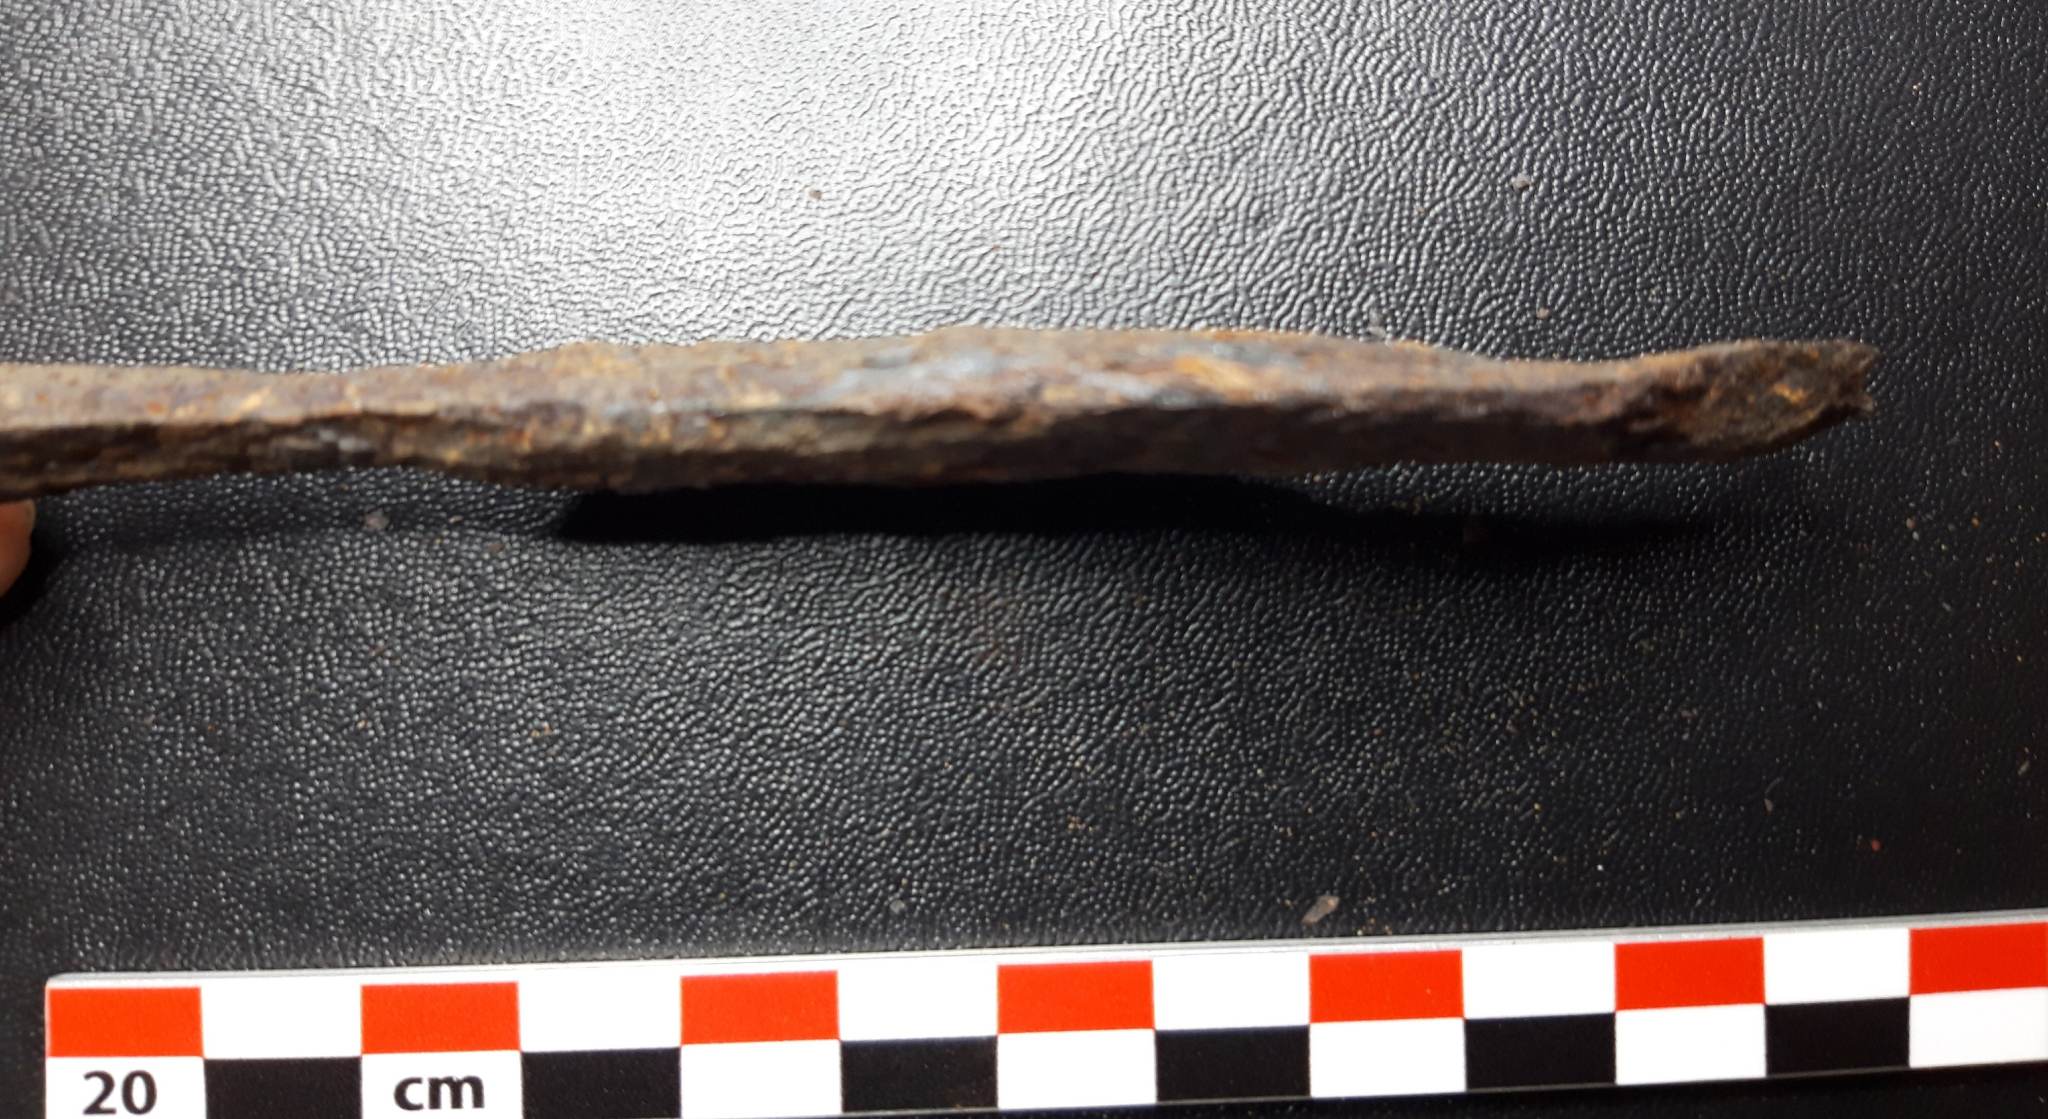
Blade find from Belgium??


On 2023-01-13 6:36 AM, "C..." * wrote:

 I am a metal detectorist based in Belgium. I stumbled across your website and hoped maybe you can help me?
I recently found an iron blade, which from my own experience looks very old. It looks like forged iron, feels like it weighs a lot for a small object.
I was wondering if you can advise me of an approximate period it might be from and its use? I have been trying to research it online, it reminds me of a small Viking period knife from the examples I have found. Maybe from the 9th -10th century, so I was thinking maybe mid to late Medieval. I could be completely incorrect though. When I found it a part of the end crumbled off, I believe it was a bit more pointed.

The blade has an interesting slight curve. The area I found it in has human history dating back thousands of years.

I thank you in advance for any help you can provide. Please find some photographs attached.

The original request e-mail, highlighted in bold are the elements that I flagged when I first read it.
Below is my reply, with images provided by "C..." inserted as considered.

Well - a lot to unpack here. Sorry to say I may not prove that helpful. I warn you that you may know much of the following already!


Belgium?
That is likely your first problem. Two World wars that chewed up most the ground, and left so much stuff buried. Very small country, intensively populated and farmed - for like forever...

Find location may provide you with some clues - my advice is first to check the history on the piece of ground where you uncovered the object. If the result is 'too much history to narrow occupation' that pretty much ensures that unless there are significant marks or design to the object, you are just not going to narrow it down.


Iron?
Ok - not copper alloy, but...
One possible narrowing would be distinguishing between post Industrial (c 1855) mild steel, and earlier forms of wrought iron as the material.
Wrought iron - especially very old wrought iron, corrodes in a different and distinctive way. The slag inclusions from its creation in bloomery furnaces often causes it to erode to display a linear grain. Steel on the other hand, more typically erodes with flake like patterns.
Looking at the object, it *appears* more like a 'modern' steel.
You could check this using a destructive spark test - or better still via a (costly) lab test, both for carbon content. Wrought iron has basically no carbon. 


One warning is that the level of corrosion to the object appears limited, not what I would expect from centuries buried. As you surely know, the condition of the ground at location of discovery is a big clue there.

Profile?

First thing that jumps out is the cross section. This is a 'sabre' grind - with a rectangular back, then the angled bevel to the cutting edge. Viking Age blades are basically all V profile grind. This to get the most function out of the least amount of metal. A sabre grind requires more material, but does result in a stiffer blade.This remains the case through the Medieval period - again shifting into the 'early Industrial = 1600's'.

One of the things I do to help me understand photographs is reduce one down to 'size as' and print it off. To help visualize what the original object shape was, I then will extend the lines into what seems a logical profile. 
 
Reduced to life size @ 13.5 cm / 8 cm blade

 The object has an extremely wide and thick back compared to a sharp taper to the cutting edge. There does not seem excessive amount of material missing on the blade side (ie - corrosion or wear effects). Attempting to pull measurements off the images, the back is about 5 mm thick and about 10 mm wide, with the bevel about 15 mm wide. As you mentioned, there is a clear blade side concave curve. (Which has to be intentional, the forging process naturally flexes the blade to a convex curve!) This curve has to relate to the function of the tool. The point, extending the existing lines forward, is very thick and blunt - again obviously for strength. 
 
(showing cutting edge)

All this would intentionally create a tool that was extremely strong, but a relatively blunt cutting edge. The curve would suggest use in a sliding cut action - not a straight chopping direction. Given the total blade length at about 8 - 9 cm, the overall result is an extremely rugged tool - far more than is required for the length. But also one that would not have a very effective cutting edge. (Yes - even with some of the edge material obviously corroded away).

The tang is very short, remains at about 4.5 cm. Good chance it just has been corroded or broken away however, so need to be a bit careful about applying too much to this. That said, it does not taper very much down it's length, which may suggest most of the original remains. Not much (remaining?) for secure mounting into a handle. It does appear thicker at the extreme end than at the joint to the blade however, and is clearly rectangular (close to) rather than circular in cross section. This all may indicate something about the original mounting method. A lot of Norse knives have rounded tangs - which passed through a hole drilled or burned into the hilt material, then secured with a metal disk as the end of the tang was peened over like a rivet.


Overall, I see a short, very strong but blunt blade, more likely to be made from a steel alloy.
My first guess would be part of an agricultural tool - like a tooth from a drag harrow.
Although I admit I am not familiar with the design requirements, another possibility could be some kind of pruning or hand harvesting tool (apples?).

If you can find someone (university?) who has a hand held XRF analyzer, this is basically micro destructive and would give you the relative elemental composition of the material. That might be the easiest way to determine relative technology of the metal itself.

Sorry - this from my computer desk and working from such limited information. May not be the commentary you were hoping for?

Good luck with this - and keep looking! Here in Ontario, our history is so relatively shallow (any iron object around my area will be no older than about 1615) - and in comparison so thin. My own home at Wareham was settled (by Europeans) about 1840 - 50. The First Nations just avoided this area, as other than deer and small game, there were no resources available that made the area worth exploiting.


* The images included here are "C..."s. I have intentionally omitted his last name. 

(Note the provision included on the bottom of any longer e-mail replies from me : " To those receiving long detailed replies to specific questions : My own written response may be edited and re-used as a blog posting."

Wednesday, December 30, 2020

Illustrations of Forge Welding

 ‘Don’t try this at home kids!’

This piece originally written for the Iron Trillium - Ontario Artist Blacksmith Association


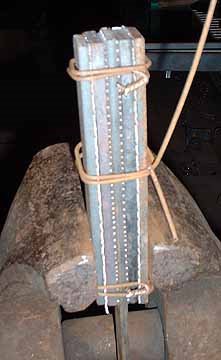
This is the start of my current discontent :


On an estimate, this stack appears about 1 wide by about 3 1/2 + tall by 10 + inches long. (1)

Do any of you see the potential problems here?

I had made a general comment after that first image was posted up on the open discussion :

“ (curious) Are you using a press? Otherwise don't you have problems with the layers 'humping' (*) and making gaps, as you hammer towards the rigidly fixed sections? “
And guess what?
Later there were questions asked ; ‘ Why where there de-laminations of the forge weld? ‘ Which were (predictably) shown to the far end of the billet, to the outer portion of one side. Yes, this was hand hammered (there was a video clip added later as well). Honestly, I considered the hammer choice and the technique shown was just - well, pretty bad (and most likely to aggravate the ‘humping’ problem I mentioned).

Observation # 1 : Don’t believe what you see on the internet. 

Remember that ’90 % of everything is Junk’. (2)

Here is the thing :
You do want to use some method to hold the pile of strips together.
Yes - there is that traditional Japanese approach, where you have what is basically a paddle (rectangular piece on a handle), on which you place a loose pile of plates or pieces. Then oh so carefully heat, then lift over to the anvil, striking with a very wide faced (specialized) hammer to weld. Using great skill not to jumble (much less drop) any of the small pieces.


I learned to prepare my stacks well before I ever had access to a modern electric welder, using several wraps of wire to hold the pieces together. This of course meant I had to pull off the wire loops after the first tack weld course. The wires would certainly weld into the top and bottom surfaces, but would end up bulging out and off the sides. Yes, you do have to use some extra care when heating to welding temperature, that you don’t just burn the wires away. (I find plain ‘black’ electric fencing wire ideal here.) Yes, this certainly adds an extra step, fixing the welded block in the vice and ripping the fragments of wire off. 


An extension of this method would be using a box shaped collar, which would be knocked free once one end of the billet was at least tack welded. (3)

These days, truth be told, I have a big MIG welder, and I usually run a bead fusing one end of the stack together - and also at the same time applying a long bar as a working handle. I personally do this along one end of the plates, not multiples down the sides as seen above. This because the MIG process will ’smear’ the metals combined in the stack, which I certainly don’t what contained in the final layered billet. In practice, I’ve found that I usually get some cracks in the welded pile where the handle is attached anyway. (This primarily because the handle itself acts as a cold shunt.)

Here two pieces of flattened iron bloom, MIG welded to a handle

Fixing the pile at one end, allows you to run your hammer blows from that point down and away to the open end. This will squeeze out excess flux, and importantly any remaining oxide or dirt, as you hammer from centre to edges, working sequentially down the stack.

Look at the measurements of the stack in that first image yet again :


  • Ideally you want your stack of plates to be *square* in cross section - the height of the stack being the same as the width of the individual bars. This is simply to make sure that you are getting even heat penetration throughout the the whole stack. (4) You can see quite clearly here that the starting stack is easily three, perhaps four times as tall as it is wide!
  • Ideally you want the strips in your stack to be roughly the same width as your hammer face, or not that much wider. (Does not necessarily appear a problem here.) This so you can quickly, and effectively, overlap individual hammer strokes. This to both ensure all parts of the stack get effective hammering, but also to ensure you squeeze out that same flux / impurities from between the plates.
  • Ideally you want to limit the overall length of your prepared pile. There are two reasons here. First is to ensure that the whole pile will come up to both the correct, and importantly a uniform, temperature suitable for effective welding. (In this case, it was later shown the individual was employing a propane gas forge. There are other potential problems / method adjustments required for effective welding in a gas forge. One clear advantage is that in a well designed unit, typically internal temperatures are quite even throughout.) (5)
  • The second reason to reduce the length of your starting stack is simply based on ‘how fast can you hammer’? Remember that your stack, especially for that first weld, is rapidly cooling as soon as it leave the forge. The outer layers especially. Even more so the bottom most ones, in contact with the cold anvil. You can mitigate this somewhat by letting the most distant part of the stack hang off the anvil, pulling the stack back towards you as you hammer, more or less in the same spot. (So moving the billet, not chasing the hammer over the surface.) But any way you look at it, you can only work so fast! I would expect anyone would find the temperature would have significantly dropped before they would reach the end of such a long stack (6).

This all suggests that there potentially would be welding flaws most likely to be found to the far end of the stack (away from the handle) and towards the outer surfaces, especially to what ever surface was placed down to the anvil.  ( Guess what ended up happening here? )

( * ) ’Humping’

Ideally you would want to start on the part of the stack closest to you, pushing any flux / debris out of the layers and squirting this away from your body. Because the top layers are directly under the hammer, these distort the most, certainly more than the bottom layers (where the force has to be distributed down through the loose stack of plates. This is going to effectively cause those upper plates to stretch longer than those at the bottom. If you have fixed by welding at this starting point (or have a loosely held wire bundle) This does not present much of a problem. But if you have secured the entire stack with multiple weld lines as seen, what will happen is that as those top layers are effectively forced longer, they will shift forward and then bulge away from the lower plates. If you worked extremely fast, with very careful control of the hammer striking angle, you might be able to both limit and adjust for this as it happens. But given that there is no functional reason (that I can think of) for running multiple securing MIG beads to begin with? ( 7 )

I should also mention (although you must believe me here, see note 1) that in the short video showing the initial weld sequence, the hammer technique is, well, questionable (at best). The smith is striking with the hammer at  a pronounced diagonal stroke. This is certain to impact more distortion force to the upper plates. If the hammer was coming in flat, at least the force would be directed straight down through the entire stack, rather than squeezing the plates forward. Additionally, the physical motion shown is simply horrible. The smith is striking with the left side edge of the hammer, arm away from the body, elbow lifted. This creates a kind of sweeping motion, rolling the wrist. And using what certainly looks like a 1.5 to 2 kg hammer (?).

'Hero' shot of me forge welding (actually a billet of bloomery iron being compacted).

My own experience has been that for the best results, is to run at least two (ideally four) welding courses. I first use the lighter, better controlled, and way faster, 800 gm hammer. I will usually do this twice, giving both the top, then the original bottom, surface a chance to be ‘up’. I consider these to be ‘tack’ welds, securing the individual plates together. Next I will repeat this combination, switching to a ‘next heavier’ hammer (for me this the 1000 gm - I find I can’t move the 1500 with enough speed or control). This ensures deep penetration and sold welding through the entire block.  (Again your mileage may vary here)

Over the years, there has been a LOT of discussion on ‘the right way to forge weld’. Frankly ‘It works for me’ may be the most common statement. There is some science behind this (not what most people think, either). Working *clean* is most certainly the best single piece of advise.
(see a blog post )


Right now I think we all are seeing an absolute explosion of people thinking that now is the perfect time to attempt to turn their hobby into a ‘paying business’. Throwing money into high powered equipment, in place of developing any hand skills. There is a possibility that for a very, very small number, this might actually succeed. Knife *making* (7) is most certainly the ‘flavour of the month’. I’d bet this also annoys OABA members who have been forging blades for years.


1) I’ve specifically chosen not to credit the individual who provided this image, or the later process images / descriptions. (This to remove any possibility of bad feelings over my opinion - this is not from anyone in OABA, or even Ontario btw.)

2) ‘Sturgeon’s Law’ : coined by science fiction author Theodore Sturgeon

3) If you look at Scott Lankton’s several publications describing the making of his Sutton Hoo sword replica, you will see this use of sliding collars.  (available as a pdf)

4) It is actually a bit more complicated that this. The differing carbon contents / alloy composition of the individual bars may also have slightly different ideal welding temperatures. Ideally you want to place either ’sacrificial’ strips, or the metal with the greatest tolerance against overheating, on the outsides (top and bottom).

5) I personally learned to forge weld in a ‘traditional’ coal forge - and continue to this day using coal as my primary method. The size of my fire box has been found to be most effective for welding billets up to at most 6 inches long. My normal starting stacks are roughly 1 1/4 x 1 1/4 x 5 inches long, which I find gives me the best results (your mileage may vary!).

6) Any of you who have seen me demonstrate certainly have noticed that my normal stroke rate is about double of most people. (This due to the ‘high and fast’ circular motion / technique that I use.) Again I find that for anything over about 5 - 6 inches, even this fast method will  just not allow enough time to place the correct sequence of blows over the surface, before the metal has dropped below what I consider an effective welding temperature. (again, your mileage my vary!)

7) On later reflection, there is a possibility that occurred to me, coming from the use of the propane forge. The tight clamping and securing the individual plates may be an attempt to limit oxygen penetration onto the inner surfaces of the plates. (We all know that an oxide scale surface will not weld?) There are a number of reasons that I personally do not consider gas forges ideal for welding. Individual experience is most likely to differ (Good equipment design a critical factor). I will suggest that binding plates together is not a substitute for correct use of a fluxing agent.

8) I (strongly) distinguish between ‘knife making’ (grinding bars to shape and adding handles) and ‘blade smithing’ (forging bars to close profile). This becomes especially clear with much  seen of recent layered steel blades. Billets that have been hand forged will show distortions from this process, which is part of their specific character. Surfaces with geometrically perfect lines obviously have to be ground to shape (often from purchased billets, themselves created using presses).
More fuel for the ‘that’s not blacksmithing’ debate ?


Saturday, October 10, 2020

"Can you sharpen.."

Yes

But I won't

I am looking to get an edge put on a hewing spearhead I had received as a gift. I just personally do not feel comfortable enough handling it myself as I do not believe I have the proper skill set.

Short answer is that I am extremely reluctant to take on a job like this one.

There are a couple of components to consider here.

1) An extremely important consideration :
The nature of the original work.
You said you had gotten the spear head as a gift. This likely means you don't have the best information on the original maker. This important related to the undertaking of sharpening (to some extent) but most importantly to the results of this work.
You can physically sharpen almost anything. Consider a paper cut!

Sharpening as a process involves some care and precision, and some combination of time and/or tools. Physically, you need to maintain a precise angle with the tools chosen, over the length of the metal, mirror imaged (usually) on the two sides. This is repeated with finer and finer abrasive surfaces. An edge made sharp using a bench grinder will certainly cut effectively. But the result is a ragged edge, which catches on the a material being cut and quickly degrades. By continued polishing of the edge with finer abrasives, the ragged will become smooth, so leaves less and less to catch and tear.

The hardness of the base material determines :
- how thin a physical edge which can be created
* most importantly *
- how durable that sharpened edge will be.

In use, that fine edge starts to wear away. The harder the material, the longer this takes.
The problem with an object from an unknown maker is two fold :

a) What *was* the original material used?

An extreme example : A high tin bronze alloy can be mixed to be harder than low carbon iron - you can cut wrought iron with certain bronze tools. (The main difference is that this high tin bronze is also a brittle as glass, low carbon iron is flexible and will bend rather than break - consider a sword in use?)
In iron alloys, the primary additional element is carbon. It does not take very much carbon to radically change the hardness of the metal. Significant is that hardness almost always increases brittleness. Antique wrought iron typically has next to no carbon at all (which is why antique objects are often so massive looking, more material was needed to give the required strength. Consider old barn hinges as a good example.)
The most common material in our modern world is mild steel. This material has roughly 0.20 % carbon. This is just enough (see below) to possibly be a 'bit hard'. It also remains soft enough to easily machine (or hand forge). Many 'reproduction' weapons are made of this material, simply as a cost factor.
At roughly 0.50% carbon you have a 'spring' steel. This provides a nice balance of potential hardness (so edge durability) against breaking. So again dependent on heat treating (below), this is a simple alloy choice for 'high impact' cutting edges (read : swords).
As you increase up to about 0.75% you get 'high carbon' steels. Good for fine edge but low impact tools - smaller knives intended for fine slicing (skinning knives).

This progression can shift with the addition of small amounts of other elements added to the alloy. The best example is adding nickle - the result being 'stainless' steels. Your home table knives are most likely only 0.20% carbon, but also about 0.50% nickle. With alloy steels, as the combination of additional elements gets more complex, so does the basic quality of the metal itself change. It is possible in our modern world to create iron alloy steels with radical handling properties. How you might work up shapes with those alloys also can become more an more complex. For some of the more elaborate alloys, attempting hand forging is basically not realistic.

Many 'display' weapons are in fact made of lower carbon, stainless series alloys. This allows for ease of manufacture, and ability to create a surface with a bright mirrored surface, which does not rust in normal situations.

Only in China : Described as "hand forged Damascus' - retail price at $250 US

b) What (if any) heat treating process was the material subjected to (this applies to most metals).
Final heat treating is a three step process : Annealing (to release forging stress) / Quenching (to harden the metal to a desired maximum) / Tempering (selectively *removing* hardness as desired) Most people don't understand the difference between Hardening and Tempering.
I'm not going into fine detail here (this can be a very complex topic).
Basically, once a iron / carbon alloy (steel) is heated to a specific temperature, the faster you cool it, the harder it gets (up to a maximum determined by carbon content). Differing cooling liquids result in different degrees of hardness.
(As you might guess, there is a huge about of 'mystical hoo-doo' around all this!)
The harder the existing metal, the more effort is required to physically sharpen it.

How NOT to oil quench a blade!

The tempering process on the other hand is a low temperature mechanism. For ease of description, the tempering effect starts somewhat above 400 F. What that means effectively is great care needs to be employed if any power tools (sanders etc) are used in the sharpening sequence. 

What is the blade for? Draw different tempers depending on use.

So without knowing what heat treating process was used, there is no way to easily tell how hard the produced object even is. This means that it may be possible to sharpen it - but no guaranties at all about how durable that edge will remain in actual use.

As you can see, all this boils down to : "I realistically can have no idea how difficult it will be to sharpen your blade - or how good a job can even be done."


Saturday, December 15, 2018

Making Spears? Ore to Bloom to Object


Some Background :
On October 10, I undertook a full iron smelt here, with the assistance of Neil Peterson and David Robertson. The purpose was to provide both a full filming and related commentaries for a new documentary series being created by a film production company out of the UK. The series is hosted by two archaeologists, who undertook an active role in the iron smelt as well as being interviewers. ( * )
The general outline was to demonstrate the technical process undertaken by the Norse used to create iron. Further illustration and commentary was provided of the second step, taking bar iron and making a spear tip.

( * )  At this point in time, I have been asked by the Producers to withhold the details of this series.


On 2018-12-04 Stuart wrote:
I want to compare volume of iron needed to create Viking swords and spears.
...
With our 18lbs of iron that we made when we were with you, you said each block could make 4-6 spearheads. I'm assuming one block would make 1 sword or less - would that be accurate?

Also how many days would it take to make a spearhead from the smelt?

(the following is based on my original reply - edited and with added materials)

ONE huge problem - is that there is not any comprehensive research on this overall process, being ore to bloom to bar to object. Especially this sequence undertaken using correct historic equipment and methods.  (1)
Almost nothing recorded or reported - so here come the Wild Ass Guesses...

SO :

Modern blacksmith's undertaking work with bloomery iron have reported :

Ore to Bloom = anything from 15 - 40 % yields at this step.
There is a huge variation here. Quality of the ore / skill of the iron master / air volumes used being the primary effects.
- Larger ore amounts typically result in larger blooms (even with everything else equal)
- Higher air volumes also dramatically increase yields.
Here at Wareham, with all else similar, but using something reproducing Viking Age, human powered air systems, my yields typically drop to the range of 15 - 18% on average. (Compare with the 28 % return for this specific test demonstration!)

Finished Bloom - hot cut during extraction
Bloom to Bar = ??
Almost everyone I know is using variations of equipment, from on 'traditional' (= mid 1800’s to ‘modern; forge equipment. So NOT the small VA forge set up we looked at in the filming. This will make a huge difference in 'loss during forging bar'.
Even with larger / hotter coal fires, using of mechanical hammers / presses, the numbers approximate 30 - 40 % loss of the bloom weight, as forged into a working bar. (2)
I certainly would expect more loss (or at least in the higher end) for all Viking Age equipment. So quoting this at 40%
This is really a bit of a WAG, since I personally have never taken a bloom into a working bar with all historic tools myself.

So this reduces this specific 8.5 kg recorded bloom down to at best 6 kg, but more likely closer to 5 kg, as the final working bar. Remember the product of the bloomery operation is a ‘currency bar’ - not the actual objects themselves.


Bar to Object = ??
Now that starting bar is sold into the hands of the blacksmith. It is re-profiled, likely cut up to needed starting sizes, and finally forged into our finished objects.
Again - I don't have the best numbers on this. My own work with bloomery iron to finished object remains quite limited.
Even with modern metals and tools (coal + power hammer). I would expect the loss to be at least 10 % at this stage. Again, I can’t provide the best comparison to losses using all Viking Age equipment. (Smaller and colder charcoal forges, much smaller anvils, …)
There is going to be additional loss (significant) during the polishing phase, after forging.
Again, I have almost no direct measurements to quote here. (3)
Certainly the more skilled and accurate to final shape from the hands of the blacksmith, the less grinding to profile, flattening, then surface polishing will be undertaken, with the associated losses in material.


The weights on the samples I had in the shop during the filming :
(the sizes are the blades L x W x T )
top - 'lance' tip (closest to your question artifact) @ 14 x 2 x .35 cm = 61 gm
rough forged hunting tip @ 14 x 3 x .5 cm = 250 gm
partially flattened hunting tip @ 17 x 3.5 x .75 cm = 444 gm
bottom - partially forged (no bevel) pattern welded @ 17.5 x 3 x .5 cm = 408 gm *

You can see there is a lot of difference between what might be considered a 'standard' hunting spear blade - and the very light construction on the 'lance' sample!

This all suggests, adding the forging loss in, roughly .5 kg each for the standard spear head being required (a bit of a WAG).
So at best, your test bloom is likely to be enough for something about 10 spear heads.


* I also have several finished spears, mounted on shafts. These are most similar to the middle two seen above.


On swords - again, I took some 'representative' samples I have under construction here:
top - to rough polish @ 81 x 5 x .77 cm = 1195 gm
pattern welded, ready for mounting @ 82 x 5 x .67 cm = 1241 gm *
finished sword @ 68 x 5 x .83 cm = 1805 gm (includes forged cross guard and end pommel + short antler tube hilt)
These are good representative weights - a finished sword (including the iron guard and counterweight pommel) is typically in the range of 1.5 to 2 kg (rarely more!)

Again - the actual losses are not personally known (I have never taken bloom to sword blade - much less with historic gear).
My best guess here is that at least 2 kg of iron  bloom would be the amount needed for a single sword.
This WAG suggests  * at best * only three swords possible from your test bloom, given the better quality of metal required for swords, two swords is more likely.

* If a more elaborate pattern welding process is used, the forge construction stage could easily approach an additional 30 % loss yet again.
I have some rough notes on forging the specific sword blade seen. I started with about 3.2 kg of metal plates. The total loss was easily 50 % overall on that project by the time the finished polish was applied.
This is certainly likely to be less productive for all VA process and equipment. 


(Speculative) Sand Table forge, 15 kg replica anvil, tools from Mastermyr.
How long - Start to Finish?
Again - I have never taken raw bloom through to working bar - using all (accurate) VA equipment.  So WAG again!

I normally use hotter and larger coal fires, plus available propane forges - and also have powerful mechanical tools replacing workers with sledges.
And honestly - 'day' is an important measure. As in ' How much can you accomplish in a typical working day'. Forge welding up the large masses of bloom is intensive and exhausting.
My 'best guess' on this is at least three working days to get a bloom into a standard currency bar.
That bar then has to be re-forged into the starting shapes required to make spears themselves. Add at least another day.
So four days to get the metal prepared to forge a spear. I would suspect you would need to easily double this time using smaller fires and smaller tools available in the Viking Age
Using my modern forge, I can forge one spear in a single working session, consider a half day each. Again likely double with all VA equipment (?)

Now these need finishing. (4)
I certainly need something about and hour each to grind and polish - but I have vastly faster high speed powered equipment.
Using just a piece of stone? No idea really. Best consider at least another full working day or two?

Do remember that in our demonstration - we did not have to actually gather any of the raw materials either!
- Easily a half day plus mucking around in the bog gathering the ore. Assuming you had already found a good source. (This not a trivial exercise in itself!)
- Several days to gather wood, cut to size - then the long process running a charcoal kiln (easily 4 - 6 days together).
- Someone would have to gather clay. If you had good stuff you might be able to use it right out of the bank? Otherwise, gather / dry / break / screen / reconstitute steps are likely added.
- None of this includes the actual walking and hauling required!

I had seen a reference that gave the ‘average iron per person within a household total’ at 2 kg each. As a male - that means a ‘large tool’ (say any axe) and a small knife. Only.


Notes:

At time of writing, the general description of this specific iron smelt experiment (October 10, 2018) has not been fully compiled.

1) There is generally a large break between those that do - and those that study.
Here in North America, the original ‘Early Iron’ group was composed of artisan blacksmiths, many of whom were employed at Living History museums as interpreter / demonstrators. In the last decade, bloomery iron has caught the attention of the bladesmithing community. Although these groups are often highly skilled, they are not as a rule academically trained. Acquired direct experience tends to dominate over careful record keeping. There certainly is no clear standard of terminology or often even in method.
This is changing into end of the second decade of Early Iron. As Experimental Archaeology itself becomes a recognized academic discipline, new researchers are active in attempting to formalize working skills with scientific measurements.
There are certainly people who have undertaken the individual segments. Very, very few who have actually combined the separate steps into one overall combined effort. Few of those have actually kept detailed records of their process.
(More often than not, closer examination of claims of ‘All Viking Age’ will show significant use of incorrect tools or process. To point a good example - my own use of electric blowers on the majority of my iron smelt efforts.)
The exception here would be the original work of Peter Crew of the UK, going back to the early 1990's.

(2) Sparked by this request, I am also working up a report on my own Bloom 2 Bar work to this date. Expect this material in the near future.

(3) Again, I must admit my work on sword sized billets is limited :
Sword of Heroes
Gilling West Replica
Pattern Welded Sword 2
I have certainly created a large number of pattern welded knives - But as anyone who has attempted the much larger and significantly more difficult forgings required for swords well knows - good knife work does not equal ability to produce swords.

(4) The topic of finishing a raw forging through to a finished weapon should have a (separate) long discussion. Obviously, the forging should be as close as possible to the required final shapes. (NOT 'Forge Thick - Grind Thin')
a) There will be grinding to the final profile, which includes removing small distortions in shape. This includes flattening the surfaces.
b) The surfaces need to reduced to below any hammer marks or pits.
c) The cutting edge needs to be reduced to the correct bevel angle - and 'close to sharp' thickness.
d) A decision needs to be made about how 'polished' (shiny) the final surfaces will be. Note that this is largely an 'artistic' decision, not really a functional, one.
In the Viking Age, all this work would be done using large whet stones (imagine a piece of rock 2 x 4, about the length of your forearm).

Thursday, December 06, 2018

'Custom' Blades / Phones = Questions

Ok - I *am* getting (more) crotchitty. 
I have gotten a good half dozen 'tell me everything - because I can't be bothered to read anything' e-mail messages over the past month.

There are two core reasons that I can see for this - both underscoring current popular culture :

1) Forged in Fire = false 'information' creates general lack of understanding
2) Use of phones and their tiny screens

This is particularly frustrating to me, as I have certainly spent considerable time and effort to supply basic information on the main Wareham Forge web site - I have also done any number of commentaries related to Bladesmithing and Custom Work on to this blog.
Following good advice from David, Neil and Kelly (particularly) I have formatted up the following bulk reply to 'Will you make my knife' e-mails * : 

Layered Kitchen Knife : 1996 = $400 (+)
This is a bulk reply to your recent query related to 'Custom' blades from the Wareham Forge.
As you might expect, I get a large number of similar first contact requests.

Increasingly, as individuals use tiny phone screens as their portal into the internet, I am receiving questions which are fully covered in some detail on both the main web site (www.warehamforge.ca) or as commentaries on the blog (warehamforgeblog.blogspot.com )

So to start with, I will refer you to the following general topics :

On Custom Bladesmithing : http://www.warehamforge.ca/knife.html
On Past Bladesmithing Work : http://www.warehamforge.ca/gknive.html
Currently Available Work : http://www.warehamforge.ca/available.html
General Questions & Answers : http://www.warehamforge.ca/QandA.html

On 'Custom' Blades (blog posts) :
https://warehamforgeblog.blogspot.com/2014/09/custom-knife.html
https://warehamforgeblog.blogspot.com/2010/01/be-serious-or-dont-waste-my-time.html


At this point in my working life (40 years at the forge):
    - I am primarily * only * undertaking projects of my * own * personal interest
    - Acquired skill and experience = high value. Any blade created will be in the * plus $500 * range
    - I am not interested in making simple 'heavy tool' / camp knives
    - I do not work with exotic modern alloys / stainless steels
 
'Hector's Bane' (Bloomery Iron) : 2012 = $1000
Despite what 'popular culture' suggests, the following qualities are not possible in a single blade
    - chose either edge holding OR heavy durability
    - chose either ease of sharpening OR rust proofing
    - Layered Steel blades should be considered decorative rather than functional
REMEMBER THE 'IRON TRIANGLE' :
You can have it CHEAP
You can have it FAST
You can have it GOOD
You can only get ONE of these 

'Bayeux' Broad Axe : 2008 = $450
Please read the background information available.
If your concept for your blade project resembles past work as illustrated, AND you are willing to commit a * significant * budget to your project, be welcome to contact me for further discussion.

I also suggest the following alternatives:
Ontario Artist Blacksmith Association : www.ontarioblacksmiths.ca

Although I can certainly recommend a number of senior artisan blacksmiths, most of these will have similar restrictions as I do (for much the same reasons)
David Robertson : www.artistblacksmith.com
Jeff Helms : www.jeffhelmes.com

Two 'younger' smiths I can suggest are :
Dustin Wolski
Simone Ruetz

Darrell

* Images and hot links added for this posting

Tuesday, August 21, 2018

'You can't always get what you WANT...'

but you get what you * PAID FOR *


On 2018-08-20 7:46 AM, N. S. wrote:
I recently received a damaged “Sword of Saladin and Scabbard” made of 1065 High Carbon Steel:
from the original seller's web site (1)

By Windlass (meaning made in India).

Here is how Windlass describes itself (taken from their own web site)
Founded in 1943, Windlass is today the premier supplier of military dress and sabers and accouterments, motion picture props, and a whole lot more. We are proud of our military contracts with governments in six continents and the excellent replica props we deliver to Hollywood’s biggest blockbusters.
You will not find this specific item still listed on the actual Windlass web site (2)

Check around the inter-web:

From the Museum Replicas web site:

Sword and Scabbard of the Great Saladin

from the Museum Replicas web site
#500818
$444.95 US
Discontinued

This sword has the unique "fork tongue" blade crafted of 1065 high carbon steel. Features 24K gold plated pommel and cross guard. Includes wooden scabbard covered in leather and accented with 24K gold plated fittings. Overall length of 41-1/2 inches. 
 
 DANGER WILL ROBINSON !!

a) Any time the description and the product images centre almost entirely on the *furniture*, not the actual *blade* you had best understand what you are paying for is the *flash* NOT the *function*.

b) The blade description? *Crafted* is what it says. Not *forged*. Not a word about the heat treating. Best assume this will be perhaps a suitable (if simple) metal alloy. But most likely ground out by machine from annealed bar stock - with no hardening or tempering undertaken. Meaning not at all *combat* ready. 
(I do realize that this was not the question given to me!)
 
c) This item is shown as discontinued (Museum Replicas & original seller). It is not listed or described on the actual Windlass site at all! 
What was not provided was if this purchase was made at the full retail - or at some discount. If at a discount - then 'buyer beware' certainly needs to apply.

Both edges of the sword and the scabbard. I tried cleaning it with Lysol, Windex, Brake Cleaner... nothing worked. Took it to a local blacksmith who only works with military swords and he was able to remove a lot of the gunk on the blade, but scratched the sword in the process. Please see pictures.
image from N.S.

image from N.S.
image from N.S.

So here is the problem:

If the corrosion effect I see in the image (just by the lion pattern etching) is the problem?
You should have returned the blade to the seller and required a replacement.

The marks look suspiciously (to me) like finger print created corrosion. (Touching the blade and not wiping it off afterwards.) This is a corrosion / rust deposit right into the steel. The surface is actually pitted.
The only way to correct this is to re-polish / grind the surface down below the level of the pitting.
Normally this means reducing the level of the surface down for the entire length of that edge. Otherwise there will be a noticeable 'divot' at that point.
Do note that the imperfection is right beside the etched design.
How to shave the surface down below the pitting - without actually effecting the shallow etching?
You might be able to remove metal just at the pitting, by carefully using a set of small grinding / polishing burs via a dremmel style tool just at the corrosion site. Given the high surface polish down the rest of the blade surface - this will always reflect light differently - and so be visible.

1065 carbon still will *always* rust - unless you constantly keep that surface lightly oiled. Even WD40 would prevent this.
Fingers touching the blade surface are to be avoided on almost any steel surface - especially carbon steels.


The first bladesmith has cleaned out the existing corrosion. That pitting is right into the metal at this point.
The surface has been scratched? To be expected unless the entire blade surface was ground down below the pitting.

'Made in India' ? (2)
To ship items overseas, usually some kind of lacquer is applied to the metal to prevent surface corrosion during long shipping. These coatings are often not evenly done. Removing the *lacquer * sounds like what you attempted. (Noting that none of the solutions you applied will effect lacquer - maybe try actual 'lacquer thinner'?)

Overall ? - I am not surprised.

I would be quoting in the range of $600 + : JUST TO FORGE THE BLADE.
The cost of the elaborate carved hilt, cast cross guard would easily push the quote into the $1000 + range.
This is a mass produced item - made 'offshore'. The selling cost reflects this  - and also the relative quality for that price.

And no - I would not be willing to undertake the kind of repair work being requested. (3)
a) With corrosion pitting into a metal surface, there is no real way to completely remove this - without also visibly effecting the surface.
b) The imperfections on the thin 'gold' plating on the hilt detail are either a result of poor application of the plating at manufacturing, or possibly damage after the fact. In either case, the underlaying metal (likely brass) would have to be re-finished, then new plating applied. This involves taking the metal collar seen completely off the sword. Given how gold reflects off surfaces, this also makes it likely the repair would also be obvious afterward.


(1) I have deliberately NOT cited this supplier - who is also in the business of selling primarily *costume* pieces. I have personally ordered various things from them in the past. With care in selection, my choices have represented good value for the reduced prices. I have found their service excellent. My working relationship with that company remains very good. 

(2) Look - this company does have a 75 year history. There are smart people in India, and family operations there who have been making blades for *hundreds* of years. This is not intended as a snark about 'made in India', in any way.
But
Look what Windlass actually specializes in, makes and sells. 
*Costume* pieces. 
Even their 'Military' lines are *dress* blades - not *functional* weapons.
(The exception to this may be the 'Kukris' they have described as 'Genuine Gurkha Regimental'. This appears to be how Windlass established its original reputation. They do provide detailed specifications for these blades, but the low price (quoted at $50 US) makes this perhaps questionable?

(3) Increasingly, I get requests to 'beat the price' or 'fix the mistake' related to what are nothing more than cheap 'wall hangers'. Surprisingly - I am not at all interested. 
Please take the effort to at least look at my body of past work, and decades of experience?
 

February 15 - May 15, 2012 : Supported by a Crafts Projects - Creation and Development Grant

COPYRIGHT NOTICE - All posted text and images @ Darrell Markewitz.
No duplication, in whole or in part, is permitted without the author's expressed written permission.
For a detailed copyright statement : go HERE