Saturday, December 31, 2016

BASIC BLACKSMITHING - 2107 Courses

Tentative Dates* for 2017 Basic level courses: 

http://www.warehamforge.ca/TRAINING/course.html

March 11 & 12 = Introduction to Smithing - two spaces only / work with propane forge

March 25 & 26 = Build a Zombie Killer - four spaces / consider an 'experience' style program
http://www.warehamforge.ca/TRAINING/zombie/zombie.html

April 7 / 8 / 9 = Introduction to Smithing - four spaces

May 5 / 6 / 7 = Introduction to Smithing - four spaces

June 2 / 3 / 4 = Introduction to Smithing - four spaces


* July - no courses scheduled (possible presentation at L'Anse aux Meadows NHSC)

* August - no courses scheduled (possible trip to Scotland)

* Should either of these projects not be carried out, it is possible there may be programs placed on the schedule for those months.


September 8 / 9 / 10 = Introduction to Smithing - four spaces

October 13 / 14 / 15 = Introduction to Smithing - four spaces

November 10 / 11 / 12 = Introduction to Smithing - four spaces

December 9 & 10 = Introduction to Smithing - two spaces only / work with propane forge


BOOK SOON

At this point I have already filled one program completely (May 27 & 28 - Zombie Killer), and I have five deposits already in hand (made as Yule gifts).
Based on the experience of previous years, available dates fill quickly!


First deposit = first booked!

Tuesday, December 27, 2016

Kristmas Krafts....

This was something I posted up on Facebook earlier this week...
If you care about the comments and suggestions - look to my Facebook page.

Here is the simplest thing I have come up with - a project suitable to make with your kids?

Cat Food Can Spinner

This project makes use of empty 156 gm aluminum zip top cans that cat food comes in. (Sure to work with tuna fish cans as well).

After emptying, wash out the can.

You need to make a small hole in the bottom.
I'm using my drill press here, but an hand drill works just as well.
Simplest way is to put the can on a scrap piece of wood, and just tap a nail through to make the hole.
If you need guide lines, measure out rough 1/4 divisions, then break each 1/4  into three roughly equal segments. Precision not required!
I normally use a pencil or a water based marker (the lines will wash off in the first rain).
Now you cut along the lines, up to the small rim edge of the can.
I've got some tin snips for this, but aviation cutters or even a pair of heavy (bandage) sissors will cut this thin aluminum (note - use rough working sissors - don't use your dress-making shears!)
This is the most 'difficult' part of the project for young fingers.
Now you twist each segment through about 60 degrees.
The easiest way is using a pair of square tipped pliers as seen.
Note that you grip the segment by the bottom 1/3 or so.
With the aluminum, you can do this with bare fingers - but be careful of the potentially sharp cut edges.
You likely will have to adjust the individual 'vanes' you have just made when finished - the shape of the can can distort a bit.
Now you need about 24 inches / 60 cm of light string, or nylon fishing line as seen here. Plus a small washer or a small nail.
Fold the line over double, tie a knot on the free ends.
Insert the folded end through the washer
Pass the other end of the line through the open centre of the loop, then snug it tight against the washer (or nail).

Last step is to pass the free end of the line through the hole you made in the centre of the can.
Run the line from the inside towards the outside of the can, so the washer pulls up tight against the inner surface of the can.
DONE!

Now hang outside off your eves or from a tree branch in your yard.

The light weight of the finished spinner makes it move with even a slight breeze, the edges of the vanes catching the wind. The longer string allows it to wind up and then spin back.

In the image you can see some other prototypes, each made from colourful pop cans.
For those spinners, a heavy box cutter was used to cut lines into the body of each can, creating strips about 1/2 inch / 1 cm wide.
The red one has straight cuts, again twisted by about 45 degrees off flat.
The blue one has diagonal cuts, with the can 'squashed' to make the oval profile.


Monday, December 26, 2016

2017 Schedule - ALREADY!


I have been asked since the Fall for my 2017 course schedule.
At this point I actually have a total of 12 paid deposits against 2017 programs (!)

So here it is - a very (very!) rough draft for how 2017 is shaping up:

At this point consider the outline up to the start of July fairly firm.

Right now DARC is under discussions with Parks Canada about a possible return to L'Anse aux Meadows NHSC. This is likely to bracket 'Parks Day' weekend of July 15 & 16. No real idea at this point about potential team size or demonstration period.
I had been asked if I would be available to come back to the Scottish Crannog Centre for their 24th anniversary event (brackets August 5 & 6). Potentially with a return to the Scottish Sculpture Workshop for Turf to Tools 3.
This makes July and August very tentative.

Early Fall may be modified by the possible ReARC conference, very tentatively the weekend of 21& 22 October.

At this point (December 2016) the intent is most of the course offerings will keep the same fee structure as 2016 rates.

As with past years, keep an eye to the web site descriptions of individual courses for firm dates and availability. Demand is even increased over last year, so you are advised to book (with a deposit) as early as possible!

www.warehamforge.ca/TRAINING/train.html

Wednesday, December 14, 2016

OAC Grant - Final Summary


Crafts Projects - Creation and Development : Final Report

A note to readers: One of the requirements for the OAC grant which funded the major portion of my six week research trip to Europe & Scotland Fall of 2016 was to submit a final report summary. In so much that it took me five hours to prepare that report - I've included it here as part of my continuing documentation of the overall project.

My original grant application was to fund one month’s work at the Scottish Sculpture Workshop, Lumsden Scotland. The amount covered return travel, studio fee and materials, lodgings, and maintaining my home studio in my absence. Two working sessions were planned. First was a continuation of the ‘Turf to Tools’ project started in 2014. This is an investigation of human impact and relationship with the local landscape, specifically through an exploration of historic bloomery iron smelting techniques. The second half of the grant covered personal study, primarily into small scale bronze casting techniques.


The core remained the two projects at SSW, from September 12 through October 10.
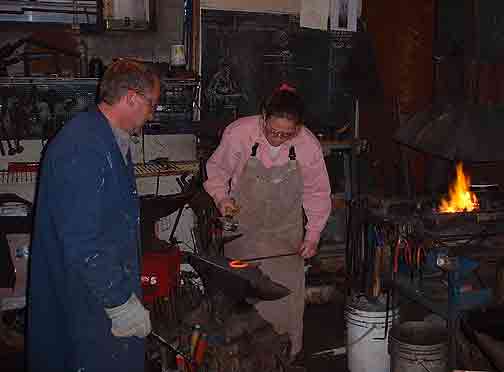
Turf to Tools 2 included three individual iron smelts, all assisted by other artists in residence. The first smelt used ore gathered on a field trip to the historic Lecht Mine. The second expanded on work from 2014, testing peat as a possible fuel. This smelt was held as a public demonstration, with artists and local people attending. The third was a teaching session for the SSW staff.
Preparing for extraction while the crowd watches at the second iron smelt as part of ‘Turf to Tools 2’. - Image by Kelly Probyn-Smith
As part of the personal project segment, I produced two small cast bronze pieces in the process of learning the base techniques and becoming familiar with the required equipment.
As an addition, some time was spend in the ceramics studio. Here two pieces were created, both based on ancient artifacts. I also was able to participate in two Raku firings, including observation of the kiln construction.
Dunnottar-Beach
Cast bronze with natural stones, 16 x 13 cm, part of the proposed ’Memory Disk’ series (not polished). Inspired by the erosion of the cliff shore line at Dunottar Castle, utilizing wave polished stones from that location.
Souterrain
Cast bronze, 13 x 9 cm, outer and inner surface shown, part of the proposed ’Memory Disk’ series (not finished). Inspired by the Neolithic to Bronze Age stone line chambers across Scotland (several nearby Lumsden / SSW).
Beaker-Pot
Wheel thrown ceramic, 8 cm tall, inspired by the ancient ‘Beaker’ artifact (seen as inset). This object used as part of the initial test of the ‘Tocca Ferro’ process. Image by Kelly Probyn-Smith
Dancer
Bisque fired ceramic, 18 cm long, inspired by Roman and Etruscan votive figures (seen as inset). This object originally intended as a master pattern for use with bronze casting. Image by Kelly Probyn-Smith
A major unexpected element was the instigation of the ’Tocca Ferro’ process, working with artists Katriona Gillespe and Kelly Probyn-Smith. This was the first testing of what may be a new ceramic firing process, working in conjunction with the iron smelting furnace. A number of small objects were created.
Ypres-1916
Ceramic, bisque and Tocca Ferro. This grouping inspired by images of destruction of the town square of Ypres during WW1.

In all honesty, I never expected to receive a grant. Through late Fall and early Winter of 2015, a number of additional projects arose that could be combined into a single air travel from Canada to Europe. In the end, I extended the OAC grant to cover a total of 6 weeks, taking part in three additional arts projects.
First of these, from August 29 through September 6, was taking part in the Ypres 2016 Cenotaph Project. I was part of one of the working teams, under Scottish artist Shonna Johnston. Artisan blacksmiths (drawn internationally) worked in groups of 6-8 to create individual panels for the larger memorial, with all work done before the public. I was one of only 6 Canadians on the working teams. In addition to the huge impact the Ypres landscape has had on me personally, I also had submitted a design for one of the memorial panels.
Working with Peter Hill on an element of the “Two Brothers” panel, as part of the Ypres 2016 event. Image by Kelly Probyn-Smith
Two Brothers
The completed panel I worked on at Ypres 2015, design by / team leader Shonna Johnson.
Age Shall Not Tarnish Them : The design rough submitted for the Ypres 2016 Cenotaph
Second was an invitation to take part in ‘ARTEfakty’, the Pruszkowski Festival of Archaeology, September 7 - 11, just outside Warsaw, Poland. I was one of only two North Americans (the only Canadian) attending, demonstrating bloomery iron smelting methods. I was grouped with a team with members from Denmark, Norway and the USA.
The ‘Viking Age’ demonstration team preparing to consolidate the hot bloom just after extraction at the ARTEfakty event. Image by staff photographer
Third was a session at the Scottish Crannog Centre, from October 2 to 5. Here I worked with staff researching (and training towards) early Iron Age furnaces, for both iron and bronze casting.
Working with staff at the Scottish Crannog Centre building and test firing an Iron Age smelting furnace. Image by Kelly Probyn-Smith

The largest impact on my future work will come from this amazing opportunity to work alongside artists from a wide range of European countries. Additionally, most Artisan Blacksmiths work alone, so the ability to work as a team, and discuss work with people from such a range of locations and backgrounds, is significant. Certainly much was learned.
The exposure to related high temperature processes at SSW has lead to a deeper understanding of furnace construction overall. My intention is to build flexible use furnace system here at Wareham over this winter (allowing for both bronze casting and raku firing).
Close association with artists from many disciplines at SSW and other the other projects has refined my own understanding of the role of the Artisan within the larger artistic community. As always, the wide range of personal contacts from such far flung locations can not be underestimated.


At this point, the primary method the support of the OAC has been attributed has been through a dedicated series of blog posts, describing the overall experience.
Additionally the OAC logo appears on the fixed blog frame indicating the support via this grant.
As the individual iron smelt documentation is created and posted to the Wareham Forge web site, the OAC logo will be included.
A number of public lectures are in the submission stage, where support of the OAC will be mentioned and illustrated.
Currently a publication is being created that details the Turf to Tools project, undertaken by SSW. The OAC logo will be included on the sponsorship page there.


In conclusion, it is my feeling that the value provided by this Project Grant was greatly increased, both in terms of scope and impact, by the expansion to include the many extra projects listed. Personally, I have been increasingly involved with skills training. In this I feel the value of this grant personally will most certainly be passed along to others into the future.


Those following this blog over the last months have seen many separate postings, describing in some detail my exeriences over the Turf to Tools 2 / European Iron Project.

Friday, November 11, 2016

Remembrance of WW1


As Readers most surely know - today is Remembrance Day here in Canada.
Sanctuary Wood Cemetery - Belgium
As you may have previously read, my personal starting point for the entire Europe 16 / OAC Project Grant was World War One :
I am clearly a child of North America in the the Sixties, the paranoia in the midst of plenty which was the Cold War. I was a serving member of the Canadian Armed Forces Reserves when I was in my late teens and early twenties. Both my units, the Hastings and Prince Edward’s and the Toronto Scottish, were regiments who had fought at Ypres in 1917. As young men of that same age as those who suffered at Ypres, we were pulled by similar forces. We certainly were frequently reminded of battle honours bought so expensively. This was the early to mid 1970’s, at the end of the Viet Nam War. I was trained by those who had participated, and have close friends who fought in, that particular brand of insanity. Honestly, my own time and place made it hard to understand just how those other young men had been driven so willingly to their destruction.
I personally had intended in visiting Europe at some point over the next few years, to allow me to visit the battlefields in my own pilgrimage of remembrance. I turned 60 this year, I know I’m not going to see the same commemoration of WW 2. As a Canadian, who as a people are so tied to the Land, I know partial understanding will best come from walking the same ground.
from 'Artist's Statement' - my design submission for the Ypres 2016 Project
As Canadians, all of the battles around Ypres have a special significance. 'In Flander's Fields', which we all learn in school here, was written by John McCrae in response to his experiences there in 1915.  Obviously, a big part of my involvement in the entire Ypres 2016 project was to 'walk the ground' of the surrounding WW1 battlefields. To that end, I left the main blacksmithing activities on a number of days to do just that.
Here are some observations:

My old Regiments had both been involved at Passchendaele, October 1917. This area was of special importance to me, and we undertook a day trip to the area.
'Stand the Crosses, Row on Row..'
First thing - It is totally flat.

View over machine gun bunker - Tyne Cot Cemetery
The ground has very, very, slight rolls to it.
The slightly raised area to the extreme right mid distance is the kind of feature that passes for a 'hill'.
The image above is taken over the top of one of three German built concrete machine gun bunkers, a position later taken by Allied troops and used as a first aid station. I'd estimate that the range to the line of trees and farm houses in the near distance to be about 1500 m. At best that line represents the last cover. From there forward, the ground slopes down slightly then back upwards again. The effective range of the German MG 08 machine gun most likely to have been installed in this bunker is 2000 m.
Clearly anyone attempting to cross that ground - even clear and grass covered as it appears today, would be under constant fire - the entire time.
Location of that bunker inside the cemetery
Everything is clean and sanitized.

I was amazed at how perfectly ordered and spotlessly maintained the various cemetery grounds were. Absolutely not a single blade of grass uncut, never, ever a spot of litter anywhere. To their great credit, the Belgians keep all the memorials in flawless condition.
I understand and value this considerable and constant effort to 'Honour Our Dead'.
But is something of the reality of War being lost in the process?
I watched the tourists come and go to this memorial. A very few searched for names. Most took their obligatory holiday snap shots, then got back into their cars or tour buses and off to the next destination. We certainly were the only ones undertaking one of the well posted and described 'battlefield walks'.

I most certainly understand that a short modern visit could never realistically attempt to convey the start truth of the conditions on that same ground to the troops fighting and dying there so long past.
But standing on manicured lawn looking at what in truth is only a handful of representative clean white markers is just far too remote for me.


Visitors Handout - from Sanctuary Wood Museum
On my first day at Ypres, I had visited the visitor's centre (the Ypres 2016 working space was set up just outside). Like any tourist, I looked through what was available locally. This was to back up the general search I had done over the internet before leaving Canada.

Sanctuary Wood is a very small private museum south of Ypres (short bus ride, could be a bicycle trip). Because of its private ownership, it does not get listed on the 'A' tourist site list:
After the First World War a farmer returned to reclaim his land in and around what was left of the wood he had left in 1914. A section of the original wood and the trenches in it were cleared of debris and casualties but generally the farmer left a section of a British trench system as he found it.
Introduction to Sanctuary Wood Museum - Great War web site
What we had found out at the Official Visitor's Centre was that too many tourists had complained that the ground was wet and muddy, much of the site hard to access because of no electric lighting.
Gee. World War One. Mud. (Are you kidding?)

View roughly south to west - large panoramic image (click to open)
 The main element of the site covers maybe an acre of ground. It remains one of the very few locations that has not been completely plowed over. There certainly has been ongoing repair to / installation of steel panels to support the trench lines in the sandy soil. The area is completely pocked with shallow shell craters. It had been dry for a couple of weeks before our visit, and even so most the craters contained brackish water, and yes, in a number of places the trenches had some mud in the bottom. (Kelly and I both had hiking boots, not any problem!)
The trees have all grown up in the intervening years. Apparently the ground had become overgrown and grass covered, but the combination of tree cover and countless feet have ground the surface back to mostly bare soil. (Add some rain and my guess is the ground would even better resemble 1916.)
Entrance to one of the underground sections - to left.
There are two fairly short (20 m?) sections of trench with overhead cover. With the expected kinks (to limit artillery effects) these are of course pitch black. One has a small 'command bunker' of it. We of course had our penlights with us. I most certainly wanted to, and did, duck walk through these (and yes, more mud).

Honestly?
I felt I learned more, at a gut experience level, from the (obviously) modified representation of World War One at Sanctuary Wood.

In Flanders fields the poppies blow
Between the crosses, row on row,
That mark our place; and in the sky
The larks, still bravely singing, fly
Scarce heard amid the guns below.

We are the Dead. Short days ago
We lived, felt dawn, saw sunset glow,
Loved and were loved, and now we lie
In Flanders fields.

Take up our quarrel with the foe:
To you from failing hands we throw
The torch; be yours to hold it high.
If ye break faith with us who die
We shall not sleep, though poppies grow
In Flanders fields.

This piece is out of sequence in my documentation of the expanded OAC Grant Project.
I have been saving it for today...

Thursday, November 10, 2016

Ancient IRON SMELT at Tap o'Noth ??


Part of my own research related to Turf to Tools, and personal project at the Scottish Sculpture Workshop, was to spend more time 'on the land' around Lumsden. A primary objective was to visit the Iron Age hill fort of Tap o'Noth at Rhynie. This is the imposing feature that dominates the local landscape - seen in the heading image I have been using for the documentation of my OAC Project Grant.

A full description of the site can be found on the Scotland's Places web site, along with one of the best collection of images:
The Tap o' Noth is a conical eminence which rises from the W end of the Hill of Noth to attain a height of 1851 ft (564m) OD, and 1300 ft (396m) above the Water of Bogie at Rhynie; it is visible from the sea, 30 miles to the E. The fort that crowns this site is the second highest in Scotland and consists of a single wall (now overgrown and heavily vitrified) which may have originally been more than 20ft (6.1m) thick and encloses an area about 335ft (102m) by 105ft (32m). 
A number of less specific web sites include this (un-documented) quote:
Archaeological finds from the site include a stone axe head dated to between c2000BC–c800BC, and a decorated bronze rein-ring dated to the 1st–3rd century AD.
Also recommended is the Historic Environments Scotland web site, which has an even larger collection of images and a full bibliography cited.

It is clear that Tap o'Noth represents a very significant effort over a long term occupation, bridging the Scottish Bronze through Iron Ages.  (Curiously, the much more detailed archaeological description from the two web sites given do not include any listing of artifact finds or suggested dating).

Locating Top 0'Noth by Rhynie (direct scan)
Enlarged - Showing the trail from the car park, over to the west and up to the summit.  (direct scan)
Ariel View - roughly from West (image poached off the internet)
The hill fort runs roughly south east to north west, with the entrance laid to the SE corner.
View up the trail on the west side - looking roughly north
It is a bit of a hike up to the summit! In the image above, the trail is along the extreme left side, snaking just this side of the single tree seen. The ground cover is heather. (Those familiar with topographic maps may note that the elevation increases over 200 m - over the last 500 m of distance!)
View from the Tap - roughly from red circle towards the SW.
View of the fort interior - from the NW corner, looking back roughly East. (Note Kelly for scale roughly centre frame.)
From the other edge of the oval (NW - left of this image overlaps right of above).
Section of vitrafied stone wall (NW side, north edge
View of vitrafied stone wall (NW side, south edge)
To take those last two images, I had climbed down over the edge of the enclosing stone wall.
The main sections of the vitrafied stone walls shows to the same NW side of the ramparts. The appearance is almost like a dark grey concrete holding together the random pile of lighter grey stones. The stones have been subjected to extreme heat, causing them to partially melt and fuse together to a solid mass. The effect is a bit like the texture of a marshmellow and rice crispy square (familiar to most North Americans). Note that the dark colour seen here is an effect of the lighting and the individual stones themselves.
Originally it was thought that a wooden palisade wall had caught fire then collapsed to create the heat to fuse the stones. On more careful consideration, it is now interpreted that purposeful stacking and firing would have been required to create the duration and high temperatures required. The purpose would have been to strengthen the piled rubble walls of the fortress.


In many of the images, there is a specific location marked.
I stopped at that position, on the roughly 'east' end of the oval construction, just to the south side of the current entrance pathway. Standing on top of the curtain wall of piled stones, I shot a series of linked images to put together a full 360 panorama view of the countryside (unfortunately I'm having trouble getting that specific image to upload here).
Partial panorama view, from SE corner, view of the fort

Looking down at my feet, I saw what appeared to be perhaps an original post hole. This was the only hole like this I had observed on walking the entire upper curtain wall. The hole had been recently filled back in with medium sized stones. The stones were clearly 'fresh' on their edges. I can only imagine someone decided the small hole represented some kind of tripping hazard and decided to gather up some stones to fill it to level. The interior of the hole was covered with moss and lichen, normally a process that takes considerable time to evolve. I was bothered by this modern intrusion, and decided to remove the inserted stones to clear to the 'original', moss lined, interior.
General overview of the 'post hole' - after clearing.
In that image, the stones I pulled out are seen to the lower edge of the hole. You can see their appearance is markedly different than the more 'aged' surfaces of the other stones in the area. You may also notice that there is a visible difference in both colour and texture running to the left away from the hole. These stones are smaller, and have a more red colour to them. I did not notice this initially, something else caught my attention.
Cleared hole, showing moss covered interior. Pen for scale = 14 cm
The hole is roughly 20 cm in diameter, current depth about the same. (I used a 'field expedient' sale via a drawing pen). On removing the stones, I noticed something strange along the interior margins, especially to the upper edge as seen.
Looking more carefully over the small stones in the area around the hole - this is what turned up:
'Stones' from around hole - far left roughly 55 mm in diameter.
Now, there were a number of distinctively shaped / textured / coloured 'stones' - just found in close proximity to that hole. The same material can be found clinging to the larger stones making up the margins of the hole interior, especially to the upper edge as seen in the photograph above. I had not seen anything of similar appearance any place else along the extensive stone walls.
The primary material was obviously deposited as a liquid, several pieces were attached to fist sized stones. The best example was composed primarily of the black material, which had encased at least one small stone. There are pockets on the surface where the material has flowed and solidified around other stones (now pulled free). The material is fairly dense, but filled with small bubbles of varying size, some of which are flattened and drawn out to oval shapes.
Detail A - Possible Iron Smelting Slag - showing small stone encased to bottom right.
One side of this roughly triangular shaped piece is broken to show the interior structure of small bubbles.
Detail B (reverse) - Possible Iron Smelting Slag
The other side shows several areas that are sealed to a tight, hard surface. These surfaces show a reddish discolouration.

Now - I have seen a lot of iron smelting slag.
Another feature on the piece above (not seen in those images) is an area that looks exactly like slag that has flowed around a small piece of charcoal. The linear grain pattern of the partially consumed wood is clear.
Micheal Nissen had brought a sample piece of tap slag from a Medieval dated iron furnace to display at the Poland Symposium. It showed identical reddish colours on its exposed surfaces (oxidation effect).

To my eye, this sample especially, looks like iron rich slag from the bottom bowl area of a direct reduction bloomery iron furnace. 

This suggests, given the remnants of identical material clinging to the stones framing at least the upper edges of the hole, that this may in fact be part of the vary base area of a 'slag pit' style iron smelting furnace.*


If correct, this provides an excellent reference for the entire Turf to Tools project. It illustrates bloomery iron production at Rhynie itself. The activity may not be directly related in time to the carving of the Rhynie Man figure - which itself was a core element to T2T.


* Now, 20 cm ID is certainly on the small side. We have in fact worked successfully to produce iron in a furnace at that diameter ( Smelt #32 - April 2008)

Friday, October 28, 2016

DARC Fall Iron Smelt - MOVED

For any reading who were considering attending the normal Fall iron smelt at Wareham:

Saturday October 29
MOVED!
434104 4th Line Amaranth  
Roughly 15 minutes north of Orangeville
Just west of highway 10
Hosted by Richard Schweitzer & Sarah Scroggie

This is a full sized build of the Icelandic / Hals system
(Construction by Richard!)
Theoretical Furnace Layout
DARC had started on this specific series of experimental smelts way back in 2007. This will be the 8th in the series.

Here are a couple of images Richard took during the early phase of his build:

Bottom layer of the sods, indicating the internal diameter
Bottom stone construction - gap for setting the tuyere
The layout used will end up functioning most like the 'slag room' system used by the Danes (Nissen, Olesen). There may be a possibility of the furnace running 'incontinent', through the cracks in the front stone work, but the thick sod walls limit this effect.
There are a couple of possible variations for installing the tuyere. As set up now, the most likely is an insert style, using either the forged copper or standard ceramic tubes. High temperatures will cetainly effect the heavy stone lintel above the gap.


February 15 - May 15, 2012 : Supported by a Crafts Projects - Creation and Development Grant

COPYRIGHT NOTICE - All posted text and images @ Darrell Markewitz.
No duplication, in whole or in part, is permitted without the author's expressed written permission.
For a detailed copyright statement : go HERE