Thursday, October 19, 2006

'Loki' Smelter at Early Iron

Early Iron 3 Symposium
Peter's Valley Craft Centre
October 7, 2006.

This is just a fast note on one of the many smelts undertaken at Early Iron this year.

On Saturday, Early Iron overlapped with an annual public event the 'Pig Iron Roast' at Peter's Valley. The organizers asked if the team leaders could provide a public demonstration smelt. To that end, TWO furnaces were built on Friday and fired the next day. Lee Sauder and Mike McCarthy constructed one of the same 'Flue Tyle' test furnaces that the participants would themselves build Saturday and fire in three person teams on Sunday. (With excellent results I should say!). Mike would be primarily responsible for conducting the smelt in this furnace - and produced a large bloom of nicely workable iron from it.

I took the opportunity to test two variables which I was interested in. First, I wanted to test a slightly smaller sized furnace based on the standard North European model. Normally the interior diameters we have built in the past were on the range of 25 - 30 cm (10 - 12 inches). This text furnace was only 20 cm interior.
(loki exterior)
The second variable was to try using a potential 'Bog Ore' type. I had gathered about 10 kg of a pudding like red oxide out of standing water in a drainage ditch near Minden Ontario the summer of 2005. Although I was certain the material contained iron oxide, I had no good way of knowing if the concentration was high enough to make for a viable ore.


I have posted up the raw data of this smelt on the main Wareham Forge - Experimental Iron Smelting area.

more to come....

Monday, October 16, 2006

Viking Age Cauldron Hanger


This is the largest of the pieces I have made for the Outlander production.
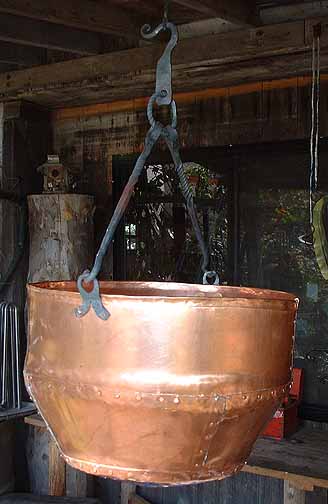
In use it is intended to hang off a main house beam roughly 8 inches in width, at a height of 8 1/2 feet above the floor. The most likely pot it will be used in combination with is the large copper cauldron also shown above. I have made a number of different pots for the production, and designed the hanger to allow for use of any of the various different sizes. Quite intentionally, I made limited use of round profile stock, sticking instead to square or flat as would be more likely for a smith during the Viking Age.

The overall inspiration for the hanger is the artifact found in the Sutton Hoo ship burial, which dates to 625 AD. This is a saxon royal burial, but decorative chain hangers have been found in a number of Viking Age burials as well. Although the Outlander hanger is shorter than Sutton Hoo, I used a number of the same chain elements in its construction. I wanted to take special care in the detailing on this specific object, as I suspect it may end up featured in some of the filming. Historically, these highly elaborate forgings were status symbols and presentation pieces, hanging in the central focal point of the hall over the fire.

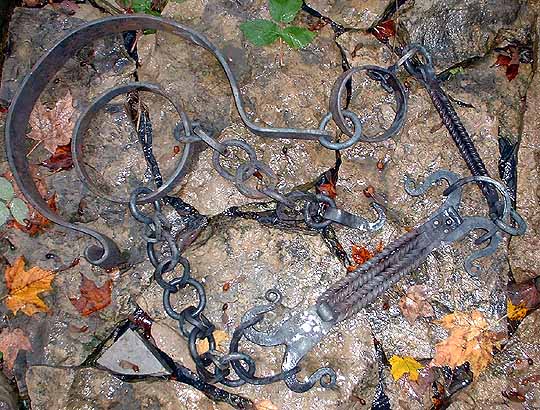
In the overall photograph, you can see the flow of the elements. The hanger has been designed with a large hook at the top to allow for easy installation and removal from the beam. Bellow this is a roughly 4" diameter ring with a swivel mounted in it that allows the lower chain to rotate.


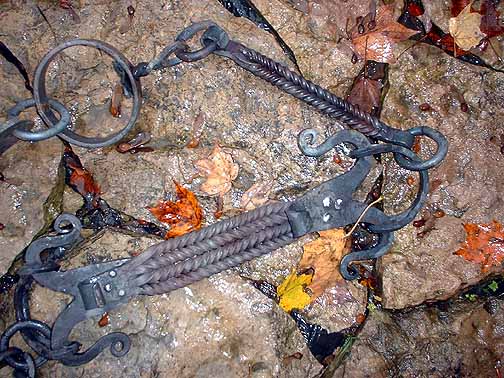
Below the swivel, there is a straight bar unit. This element is made of two bars, each of 3/8" square stock which have been twisted in alternate rotations. The ends of the bars are then forge welded, and the block flattened and folded to a small hook. Rings made of 3/8" round join the completed element to the chain.

The most elabaorate elements of the series are next. In use, this large bar and hook piece will hang at roughly eye height of the standing viewer. The form of this element is a bundle of four alternately twisted rods, forged to shape much the same as the single bar element described above. This unit is attached to a pair of spiral hooks at each end by means of three rivets. The individual hooks are formed from a piece of 1 1/2 x 3/16 " flat bar which was slit at one end and then drawn out. The two points were then formed to the reversal curve hooks. The opposite end was then drawn down to a taper, and this also formed into a curve. On the lower unit, that terminal curve is large enough to hook up the lower chain.

On both ends of the bar and hook element are a matching pair of 'flat 8' rings. These are formed of 1/4" square. First a large circle is formed and welded. This is then folded in half. The two folded ends are opened up to a small circle, and the balance of the curved half circle is tapped tightly closed. Again this is an element taken from the Sutton Hoo prototype.


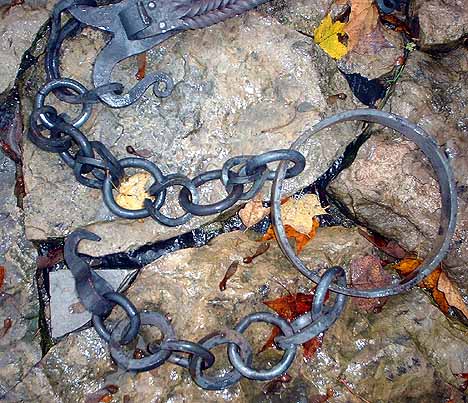
Just below the bar and hook element is a short length of chain made from a set of 'flat 8' style links joined by simple circles. The decorative links are similar to those described above, but in this case the finished link is a roughly 3 inch circle.

The lowest part of the chain is the working end, and is a simpler set of alternating round and square stock rings. It ends in a hook, formed from folding and welding a length of 3/4 x 3/16" flat stock.

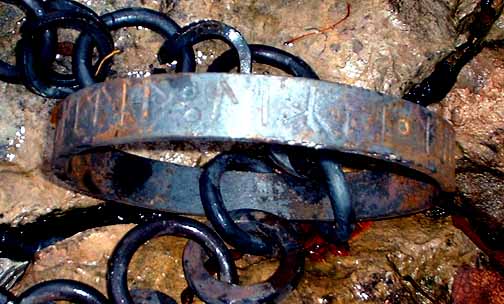
In the centre is a large ring made of flat bar. I decided to sneak something in there for the Viking Age enthusiasts and die hard fans. The exterior of this ring is punched with a short text in runes. The text is in actual Old Norse, and reads:
KITIL • KIRthI • MIK / Ketil • Gerthi • Mik / 'Kettil Made This'. To those who have read much of the Wareham Forge or DARC web sites, you will recognize 'Kettil' as the characterization I use in museum presentations.

Wednesday, October 04, 2006

Outlander - Chain with Shackles

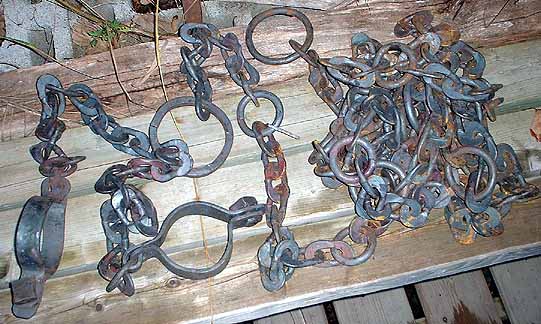
One of the projects for 'Outlander' is the creation of twenty feet of chain ending in wrist shackles.

First off, I am not aware of an artifact sample from the Viking Age that could be specifically identified as a prisoner or slave chain. There are a number of lengths of chain - but most commonly these are related to the cooking fire. Cauldron hangers and chain trammels of several types are found from the Viking Age. These range from simple circular or 'figure 8' shaped loops (just pinch the middle of a circle) to extremely elaborate elements found in royal quality burials.

For this project, the twin factors of design and cost would work directly against each other. The ideal approach would be to hand form and then forge weld each individual link. I would normally charge $5 per link for this work. You can see that the cost of 20 feet (roughly 200 links) would be very high! On top of that there was a time constraint to consider - ALL the work for this project was to be delivered for Oct 1.
In the end I proposed taking a heavy weight commercial chain and re-forging all the links to dress them to a hand worked look. This was considerably less labour than creating each link from scratch. I cut the chain into short one foot lengths, allowing for considerably easier handling of the hot and flexible chain. The end of each link was flattened - specifically in a random and irregular fashion. The short lengths were then joined back together using a roughly 3 inch diameter round link of 3/8 round.
One extra thing I did was quench the completed chain from a bright orange heat. Although basically a mild steel material, this quenching served to slightly harden the metal. The reason for this was sound. The completed chain makes a wonderful tinkling noise as it is dragged around!

The two terminal ends finished up in a much larger (roughly 4 inch) ring. At one end this was made from 3/8 square stock - this was the end the shackles were attached to.
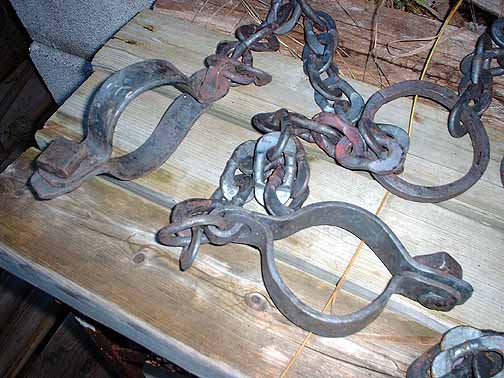
The two shackles were attached to a separate two foot length that fitted through the terminal ring, allowing for free motion. The shackles themselves are formed of two pieces of heavy flat stock. Each pair of U shaped pieces ends in the same kind of loop and tab arrangement seen on sea chest hinges. Here the tab of the loop is made over long to allow for a small ring that attaches the chain. The end of the tab is welded back down to the cuff.
On the other end are punched a pair of matching holes. Through these is the locking pin. Historically this would be done by inserting and hammering over a rivet. Actors however, and not likely to submit to imprisonment (as much as the director might want to nail them down!) I had to design some system that would maintain the visual feel of the Viking Age - but also allow for quick application and removal. In the end I found a type of blind fastener the ideal size - thats a tube shaped bolt with the threads on the INSIDE. To each of these was welded a roughly square chunk of metal hot cut from heavy stock to give the appearance of a square head rivet. I created two different types of matching bolts. - one round headed and one square headed. These take about 30 seconds to screw in place to secure each shackle.

Early Iron 3 - this Weekend!

EARLY IRON THREE

Early Iron is the annual symposium that explores the direct physical
process of turning ore into workable iron - using variations on historic
method - held in the NE of the USA.

Go On for details here

PLAN TO ATTEND!

Next Weekend - Oct 7 - 8

We have kept Early Iron set on the weekend that combines US Columbus Day
and CDN Thanksgiving to give you all an extra day to travel.

This year the event is located at the Peters Valley Craft School, under
the direction of Dick Sargent. This is located at the top NW corner of
New Jersey, putting the event a bit more central to everyone.

Don't let the tie in to 'Pig Iron Fest' fool you - its going to be
another busy weekend of HANDS ON iron smelting! As with the very
successful schedule used last year, participants will be grouped in to
small teams and each will prepare materials and construct a smelter the
first day - then undertake a full smelt the second. Last year EVERY TEAM
successfully produced a workable iron bloom to share between them!

Participants will work under the supervision of :
Mike McCarthy - has been teaching a number of hands on workshops in iron
smelting over the last year, and is sure to have good instructions to
pass along.
Dick Sargent - attended a week long intensive at Rockbridge Bloomery
this year, and has been organizing some of those same workshops with Mike.
Darrell Markewitz - has continued experimenting with Viking Age methods
- and finally got all the historic equipment to produce workable iron.
Skip Williams - will be flying in from Europe the day before he leaves
for EI3 - and is absolutely sure to have fresh insights to share.
Lee Sauder - has been experimenting with clay construction methods -
and well, its just the great resource he always is.

ATTENDANCE IS LIMITED

To only * 30 * for the full workshop participants.

If you have never smelted before, this is an ideal chance to learn from
those have a combined experience of well over 150 experimental iron smelts.

If you have smelted a couple of times, this is the perfect chance to get
some of those problems sorted out in an active workshop.

If you are in a related field of study - we'd love your input! Come
along and see how the theory applies to direct practical methods. Even
if you don't want to get right in there and smelt yourself, there are
single day 'observer' passes available.

Hope to see you there!

Darrell
(for the 'Gangue aux Fer')
 

February 15 - May 15, 2012 : Supported by a Crafts Projects - Creation and Development Grant

COPYRIGHT NOTICE - All posted text and images @ Darrell Markewitz.
No duplication, in whole or in part, is permitted without the author's expressed written permission.
For a detailed copyright statement : go HERE