Mainly additions down the side bar.
As the Wareham Forge web site is now my primary means of contact for PAID work, I thought the large amount of time I spend writing and formating over here should have at least a FEW links back to 'what I do for a living'.
Sunday, December 05, 2010


Friday, December 03, 2010
Reality and YouTube

Sometimes its hard not to rage against the 'world as it is' against the 'world as it *should* be'. More and more I find I'm becoming the 'old guy'...
Take YouTube.
I have a large number of available film clips available. At current counting there are 25 in total. (See my 'channel' : DarrellatWareham )
Of those the breakdown is:
Iron Smelting - 8
Blacksmithing Work - 13
Viking Age Work - 7
Fluff - 1
(some double up in those categories)
Now, what *bugs my butt* is people complaining about the video / audio quality:
Film Critics: PLEASE READ BEFORE COMPLAINING ABOUT VIDEO / AUDIO QUALITYWhat I see here is people who can NOT get their simple brains past the intent of the film series in the first place - INFORMATION.
Please realize that I am an ARTISAN BLACKSMITH not a FILM MAKER.
Deliberate choices have been made to record information details, and the nature of the events depicted is effected by limited equipment.
Sound is recorded as 'ambient' - as I feel the sound of hammer on metal is a critical piece of information. This means problems with shifting volumes and background noise like fans and blowers sometimes intrudes.
Almost all camera systems use some form of infra-red focusing and what is depicted is hot metal. So of course focusing often shifts.
Cameras 'see' a different range of light than the human eye. The result of this is a flaring and inaccuracy when recording hot metals.
I deliberately choose to narrow the view to the working tools. The intent is not to display myself, but my work methods.
The video segments presented here are intended to be Educational - not Entertainment.
Yes I realize (St McLuhan) that the 'Medium is the Message'. But I get pissed off at weenies who feel its their goal in life to bitch about trivia like focusing, rather than paying attention to the CONTENT. And then feel it is appropriate to preserve their feeble opinion with posted comments.
Forging a Viking Age Broad Axe 77,062 views


Thursday, December 02, 2010
Shape of Forges in Early History
On 26/11/10 3:21 PM, Sacha wrote:
First, most of our early archaeological evidence seems to point to ground forges. I have seen some Greek illustrations (on ceramics) that show table styles, but I suspect before the Middle Ages proper, mostly the smith appears to have squatted or grabbed off the ground. There is a clear LACK of evidence, and as far as I know no examination of smith's bones has been made either.
That being the case, the general system is a side draft tuyere. Any charcoal forge will be side draft, typically with the air tube set about 7 - 10 cm above the base level of the fire box. This is to allow some place for the volumes of ash to collect, without choking off the air flow.
What you can expect is a low wall on one side, containing the tuyere. The easiest way to do this is just use clay to build up a crescent shape. Norse (later and more northern) has some artifacts which are bellows stones. Soapstone with a hole through it for the air blast.
There does not especially need to be a separate tuyere - if there is a heavy fire proof 'bellows side wall'. Such are common finds, and mainly made of ceramic. Again I have not looked specifically at Romano British. A substitute that also fits the archaeological record is a forged iron tube. As this working end of the air system is pretty much covered, for practicality simple steel pipe can be substituted. Note that 2 - 2.4 cm interior diameters do seem to be pretty standard to the artifact tubes. Because the bulk of the heat is directed to the bellows side wall, you might also be able to use hard wood or even antler / bone for the tube.
Many of the early systems have a version of double bag bellows, joined by a Y tube to the tuyere end. The easiest way to form this Y connector is to stitch one out of heavy leather. The use of leather also serves as a flexible coupling, reducing the jerking vibration from the bellows action to the more fragile tuyere / bellows wall side. This appears to have been an almost universal approach by almost everyone who has done any serious experimental archaeology with smelting, forging or casting.
The reason for the two bellows chambers is that the alternating blast cycle serves two important functions. First, this allows for a relatively constant air blast to be delivered. Second, because there is always some air being forced down the Y tube, you can effectively eliminate a downstream valve system. With a single chamber, without a downstream valve, any intake of air to the chamber will also draw hot gas from the forge back up into the bellows bag. (Double plus not good!)
The biggest cultural indicator may be the bellows. There are a number of types possible, which certainly appear to increase in relative complexity as history progresses. The biggest problem here is finding any artifact evidence. Typically, there is absolutely none surviving. Bellows are universally constructed from wood planks with leather bags - both materials which rarely survive. (The exception are ceramic 'pot' bellows, which is a system used in some parts of Africa.) Generally you have to look to period illustrations of blacksmiths at work for an indication of which system was used. (I would expect there would be regional variations on this as well.)
The simplest (and 'earliest') way to construct a bellows is to take a small animal body, cut it in half, then put a wooden plate across the larger open end. One leg then forms the supply tube to the tuyere. The wooden plate has a central hole, with a strap across it. In use, you hand goes through the strap. Lift you hand, you fill the leather bag. Push down, your palm seals across the hole, forcing the air down the leg tube.
 A 'Celtic Iron Age' forge set up.
At Military Through the Ages, Jamestown Virginia.
A variation on this is to use a pair of sticks stitched along the open edges. You push the sticks together (closed) on the down stroke, slide them apart on the upwards, fill stroke. (I suspect there is a bit of a trick to this!)
Bronze casting furnace, by Umha Aois, in a 2008 demonstration.
Although this is a furnace (with a closed bowl) this clip clearly shows the bellows in action, the use of a leather Y tube.
A later variation on both those is the 'drum' bellows, which uses two cylindrical chambers, each with a simple leather flap valve in place of the operators palm. In theory (and eventually in practice) it is possible to make a very large cylinder, so deliver large air volumes.
Into Anglo-Saxon / Viking Age times, there is the development of a double 'accordion' system. Two escencially U shaped chambers siting side by side. This system appears to remain in use into the Medieval period, the chambers getting larger and larger (eventually water powered).
 A Norse forge with bellows stone, set up on a (speculative!) sand table forge
DARC, presentation at Haffenreffer Museum in 2006
The other primarily indicator of date and cultural set is going to be the anvil.
Generally, early anvils are small and simple. Little more than cubes of iron, perhaps with one facet drawn off to a slight square taper, to allow better mounting in a wooden stump. It is unusual to find one with a horn. (A separate L shaped stake would serve that function - if one was used at all.) Surviving examples from the Viking Age are generally about 10 cm on a side. This will allow you to make most objects, remember the heat zone from that charcoal fire is rarely much more than this same 10 cm. Larger work would be roughed out on a block of stone.
 Replica Early Period anvil. Forged from bloomery iron, about 8 cm per side on the face.
Produced at Early Iron 3, with Lee Sauder and Mike McCarthy
Once again, this is not going to be a common artifact (this time due to the raw value of such a large mass of iron. Bloomery furnaces are certainly capable of producing much larger iron masses (easily into 10 - 20 kg) but such large masses are extremely difficult to heat to forging temperatures - and manipulate and form. Checking period illustrations may provide some clues as to shapes and sizes of anvils.
The other tools of the blacksmith, hammers, tongs, punches, are ageless and universal.
 Viking Age blacksmith's tools and tool box. Created for Parks Canada
So - to get back to your specific question, a Romano British forge:
- I would expect a simple ground forge, likely clay as the bellows side wall. This would be a 'build on site and discard' unit.
- Depending on just exactly what part of Roman Brittan you are interested in, the bellows is possibly a double drum or accordion style.
- Your anvil should be a small block style.
I'm from england and I'm in a late roman reenactment group who are looking for a period forge to bring with them to shows. If you do happen to make forges for reenactment could you please come back to me, as it is extremely hard to find historical forges.There are a couple of problems here.
First, most of our early archaeological evidence seems to point to ground forges. I have seen some Greek illustrations (on ceramics) that show table styles, but I suspect before the Middle Ages proper, mostly the smith appears to have squatted or grabbed off the ground. There is a clear LACK of evidence, and as far as I know no examination of smith's bones has been made either.
That being the case, the general system is a side draft tuyere. Any charcoal forge will be side draft, typically with the air tube set about 7 - 10 cm above the base level of the fire box. This is to allow some place for the volumes of ash to collect, without choking off the air flow.
What you can expect is a low wall on one side, containing the tuyere. The easiest way to do this is just use clay to build up a crescent shape. Norse (later and more northern) has some artifacts which are bellows stones. Soapstone with a hole through it for the air blast.
There does not especially need to be a separate tuyere - if there is a heavy fire proof 'bellows side wall'. Such are common finds, and mainly made of ceramic. Again I have not looked specifically at Romano British. A substitute that also fits the archaeological record is a forged iron tube. As this working end of the air system is pretty much covered, for practicality simple steel pipe can be substituted. Note that 2 - 2.4 cm interior diameters do seem to be pretty standard to the artifact tubes. Because the bulk of the heat is directed to the bellows side wall, you might also be able to use hard wood or even antler / bone for the tube.
Many of the early systems have a version of double bag bellows, joined by a Y tube to the tuyere end. The easiest way to form this Y connector is to stitch one out of heavy leather. The use of leather also serves as a flexible coupling, reducing the jerking vibration from the bellows action to the more fragile tuyere / bellows wall side. This appears to have been an almost universal approach by almost everyone who has done any serious experimental archaeology with smelting, forging or casting.
The reason for the two bellows chambers is that the alternating blast cycle serves two important functions. First, this allows for a relatively constant air blast to be delivered. Second, because there is always some air being forced down the Y tube, you can effectively eliminate a downstream valve system. With a single chamber, without a downstream valve, any intake of air to the chamber will also draw hot gas from the forge back up into the bellows bag. (Double plus not good!)
The biggest cultural indicator may be the bellows. There are a number of types possible, which certainly appear to increase in relative complexity as history progresses. The biggest problem here is finding any artifact evidence. Typically, there is absolutely none surviving. Bellows are universally constructed from wood planks with leather bags - both materials which rarely survive. (The exception are ceramic 'pot' bellows, which is a system used in some parts of Africa.) Generally you have to look to period illustrations of blacksmiths at work for an indication of which system was used. (I would expect there would be regional variations on this as well.)
The simplest (and 'earliest') way to construct a bellows is to take a small animal body, cut it in half, then put a wooden plate across the larger open end. One leg then forms the supply tube to the tuyere. The wooden plate has a central hole, with a strap across it. In use, you hand goes through the strap. Lift you hand, you fill the leather bag. Push down, your palm seals across the hole, forcing the air down the leg tube.
 A 'Celtic Iron Age' forge set up.
At Military Through the Ages, Jamestown Virginia.
Bronze casting furnace, by Umha Aois, in a 2008 demonstration.
Although this is a furnace (with a closed bowl) this clip clearly shows the bellows in action, the use of a leather Y tube.
A later variation on both those is the 'drum' bellows, which uses two cylindrical chambers, each with a simple leather flap valve in place of the operators palm. In theory (and eventually in practice) it is possible to make a very large cylinder, so deliver large air volumes.
Into Anglo-Saxon / Viking Age times, there is the development of a double 'accordion' system. Two escencially U shaped chambers siting side by side. This system appears to remain in use into the Medieval period, the chambers getting larger and larger (eventually water powered).
 A Norse forge with bellows stone, set up on a (speculative!) sand table forge
DARC, presentation at Haffenreffer Museum in 2006
The other primarily indicator of date and cultural set is going to be the anvil.
Generally, early anvils are small and simple. Little more than cubes of iron, perhaps with one facet drawn off to a slight square taper, to allow better mounting in a wooden stump. It is unusual to find one with a horn. (A separate L shaped stake would serve that function - if one was used at all.) Surviving examples from the Viking Age are generally about 10 cm on a side. This will allow you to make most objects, remember the heat zone from that charcoal fire is rarely much more than this same 10 cm. Larger work would be roughed out on a block of stone.
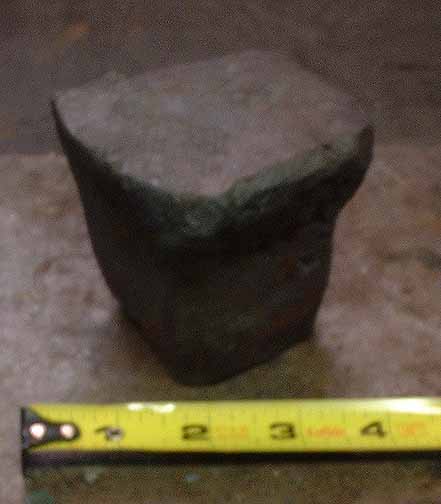 Replica Early Period anvil. Forged from bloomery iron, about 8 cm per side on the face.
Produced at Early Iron 3, with Lee Sauder and Mike McCarthy
The other tools of the blacksmith, hammers, tongs, punches, are ageless and universal.
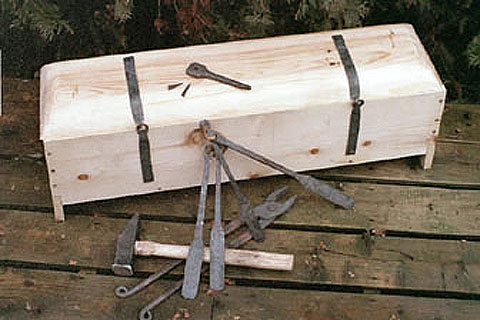 Viking Age blacksmith's tools and tool box. Created for Parks Canada
So - to get back to your specific question, a Romano British forge:
- I would expect a simple ground forge, likely clay as the bellows side wall. This would be a 'build on site and discard' unit.
- Depending on just exactly what part of Roman Brittan you are interested in, the bellows is possibly a double drum or accordion style.
- Your anvil should be a small block style.
Wednesday, December 01, 2010
Jeff Pringle on Viking Age Axes
I'm short on a topic for this week's posting. These are some collected pieces from bladesmith Jeff Pringle, who has been providing some excellent insight on the topic of Norse axes and how to forge them. Jeff has obviously studied both the available archaeological materials and references to some depth - then followed that up with some solid practical work. (See the earlier post with some his comments.)
I've put any of my own comments in italics.
As before, the source for these is Don Fogg's Bladesmith Forum.
(If you have not yet checked that out, you certainly should!)

Topic: Viking age axe tutorial (Forum: History) / contributed by Jeff Pringle
=====================================
Although it seems like there is a bewildering array of axe sizes & types, there are some rules of thumb from archaeologists that help narrow things down. Kirpicnikov measured hundreds of axes (single-handed variety) from X-XIII centuries, and this is what he had to say, via google translator:
“The most important feature of many battle ax is not the form, but the size and weight… the handle, being, apparently, the same length (average 80 cm), it varied in thickness. Hundreds of measurements show the usual size of battle-axes (with some exceptions): the length of the blade 9-15 cm (3.5-6 in.), the width to 10 - 12 cm (4-5 in.) socket holes 2-3 cm (~1”) in diameter and weight up to 450 g. These measurements are repeated on special military ax types, but somewhat less weight (an average of 200-350 g)…In turn, finding such axes in the mounds of soldiers indicates their military function. In contrast to the military axes, dimensions of the working axes as follows: length 15-22 cm (6-8”)(usually 17-18 cm (7”)), width of the blade 9-14. 5 cm (3.5-5.5”), the diameter of socket 3 - 4. 5 cm (1.2-1.8”), the normal weight of 600-800 g. These axes are often found in the mounds of the peasant as an attribute of the male burial. Of course, there is no absolute dividing line between the size of military and working axes. Here there are deviations in both directions.”
Kolcin wrote about the weight variation between carpentry and battle axes:
“The first type, usually massive and heavy (average weight 850 g) – This is carpenter axe. The second type of axe is lighter (average weight 700 g) - this is the instrument of joiner, cooper. It most frequently adapted as a combat axe. The third type of axe was always logger’s. This type includes the wood choppers.”
If you look at the big Broad axes that were likely used with a longer handle, they are forged out much thinnner, so the weight is probably similar to the earlier axes. Your favored dimensions are about right, though it looks like weight was the primary consideration over exact blade dimensions. That is where the fast comes in, for the power you’ll have to depend on your arms.
 A group of VA axes, in the Danish National Museum.
The edge on view shows the combat axes with their extremely thin cross sections, compared to the woodworking tool axes to the right.
I've put any of my own comments in italics.
As before, the source for these is Don Fogg's Bladesmith Forum.
(If you have not yet checked that out, you certainly should!)
Topic: Viking age axe tutorial (Forum: History) / contributed by Jeff Pringle
=====================================
Although it seems like there is a bewildering array of axe sizes & types, there are some rules of thumb from archaeologists that help narrow things down. Kirpicnikov measured hundreds of axes (single-handed variety) from X-XIII centuries, and this is what he had to say, via google translator:
“The most important feature of many battle ax is not the form, but the size and weight… the handle, being, apparently, the same length (average 80 cm), it varied in thickness. Hundreds of measurements show the usual size of battle-axes (with some exceptions): the length of the blade 9-15 cm (3.5-6 in.), the width to 10 - 12 cm (4-5 in.) socket holes 2-3 cm (~1”) in diameter and weight up to 450 g. These measurements are repeated on special military ax types, but somewhat less weight (an average of 200-350 g)…In turn, finding such axes in the mounds of soldiers indicates their military function. In contrast to the military axes, dimensions of the working axes as follows: length 15-22 cm (6-8”)(usually 17-18 cm (7”)), width of the blade 9-14. 5 cm (3.5-5.5”), the diameter of socket 3 - 4. 5 cm (1.2-1.8”), the normal weight of 600-800 g. These axes are often found in the mounds of the peasant as an attribute of the male burial. Of course, there is no absolute dividing line between the size of military and working axes. Here there are deviations in both directions.”
Kolcin wrote about the weight variation between carpentry and battle axes:
“The first type, usually massive and heavy (average weight 850 g) – This is carpenter axe. The second type of axe is lighter (average weight 700 g) - this is the instrument of joiner, cooper. It most frequently adapted as a combat axe. The third type of axe was always logger’s. This type includes the wood choppers.”
If you look at the big Broad axes that were likely used with a longer handle, they are forged out much thinnner, so the weight is probably similar to the earlier axes. Your favored dimensions are about right, though it looks like weight was the primary consideration over exact blade dimensions. That is where the fast comes in, for the power you’ll have to depend on your arms.
 A group of VA axes, in the Danish National Museum.
The edge on view shows the combat axes with their extremely thin cross sections, compared to the woodworking tool axes to the right.
Subscribe to:
Posts (Atom)






 Posts
Posts


