Since I started my series of experimental iron smelts - AIR RATES have been a constant concern and problem.
With many of the smelts undertaken with DARC, the intent was to work back from predictable modern equipment towards a possible all Viking Age smelt. We have had some good experimental results, but more work remains in this endevor.
Since October of 2004, most of the smelts listed as using an electric blower have used the same vacumn cleaner blower. Although the blower was scrounged at my local dump, the unit is a very good quality OLDER machine - from the early 1960's. Despite some early problems, once the original wireing was replaced the blower has proven dependable. The output is adjusted through a control box that uses an electric outlet that is modified by a standard light dimmer switch.
Some researchers are quite dismissive of 'vacumn smelting'. I personally find this attitude snobbish and unrealistic. Teams keeping careful records and producing duplicatible results should be commended - reguardless of the personal resources they bring to the activity of re-learning lost ancient techniques.
Please follow this link to see the charts (on the Wareham Forge / Iron Smelting series).
(Sorry if you suffered through the badly formatted version of this posting. This was my first attempt to transpose data from the evil MiCROSOFT through to a web posting...)
Darrell
Saturday, October 28, 2006


Friday, October 20, 2006
'Loki' Smelter - part 2
Early Iron 3 Symposium
October 7, 2006.
If you are wondering where the name 'Loki' comes in....
At SmeltFest in March, Dick Sargent and I build and twice fired a larger
modified version of the basic clay cobb furnace. Reaching the point in
my smelting experience where I'm less frantic over the process, I
decided to play a little with the clay - and sculpted the base of that
furnace. I shaped the jaws of a serpent or dragon, which in effect spat
out the flame at the mouth of the smelter. Vandy christen this furnace
'Jormungand' - named for the World Serpent of Norse mythology.
(If you are interested, see the report on that smelt - over on the Iron
Smelting part of the main Wareham Forge web site.)
The image above shows the smelter under construction. My standard method
has been to use a form, usually sheet metal, to create the interior
spacing of the smelter. As was done with Jormungand, the form in this
case was a length of stove pipe. I had found an ideal 8' (20 cm)
diameter piece in the barn. This was covered with a layer of paper to
keep the clay from sticking to it. (An important step!). The three half
bricks that formed the tap arch are also covered this way before the
clay work starts. Note also the shallow pit dug in front of the smelter
(which rests on the ground) to ease the tapping of slag.

The first batch of clay cobb I mixed up was a bit on the sloppy side.
Skip Williams had suggested the addition of charcoal fines to the
chopped straw and powdered clay mix that I have used in the past. He had
good results with the charcoal mix in smelts he had recently undertaken
in Holland at a European gathering of iron makers. So I altered the mix
to roughly 50 % clay, 25 % chopped straw and 25 % charcoal fines. These
all by rough volume. I have found in the past that the type and
condition of the straw actually makes a big difference in how much water
needs to be added to the mix. The straw we scrounged up from the old
barn at Peter's Valley was not ideal - either in terms of plant matter
or dryness. With the use of the charcoal addition as well, I just plain
got my proportions wrong.
The overall shape, with the slightly expanded base, was not entirely
intentional. I had built up the first lower section to about The long
and short of all that was that the first layer of clay was too damp,
and started to slump under the weight of the second lot that composed
the upper half of the smelter. This layer had started at roughly 7 - 8
cm thick - but was slowly expanding to closer to 10 cm. To stop further
slagging, I found some piece of scrap lumber and tied them in a rough
circle around the base. These pieces would remain in place through the
initial drying fire step. The end result was the rather elegant
shouldering of the bottom part of the finished smelter - just about at
tuyere level.

As with most of my recent smelts, I used a ceramic tube for the tuyere.
I have been getting these from a local potter's supply house. The
original function of these tubes are as shelf supports for porcelain
kilns. They are rated not to slump until about 1200 C - about the
operating temperature of the smelter. The tubes come 30 cm long and have
a 2.5 cm interior diameter. For those who have looked at the
archaeological evidence for early smelters in northern Europe -this 2.5
cm interior diameter is relatively consistent. The cost of each of these
tubes is about $10 delivered to my workshop. They have been used for
most of our smelts for the last year (about 10 so far) with good results.
With the tuyere tube in place - I was struck right away with the
shoulder, well, being a shoulder. The tuyere forming a mouth or tongue.
It proved fairly easy to add two eyes, projecting eye brows and a
drooping moustache. A final touch was to cut two shallow holes into the
body of the smelter to create the pupils. When the smelter was at full
heat, the result was two orange glowing eyes!
There are a number of bellows stones with simple line carvings of faces.
usually interpreted as being the god Loki. Generally the Norse had a
very arms length relationship with the divine Powers. Since Loki is the
trickster, depicting him blowing on the forge may have been an attempt
to harness his aspect in an attempt to control the fire. Any smith (much
less a smelter) knows how easily things can go wrong in forge or furnace!

more to come....
Thursday, October 19, 2006
'Loki' Smelter at Early Iron
Early Iron 3 Symposium
Peter's Valley Craft Centre
October 7, 2006.
This is just a fast note on one of the many smelts undertaken at Early Iron this year.
On Saturday, Early Iron overlapped with an annual public event the 'Pig Iron Roast' at Peter's Valley. The organizers asked if the team leaders could provide a public demonstration smelt. To that end, TWO furnaces were built on Friday and fired the next day. Lee Sauder and Mike McCarthy constructed one of the same 'Flue Tyle' test furnaces that the participants would themselves build Saturday and fire in three person teams on Sunday. (With excellent results I should say!). Mike would be primarily responsible for conducting the smelt in this furnace - and produced a large bloom of nicely workable iron from it.
I took the opportunity to test two variables which I was interested in. First, I wanted to test a slightly smaller sized furnace based on the standard North European model. Normally the interior diameters we have built in the past were on the range of 25 - 30 cm (10 - 12 inches). This text furnace was only 20 cm interior.
(loki exterior)
The second variable was to try using a potential 'Bog Ore' type. I had gathered about 10 kg of a pudding like red oxide out of standing water in a drainage ditch near Minden Ontario the summer of 2005. Although I was certain the material contained iron oxide, I had no good way of knowing if the concentration was high enough to make for a viable ore.


I have posted up the raw data of this smelt on the main Wareham Forge - Experimental Iron Smelting area.
more to come....
Peter's Valley Craft Centre
October 7, 2006.
This is just a fast note on one of the many smelts undertaken at Early Iron this year.
On Saturday, Early Iron overlapped with an annual public event the 'Pig Iron Roast' at Peter's Valley. The organizers asked if the team leaders could provide a public demonstration smelt. To that end, TWO furnaces were built on Friday and fired the next day. Lee Sauder and Mike McCarthy constructed one of the same 'Flue Tyle' test furnaces that the participants would themselves build Saturday and fire in three person teams on Sunday. (With excellent results I should say!). Mike would be primarily responsible for conducting the smelt in this furnace - and produced a large bloom of nicely workable iron from it.
I took the opportunity to test two variables which I was interested in. First, I wanted to test a slightly smaller sized furnace based on the standard North European model. Normally the interior diameters we have built in the past were on the range of 25 - 30 cm (10 - 12 inches). This text furnace was only 20 cm interior.
(loki exterior)
The second variable was to try using a potential 'Bog Ore' type. I had gathered about 10 kg of a pudding like red oxide out of standing water in a drainage ditch near Minden Ontario the summer of 2005. Although I was certain the material contained iron oxide, I had no good way of knowing if the concentration was high enough to make for a viable ore.


I have posted up the raw data of this smelt on the main Wareham Forge - Experimental Iron Smelting area.
more to come....
Monday, October 16, 2006
Viking Age Cauldron Hanger
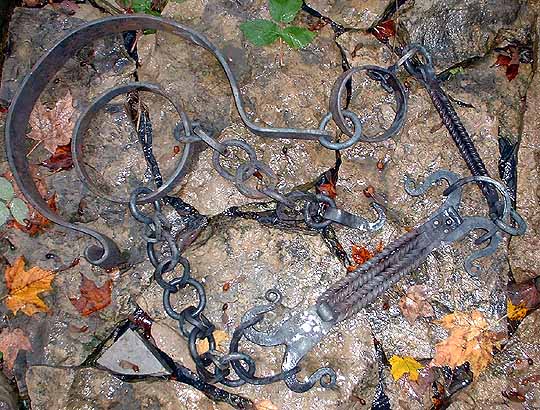
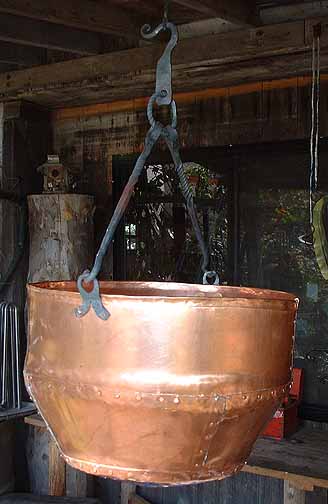
This is the largest of the pieces I have made for the Outlander production.
In use it is intended to hang off a main house beam roughly 8 inches in width, at a height of 8 1/2 feet above the floor. The most likely pot it will be used in combination with is the large copper cauldron also shown above. I have made a number of different pots for the production, and designed the hanger to allow for use of any of the various different sizes. Quite intentionally, I made limited use of round profile stock, sticking instead to square or flat as would be more likely for a smith during the Viking Age.
The overall inspiration for the hanger is the artifact found in the Sutton Hoo ship burial, which dates to 625 AD. This is a saxon royal burial, but decorative chain hangers have been found in a number of Viking Age burials as well. Although the Outlander hanger is shorter than Sutton Hoo, I used a number of the same chain elements in its construction. I wanted to take special care in the detailing on this specific object, as I suspect it may end up featured in some of the filming. Historically, these highly elaborate forgings were status symbols and presentation pieces, hanging in the central focal point of the hall over the fire.
In the overall photograph, you can see the flow of the elements. The hanger has been designed with a large hook at the top to allow for easy installation and removal from the beam. Bellow this is a roughly 4" diameter ring with a swivel mounted in it that allows the lower chain to rotate.
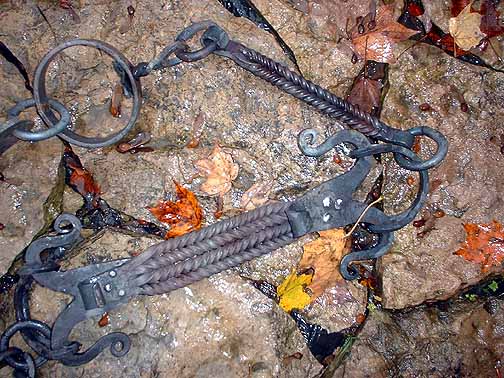
Below the swivel, there is a straight bar unit. This element is made of two bars, each of 3/8" square stock which have been twisted in alternate rotations. The ends of the bars are then forge welded, and the block flattened and folded to a small hook. Rings made of 3/8" round join the completed element to the chain.
The most elabaorate elements of the series are next. In use, this large bar and hook piece will hang at roughly eye height of the standing viewer. The form of this element is a bundle of four alternately twisted rods, forged to shape much the same as the single bar element described above. This unit is attached to a pair of spiral hooks at each end by means of three rivets. The individual hooks are formed from a piece of 1 1/2 x 3/16 " flat bar which was slit at one end and then drawn out. The two points were then formed to the reversal curve hooks. The opposite end was then drawn down to a taper, and this also formed into a curve. On the lower unit, that terminal curve is large enough to hook up the lower chain.
On both ends of the bar and hook element are a matching pair of 'flat 8' rings. These are formed of 1/4" square. First a large circle is formed and welded. This is then folded in half. The two folded ends are opened up to a small circle, and the balance of the curved half circle is tapped tightly closed. Again this is an element taken from the Sutton Hoo prototype.
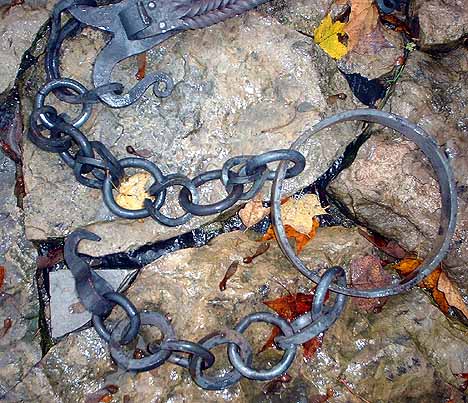
Just below the bar and hook element is a short length of chain made from a set of 'flat 8' style links joined by simple circles. The decorative links are similar to those described above, but in this case the finished link is a roughly 3 inch circle.
The lowest part of the chain is the working end, and is a simpler set of alternating round and square stock rings. It ends in a hook, formed from folding and welding a length of 3/4 x 3/16" flat stock.
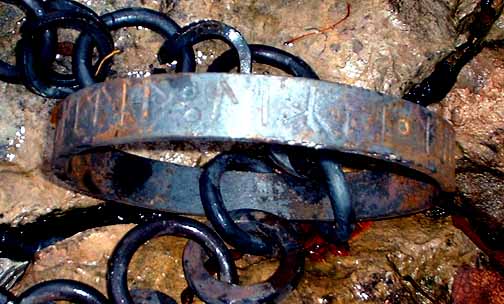
In the centre is a large ring made of flat bar. I decided to sneak something in there for the Viking Age enthusiasts and die hard fans. The exterior of this ring is punched with a short text in runes. The text is in actual Old Norse, and reads:
KITIL • KIRthI • MIK / Ketil • Gerthi • Mik / 'Kettil Made This'. To those who have read much of the Wareham Forge or DARC web sites, you will recognize 'Kettil' as the characterization I use in museum presentations.
Subscribe to:
Posts (Atom)






 Posts
Posts


