Saturday, June 26, 2010

Currency Bar from DARC Iron

A general feeling was that we should have at least one completed 'currency bar' made up for the L'Anse aux Meadows presentation - that was formed from iron we had smelted ourselves. There was one completed billet of iron on hand. Unfortunately there are some gaps and errors in the records, so not as much information can be gained as was hoped.

INITIAL SMELTING

Date : November 12, 2005 (note that earlier records show this as 'October 2005'
Experiment :13/D7 (detailed notes on the DARC Iron series)
Location : Wareham, ON
Team : DARC
Furnace: Norse Short Shaft
- clay cob with stone slab support
- tap arch
Note - reuse of furnace from June 05
Size : 25 cm x 60 H
Source : suggested by earlier experiments
Tuyere : 25 mm ID ceramic kiln support
Placement : 16 cm from base
- about 5 cm in from wall
- angle at 20 down
Bellows : vacuum blower
Air : 600 l / min (estimated)
Charcoal : 79.5 kg broken hardwood
Consumption : about 2 kg charcoal every 10 minutes
Ore : Stelco taconite + Virginia Rock Ore
17 kg (roasted)
Sequence : ore added in variable sequence (7 - 10 min)
as small charges .75 - 2.25 lbs
Duration : about 6 1/4 hours (not including preheat)
Result : 4.3 kg bloom
Yield : 22 %
Notes : - Successful creation of historic sized bloom
- Success in patching and re-firing furnace

BLOOM TO BAR


My notes list an undated effort to forge down a portion of the November 2005 bloom. These seem to indicate the main part of the bloom was cut into two sections, one at 1.70 kg, one at 1.86 kg, the remainder of the mass as smaller fragments. The 1.70 kg piece was forged down into the working bar seen above. The notes list the resulting bar at roughly 2 x 3 by 34 cm, but do not give the finished weight.


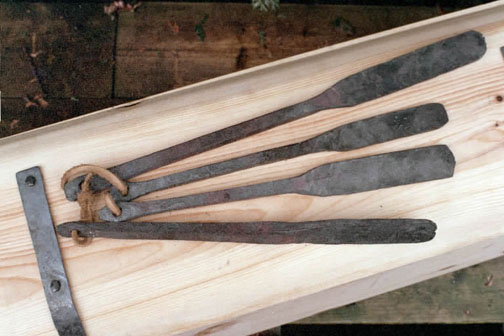
This is the completed currency bar. The finished weight is 895 gms. The size is in the range of the artifact samples : 15 x 15 mm (widest portion 18 x 18) by 525 mm long.


This is a close up of the flattened end of the bar. The 'paddle' is 110 mm long, and roughly 32 mm wide. It tapers slightly from 5mm thick at the base to 3 mm at the tip.


A close up of the bar end. I developed the runic mark seen for use on DARC replica objects. In five strokes it combines all the letters for DARC, both in Roman and Norse characters.

The starting billet could perhaps have used one additional consolidation weld. There is some cracking along the straight corners of the bar as a result. The flattening step held together very well however, a step added in the Viking Age as a quality check. Overall the quality of this bar is in the same range as I found when I created a set of replica bars for Parks Canada, using various antique wrought irons.

Replica Currency Bars - for L'Anse aux Meadows NHSC, 2001

Thursday, June 24, 2010

Vinland 4 - Full report available

The 4th of the Vinland series smelts, undertaken on June 12th, is now available:
http://www.warehamforge.ca/ironsmelting/LAM/Vinland4/report6-10.html

As described earlier here, this smelt was undertaken using all Viking Age equipments (including clothing) and methods. The only modern elements were necessary safety equipment (primarily eye protection).

Monday, June 21, 2010

Vinland 4 Smelt - Draft Report

On June 12, the Norse had come to Wareham and undertook an iron smelt.

The framework for the smelt was inside DARC's full dress rehearsal for our major presentation at L'Anse aux Meadows NHSC coming up in August. As most of you are sure to know (?) this is the site of the first iron production in North America, by the Norse circa 1000 AD. This smelt was undertaken using all Viking Age equipment and methods and in historic clothing (other than modern safety equipment).


Duplicating the physical layout of the 'Furnace Hut' uncovered at L'Anse aux Meadows.
Pierre on the bellows, Darrell checking the tuyere, Ken adding charcoal and ore.

Keeping to the archaeology of L'Anse aux Meadows, the furnace was built with 5 cm walls, made of 50 / 50 clay and sand mix. I had made up the first course of clay a bit too wet, so the whole furnace had slumped. The major effect was to produce a 'pot belly' shape. Although the furnace started at the 20 - 22 cm ID suggested by the archaeology, the sagging expanded the diameter right at tuyere level to closer to 28 cm. This was sure to effect air requirements. The air was provided by that special 'smelt sized' Norse style twin bellows I had made up. I think in fact that we had exceeded the amount of volume it could dependably produce. Certainly we have all seen that any reduction in air volume below the Sauder and Williams Magic Numbers results in reduced bloom yields.

We had big problems with cracking. I *did* expect this from not using any kind of organic material in the wall material. Generally we were able to reduce massive voiding of working gases by placing stone slabs around the outside of the furnace, and packing the gaps with 50/50 sand and ash mix. The problem with that stuff is that if too much of it runs into the cracks and into the furnace itself, it makes a lot of extra slag. We managed to get through the bulk of the smelt with only a single tapping off however.
The 'disaster' happened right near the end of the smelt. The last heavy charge (about 2 kg worth) had been added, and we had just started the burn down. The top of the charcoal had dropped down maybe 10 cm from the top, so that large charge might have gotten to just above tuyere level. There was a huge self tap out of one of those large cracks, I'd estimate at least a half the available liquid slag. Must have been at least a litre, maybe more (think a milk carton's worth).

This is where being tired did not help. I tried picking up the pieces of slag and re-cycling them back into the furnace. with the addition of a bit more charcoal to cover. The loss of slag had also significantly dropped the internal temperatures (of course!). I certainly did not help that by putting the 'just barely solid' - but colder, slag back into the furnace. We kept going with the burn down, till we were maybe 10 cm above tuyere and slag bowl.

Initial working of the bloom.

Of course when we pulled the bloom that we had, it really was not hot enough to forge effectively. Really it was closer to a bright orange than at welding temperature like it should have been. What we ended up with was a rough brick shape, but more mechanically compressed than really solid. The resulting piece was about 10 x 4 x 6 cm (2/3 the size of a pound of butter), with a lot of cracks. When I spark tested it, it appears to be nice low carbon material.
The good news on this is that this small bloom will prove relatively easy to handle for me when I go to try to forge it down into a bar.

What I really *should* have done was to have immediately cleared the furnace and pulled the bloom when the slag poured out - so at least the mass would have been at welding temperature.
My guess is that there was considerable iron contained in that last flow of slag. We had run virtually the same smelt last time, the only main difference was that the earlier furnace was cylindrical at 22 cm ID. With the same air set up, the same ore, the yield was closer to 25%.

The purpose of this experimental series is to duplicate (?) the physical processes that were carried out by the Norse at Vinland. This puts our team in a bit of an awkward position. All the archaeological evidence suggests that although the Norse did smelt local bog iron ore into a small bloom, they certainly did not 'do it very well'. We know from our own experience that merely adding chopped straw to the clay mix would virtually eliminate the cracking problems. Our quandary : Do we do what our experiences have taught us - or do we 'screw up' like they did?

In truth, the iron smelt presentation at LAM on August 21 is really about demonstrating the *process* to the general public, not about the quality or size of the bloom produced at all.

But its hard to report poor results openly ...

PS - I expect to have my full report on this smelt, with images, posted up to the web site in a couple of days. Will send the link when I've got the materials available.

Sunday, June 20, 2010

Working Meteor Iron?


I received a request about a possible commission to forge some meteor iron into a blade. I took the trouble to expand to detail on the response, with the full intent of sharing my opinions with my larger block of readers.


Here’s some of the difficulty of the piece…rather finding someone willing to forge it. My client wishes to use meteorite iron he acquired from an impact site in the states. Additionally he has floated the idea of using some volcanic ash in the forging or differential hardening of the blade. The piece that he wants is a conceptual art piece as much as a collectable show piece. The underlying theme of the piece will be “extinction”. I’ve come across a few suppliers in which knife makers use to buy stock metal that do have pattern forged steel using meteor iron but finding a small forge willing to use the iron he has or having experience enough to do so has been a little difficult so far.

Calvin - BadAss Jewellery

Here's the background:

1) Meteor Iron

The stuff is notoriously difficult to work with.

Merely getting a piece of meteor is not exactly easy - or cheap. As metal, it is sold by the gram, like silver. I do have a small slab of very high quality meteor iron, in the form of a cut and polished slab of metal. I got it from a jewellery supplier (now lost) maybe 15 years back. The piece is about 4 x 6 cm, about 3 mm thick. At the time it cost me roughly $100 US. I have no real idea what complete meteors of suitable size might cost. I'd estimate you would require a piece of raw meteor something between a golf ball and a tennis ball in size.
Individual complete meteors vary *extremely* in quality. Most are not suitable for forging, the mere process of heating and plunging through the earth's atmosphere doing nasty things to both the quality of the alloy and also tending to fracture the structure.
The reason any smiths you have talked to have mentioned layered steel with meteor as a component is that the best way to successfully end up with a workable blade is to incorporate the meteor iron into a matrix with other iron alloys to help hold the meteor together.

Image - The slab of meteor iron from Africa (Keyna?) The source was a huge ancient strike, large enough to be mined as metal. The dark spots are inclusions, note the stress cracks at the upper right. The metal has been polished and lightly etched for use as a jewellery material.

Meteor iron is extremely high in nickel content. To the tune of 7 - 15 % Nickel. Modern stainless steels are in the range of 0.5 to maybe 2%. Nickel is extremely hard to forge - the metal resists forming, even at forging temperatures. So a pure meteor, assuming it was not full of cracks and flaws to begin with, would be much more difficult to forge out than even modern alloy steels.

A meteor is made up of nickel and iron. No carbon what so ever. Carbon is what makes a blade hard, which is what allows it to keep a sharp edge. Although the rigid nature of the high nickel content would help this some, again a pure meteor blade would just not hold an edge like a simple carbon steel would. So once again, bladesmiths who are concerned with the qualities of a working knife will incorporate high carbon steels into the matrix with the meteor iron to provide something like correct edge holding. The customer needs to decide if they are expecting a piece of jewellery - or a working tool.

Nickel has a real attraction for sulphur, especially at welding temperatures. Sulphur 'spoils' the weld, if not keeping it from correctly fusing, it can make the result brittle. And working with straight meteor is more likely to require continual welding steps to correct for the tendency to fracture. The rigid nature of the nickel also means that the metal needs to be forged into the higher temperature ranges (At the normal orange, this stuff is so stiff it hardly moves under the hammer). Ideally the working forge would be a high end propane forge to try to eliminate the sulphur. Working against this is how much easier it is to control the correct working atmosphere (oxygen balance) required for successful welding in a coal forge. Again, the simplest way to prevent these specific problems is cover the nickel alloy with slabs of mild steel, so layered steel again.

Compared to some of the other problems, handing the material may seem trivial. But the frustration of trying to work up something from an irregular 'rock' is not to be discounted. I would expect you would end up spending more time chasing the hot piece as its bounces off the anvil than actually hammering it (based on admittedly limited past experience).

2) Volcanic Ash

I am not sure that there would be any utility to be provided here.
Ash is used in the annealing phase. In short, the longer the blade takes to cool, the softer it becomes for shaping, and most importantly, the more internal stresses are released. So the ideal annealing material would be an extremely good insulator. Wood ash is the normal material of choice, sometimes people use vermiculite. I have never had a sample of 'volcanic ash' to examine. I expect the material, given its source, may in fact *not* be an ideal insulator.
For your customer, it might be possible to build a steel box, fill that with the volcanic ash, then heat the whole thing. Insert the hot blade blank, then bury the whole box into a fire, let the fire cool naturally. The bulk of the wood fire around the box would provide the technically required slow heating. This is a lot of extra trouble just for a 'concept'.

The most obvious application of volcanic materials might lay in the polishing steps. I believe both pumice stone and powdered ash are used as abrasives in the Japanese traditions. I don't work with those methods myself. They are hand methods and time intensive (read expensive labour).


The various initial forging and manipulation problems are similar to those I experience when working iron blooms down into working bars. Although I certainly would not say I have the best experience with this (Lee Sauder is certainly the master there). I certainly have more than almost any Canadian blacksmith. (This not so much because I am so wonderfully skilled - more like no one else is that crazy.)

I have twice attempted to work up complete small nickel iron meteors into finished bars. In both cases, the material was provided by the client, pieces roughly the size of a half walnut (and about the same shape). Extremely difficult to manipulate something that small! Both times, the material completely disintegrated due to stress cracks and inclusions. The first time, I just gave up on the process the fragmentation was so bad. The second time I did what most everyone else does, which is layer the meteor material between pieces of modern steel. I was then able to create a billet of material with the meteor as one of several layers and finish the project.

The overall problem with the scope of the project is that there are just too many variables on the materials end to be able to quote a simple price. The whole forging process itself would be one giant experiment. This leaves you with two possibilities:
1) You find someone who has already developed working experience specifically with forging blades from solid meteor iron. The cost of a commission is going to reflect all the past effort to develop those skills.
2) You fund the experiment. This may mean covering the cost of several attempts before a product of the desired quality is the result

I would expect the raw materials to run several hundred dollars.
I would estimate the time expended would run at least a full working week. Ball park for that block of *my* time is $1000.

There are good technical reasons why most experienced bladesmiths are only offering meteor iron incorporated into layered steel billets - rather than pure meteor iron blades.
 

February 15 - May 15, 2012 : Supported by a Crafts Projects - Creation and Development Grant

COPYRIGHT NOTICE - All posted text and images @ Darrell Markewitz.
No duplication, in whole or in part, is permitted without the author's expressed written permission.
For a detailed copyright statement : go HERE