Thursday, July 12, 2012

Return to Vinland

 the Viking Age comes to LIFE
July 19 - 25, L'Anse aux Meadows NHSC

Newfoundland


The Dark Ages Re-creation Company has been asked by Parks Canada to mount a major presentation at L'Anse aux Meadows NHSC again this year. The 10 days of living history is to help mark the 'Presenting Norway' special event this summer.

Major physical demonstrations in the Norse Encampment area will include:


Rig on Music - Thorgeir  on the Spring Pole Lathe

Ka∂lin (or more likely Gudrin) on the Warp Weighted Loom


Ragnarr attempting to make a deal..


Kettil attempting to appear wise
 Living History - What does it look like?

DARC focuses on daily life in the Viking Age. The presentation will centre on a 'camp', with costumed interpreters surrounded by a collection of replica objects consisting of domestic goods, tools, and storage. At the rehearsal, simple overhead covers and tents will mimic the buildings which we will use at L'Anse aux Meadows. Individuals will be outfitted with the tools of their various trades and arts, all representing our real interests and skills. (We really are weavers and cooks, blacksmiths and carvers.) All of the objects seen, from clothing to tents, are based on specific artifact prototypes.
To the public, the members of DARC present themselves as actual voices from the past, with shared experiences as a group and direct personal histories. Individual members of DARC have prepared detailed characterizations based on their personal research into the Viking Age, developing considerable expertise in specialized areas. These characters are the 'common man': artisans, merchants or farmers typical of the Norse of the North Atlantic circa 1000 AD. Any conversation is likely to begin at this 'role playing' level of historic interpretation. The interpretive level used is then shifted to suit the needs of individual visitors. Some people delight in talking to a character from 1000 years ago, others are more comfortable with more of a modern commentary. These experienced interpreters are able to handle a wide range of topics and level of detail.

An interpretive team with proven experience!

Members of DARC are drawn from throughout Central Ontario, and are serious amateur living history enthusiasts, most with decades of experience. DARC has provided skilled and well equipped interpreters for special programs for all of the major events and exhibitions that marked the 'Viking Millennium' in Canada. No other group of Canadian re-enactors has as much accumulated museum experience. As a group and as individuals, members have worked both throughout Canada and the USA. Personal research has taken members to museums and archaeological sites across Iceland, the United Kingdom and Scandinavia. This will be the third major group presentation mounted at 'Vinland'. Individual members have been cornerstone to the 'Norse Encampment at L'Anse aux Meadows NHSC since its first inception in 1996.

On the Web : www.darkcompany.ca

Images by Paul Halasz , used with permission

A note to my regular Readers: 
I am leaving Friday July 13 for this presentation. I'm only back three days and its off to Goderich for the Celtic College and Earth, Air Music Festival. Three days after I finish there, its off to Owen Sound for Summerfolk.  Entries may be a bit spotty for the next 6 weeks!

Tuesday, July 10, 2012

Michael McCarthy 'back on the web wagon'


Uncanny Gallery at Mohawk Valley Forge  

Regular readers here will recognize the name Mike McCarthy. Mike is basically single handedly responsible for the formal creation of Early Iron in North America. I mean, before he stuck his nose in, there were certainly a number of people seriously working on bloomery iron smelting. But he was bold (crazy?) enough to actually contact a wide group of those involved and interested gather them together for the first 'Pre-Industrial Iron Symposium' at the Farmers Museum, Cooperstown NY in 2004. He would organize the second Early Iron again in 2005.

Mike is one of the very most intelligent people I know. In the classic definition of 'ability to process information and adapt to situations'. He would have been roughly in his mid twenties when I first met him (2003) and I was in awe of his massive raw energy. Up at dawn organizing, smelting all day, round table discussions late at night - and then staying up for hours more reading. Like a sponge. And *remembering* all that stuff.

All things considered, I am truly flattered that he considers me a friend. (Aw, shucks Mike...)

Anyway, the point of all this gushing is to point my readers to Mike's re-emergence onto the web, via his blog. Its not light reading. But thought provoking and concept deep.

Highly recommended.

Monday, July 09, 2012

Alloys for casting?

 Expanded from a contribution to the Norsefolk discussion group from this morning:

On 09/07/12 4:46 AM, Norsefolk_2@yahoogroups.com wrote:
3a. Re: Pewter casting
     Posted by: "Sam F"
     Date: Sun Jul 8, 2012 4:19 am ((PDT))

I would say, always go with a modern lead-free pewter alloy.  I know we're all serious history buffs, but history is not worth risking your health or well-being over. Lead poisoning is nasty stuff.

I have to strengthen what [earlier poster] Charles has said about being careful with copper based alloys. With the huge increase in base copper costs over the last decade, more and more cheaper metals are being substituted by manufacturers. Here read both Zinc and Lead. I personally had the same low level toxic exposure that Charles warned of this winter. Very nasty. Good news was that I too 'recovered' from the worst of it after a couple of days. I suspect both of us will have built up damage to our tissues (especially potential liver concentrations.) Very, very, double plus un-good.

So - care when purchasing bronze (copper tin) alloys is called for. Always ask for the Materials Data Sheet. In North America, suppliers are required by law to supply this information on request. It may mean dealing in larger quantities and with more expensive industrial suppliers - but toxic heavy metals poisoning is for *life*.

Sam has warned of the same thing with 'pewter'. Modern lead free alloys are typically 92 tin, 6 copper, trace of antimony. The antimony is a problem, but usually is in the range of 1 - 1.5 %. I've said this before, but lead free plumbing solder from your hardware is a safe alloy to use.

One important note however.
Lead in these mixtures does two things. Both are important to our understanding of just how historic casting process will work:
1) Acts to effectively lower the melting point of the metal.
Working with small crucibles in a charcoal fire, you can see why that might influence your results.
2) Acts to reduce the viscosity - improving the flow of the liquid metal. Historically you see lead added to copper alloys for the same root cause as is happening with the degrading of alloys today - cost. Losses during the casting process, and declining access to the correct metals was both accommodated by adding the cheaper and easier to get lead in an effort to 'extend' the valuable copper and tin in the mixes.
There are some ways you can work to reduce the impact of a 'thicker' flow with the modern tin alloys.
1) increase the size of the entry cone 'button' to help force the metal down into the mould
2) pre head your moulds

I have seen modern workers drastically overhead their metal to increase its pouring ability. I most definately would *not* recommend this. All the toxic effects come from metal as vapour - most likely if the metal is overheated.  Better just to adjust your mould!

One of the interesting things is taking a look at the existing stone artifact moulds, for hints of what metals might have been used.

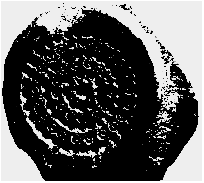
Stone mould for a disk broach

You do find a number of moulds obviously intended for top filling in the historical record. I certainly have never had much luck attempting to top fill any of my own soapstone moulds using modern high tin / lead free alloys.
The reason for this is that the 92 % tin alloy is not only more viscous, it also has a much higher surface tension (which might be related ?). The result is that with a top pour, the metal 'pillows up' , not filling to the edges of the mould. For that reason, all the moulds I have used are designed for edge pour. (This also allows the use of a single backing plate.)

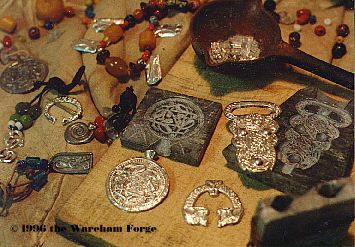
Past work - Soapstone moulds and cast pieces.
 Another clue to historic moulds is looking at the size of the entry cone, the space where the molten metal is poured when filling. A viscous metal requires a larger diameter hole to effectively fill.
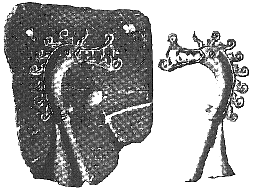
Viking Age slate mould for a small belt mount
 Now, I had made a replica of this same mould, and have always had trouble getting it to fill. Note that it is set up for a edge pour. Also the entry cone is quite small and narrow.
 This certainly suggests two things to me:
1) The smith was attempting to be quite careful about just how much metal was being contained in the 'button'.
2) The narrow diameter of the entry line is more suitable for a very 'thin' metal at molten temperatures.
Taken together this suggest a use of bronze or silver as the intended metal for this object.
The melting points of the alloys of these metals ranges about 1800 F, easily four times the temperature required for a lead based pewter. With the mould pre-heated, a successful casing in bronze or silver can be made in a stone mould. (I do wonder if the back side of the artifact mould shows any heating scars.) I have not personally used any slate moulds, but I do know from experience that soapstone suffers some loss of surface detail due to chipping when used with bronze or silver.

Those interested in trying out simple soapstone moulds for pewter casting can find a technique guide I prepared.


Saturday, July 07, 2012

Some Recent Work

Along with the organizational challenge (read insanity) of preparing for DARC to L'Anse aux Meadows NHSC (Friday morning), and Goderich Celtic (three days after LAM), I have been really, really attempting to get some new work finished.

The first here is actually from mid June, one of three replica pieces ordered on very short time frame for Red Bay NHSC. The major object was a whaling harpoon, but the order also included this oil lamp:

Original artifact, as found
 
My replica

You can see the original is broken off at the sides of the handle, so anything above that line is purely speculative. I was shown an image of a replica that had been made for the Rooms at St John's, which had an 'iron' handle (obviously wrong) and a long length of S loop chain. I chose to reduce the size and complexity of this chain. (Which of course is not supported by the artifact in any case.)

I really wanted at least *something* new for Goderich, and Summerfolk the weekend following (Only three clear days between them, and there is an offload and re-pack in there too.)

The ideal would be to have something as completed objects that represented the three months I spent on the Bloom To Bar project:

Starting billets - bloom iron with spring steel cores
Rough forged blade blanks
I had prepared two billets I intended to lead to a very specific bladesmithing design. The top one is iron from Slag Pit 2 ( # 49 , November 2011 ) an the bottom from Black Rock (# 14, February 2006 ) In both cases the iron was deliberately used before much welding and folding had been done, specifically to allow cracks and irregular edges. I actually had gone a bit *too* far on the Slag Pit 2 iron, ending up with most all the flaws removed. For the second attempt, I was able to restrain my natural desire to forge in all the imperfections.

In the lower image, the two blanks are at different stages in completion.
The top blade has had the blade profile roughed out, and the first pass on forging the edge completed. The hilt is only vaguely shaped at this point however.
The bottom blade is complete in its forging. I had ground the rough forging to the basic lines I wanted for the finished knife. I find it easier to check for warps and wobbles if I do this first. Then the blade was forged again, first to correct any irregularities, second to refine the edge. (Forge thin - grind thinner). It is now ready to be surface ground, then the finished surface to be created on the belt sanders. Then heat treated. Then finish polishing. (The actual forging out of the knife shape is by far the fastest part of the whole process!)

Stay tuned for images of the completed knives...
 

February 15 - May 15, 2012 : Supported by a Crafts Projects - Creation and Development Grant

COPYRIGHT NOTICE - All posted text and images @ Darrell Markewitz.
No duplication, in whole or in part, is permitted without the author's expressed written permission.
For a detailed copyright statement : go HERE