Right of the top, I warn readers that I make a huge distinction between BLADESMITHING and KNIFE MAKING. (1)
"... if I wanted to set up a forge to try making some knives ... what equipment should I get?"
The original question was framed related to Bladesmithing.
Forging shapes, then finishing these into working knives.
From my point of view, Knife Making does not involve the forging process at all.
- This process instead involves starting with a rectangular bar of material, then shaping, and polishing this to some profile. (2)
- It rarely involves any kind of heat treating process as applied by the maker. (3)
- To complete the knife, some combination of handle material is applied, which may or may not include a guard or pommel. Most typically, considerably more effort is expended on the hilting, than on the actual blade itself. (4)
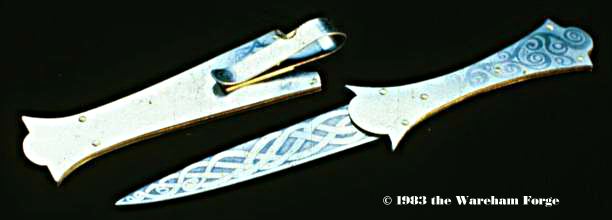 |
| 'Dea's Knife' - 1983. Knife Making : This started with a commercial blade, which was etched and hilted with patterning on blade, hilt and scabbard (in nickel silver). |
 |
| Bloomery Knives, 2012 : At the rough forged stage ('Hector's Bane' is lower - click for actual size). One thing to note - imaging the size of the bar needed if these had been ground! |
5) Some way to securely hold small pieces (to a bench or a vice)Without getting too deep into the 'why' of each, here are the general finishing steps, with some discussion of the tools involved.
6) Something to shape / smooth / polish the forged shapes
7) Something to shape / smooth handle materials
A) Profile
Notice the difference to the shapes of the two forged blanks above. The upper shape is entirely created by the forging process. You can see the edges have wobbles, there is a ragged surface at the very rear of the handle, there is no real point. The lower blank has been generally 'smoothed to profile'.
B) Clean
Next is to remove the fire scale off the surfaces that will later be polished. The primary reason to do this is that the iron oxide scale is considerably harder than the solid metal underneath. Depending on the annealing method used, this scale varies considerably in thickness. (5)
C) Flatten
Once the scale has been removed, any forged surface is certain to contain, at the very least, some pitting from the forging fire. There may also be some hammer marks remaining. Obviously the skill at the forging stage will determine how much of this has happened. Ideally, all the pits and imperfections need to be removed. This is done by reducing the rough blank's surface until all these flaws are gone. (6)
5) Clamping
You will need some way to secure the small blank down. And a secure surface to mount it to.
This can be as simple as a C clamp on the edge of a Workmate.
Better would be a vice correctly mounted to a sturdy bench.
Blades that feature full tang construction can be a bit hard to grip in a vice. There are some simply made jigs that can make this easier.
6) Shape, Smooth & Polish
ii) Filing
You most certainly can do all the initial shaping, scale removal and flattening with simple files. Even on to the first polishing step (with care and fine file).
iii) Grinding
Obviously, using a mechanical / electric tools will greatly speed any of these tasks. A couple of important considerations:
- There will be some investment, a small bench grinder will cost about $60 - $75 *. a half decent angle grinder about $50 + *.
- Power tools make a mess! Remember you are ripping off tiny pieces of scale and metal. These tend to fly all over! (Working at your kitchen table is not suggested.)
- Speed always comes at the cost of control. A hand file make take hours, but as each stroke is both separate and individually contributes little effect, it is easy to maintain even, exact work.
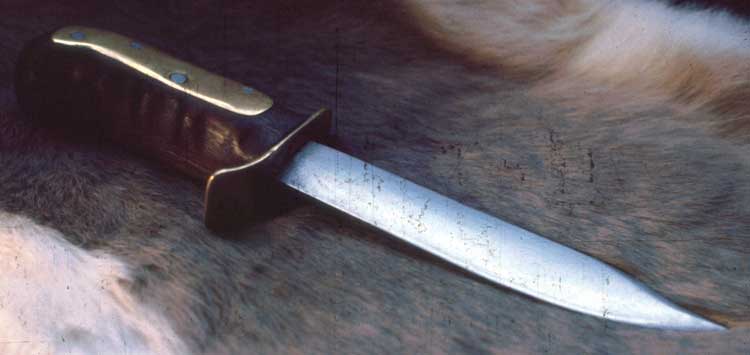 |
| 'Gut Ripper', 1979 : Forged from old file, all work done with 1860's era hand tools (files +). |
I personally find an angle grinder is one of the most versatile hand power tools. Again, there is a skill to maintaining a flat surface as you move a grinding disk over a surface. One clear advantage is the ability to switch out to flap sanding disks of various grades. Noisy and messy however!
iii) Polishing
Once you have the blade profiled, pits removed and more or less flat?
How far the polishing rabbit hole you go is entirely decorative - not functional.
There are plenty of 'antique' blades that still show course file marks (sometimes these are actually the teeth marks from the piece of old file used as the starting material). Generally the process is to use finer and finer abrasive surfaces, each removing the marks from the previous stage. Certainly, a mirror polish surface is possible, even with the most simple of stones and grits. (Look to artifact Japanese swords as a clear example). The 'cost' is time, and care.
Polishing can be vastly speeded up by use of power tools, here meaning a belt sander. The bigger and more powerful, the more expensive. Any sander bases its effect on the number of feet passing per second. Pushing metal against the belt creates drag, and a larger, more powerful motor will better overcome this. The width of the belt will determine how much of the metal is effected at the time. A thinner belt has less potential drag, but will apply effect over a much smaller area (result is that it can quickly cut into that small portion, making for an uneven result).
The small size 2 x 36 inch belt table top machines are great for putting on a final edge, but I personally find that they work a surface far too slowly to be really practical.
Heavier 4 or 6 wide by 48 sanders (typically equipped with 3/4 to 1 HP motors) are available as woodworking machines. Equipped with metal specific sandpapers, they do a good job for the intermediate worker. Figure in the range of $350 - $400 *
Serious knifemakers use sanders with very long belts (typically 60 - 72 inches long) that are fairly narrow (2 inch wide fairly standard), driven by quite large electric motors (in the range of 1 1/2 to 2 1/2 HP). These machines (often with electronic speed controls) are very expensive - in the range of $1000 - $1500. **
7) Hilting
The general outline of tools at this final step, well after the actual creation of the actual blade, could be considered at least roughly like the things already discussed. The consideration here is to fine woodworking and metalworking of almost infinite variety. Often into the realm of jewellery making tools.
 |
| 'Saxon Gladius', early 1980's : Commercial blade re-hilted with carved moose antler and inset rough garnets, shaped wooden scabbard. |
The one additional tool I will mention that will certainly be a requirement, beyond filing and sanding, is a drill. Although you can manage with a hand held electric drill, the next step is even a small table top drill press. The exact nature of how pressure is applied with a drill press means more exact work - and way fewer broken drills! (On the saving on drills alone, a small press quickly pays for itself.)
* any costing quoted in CDN funds.
** The Nexus sanders linked do not include the cost of the electric motor!
1) To be absolutely clear, I do not consider myself a professional bladesmith.
I have certainly made a large number of blades of all types and sizes over my decades as an artisan. These have ranged from tiny carving knives to full sized great swords, reproductions of artifacts through to purely fantasy designs. Working tools to film props. All this however has never been my primary activity.
Although I have undertaken strictly knife making tasks, (mainly in the far distant past!) this has almost never been of the typical 'grind from a bar' type. Mainly because it is the forging exercise that interests me.
2) The more typical process taken by modern knife makers is to purchase industrial alloy bars of specific composition (ideally chosen for the suitability for the working task expected of the final knife). Increasingly, it is also possible to purchase pre-made bars of various layered steel composition and patterning. Much of this material is actually made offshore, India and China. (Usually low layer count and extremely cheap pricing is a clear sign of this.)
3) Starting bars are commonly purchased as annealed (softened) to ease the grinding and polishing steps. Then these blanks are sent out to a commercial heat treating company. On return, then handles are applied.
Do note there is a mid ground here, at least in terms of heat treating. Those using re-cycled objects / scrap materials usually need to undertake their own annealing step before working with the starting bars. (Think of taking a piece of leaf spring to make a sword blade as a common example.)
4) Note please that I am NOT making a judgement call here (Well, maybe about the difference between furnace heat treating and 'zone heat treatment by eye, the second I consider superior, if done correctly). Much of the 'fine art knives' desired by collectors are valued for the elaborate detail in the hilting - not the actual blades themselves.
5) Remember that 'economy' sand papers are themselves coated with - iron oxide. At the very least, using something durable (and more aggressive) saves you in cost of sand paper!
6) There is a technical reason for this. Any remaining pit or thinner spot will become a place where stress force will be concentrated. If the finished blade gets subjected to force in use (or more commonly mis - use), the blade may snap along this weakened area.


No comments:
Post a Comment