‘Don’t try this at home kids!’
This piece originally written for the Iron Trillium - Ontario Artist Blacksmith Association
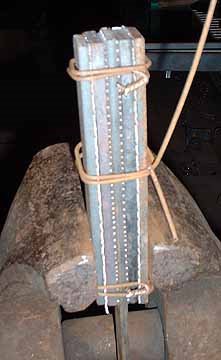
This is the start of my current discontent :

On an estimate, this stack appears about 1 wide by about 3 1/2 + tall by 10 + inches long. (1)
Do any of you see the potential problems here?
I had made a general comment after that first image was posted up on the open discussion :
“ (curious) Are you using a press? Otherwise don't you have problems with the layers 'humping' (*) and making gaps, as you hammer towards the rigidly fixed sections? “And guess what?
Later there were questions asked ; ‘ Why where there de-laminations of the forge weld? ‘ Which were (predictably) shown to the far end of the billet, to the outer portion of one side. Yes, this was hand hammered (there was a video clip added later as well). Honestly, I considered the hammer choice and the technique shown was just - well, pretty bad (and most likely to aggravate the ‘humping’ problem I mentioned).
Observation # 1 : Don’t believe what you see on the internet.
Remember that ’90 % of everything is Junk’. (2)
Here is the thing :
You do want to use some method to hold the pile of strips together.
Yes - there is that traditional Japanese approach, where you have what is basically a paddle (rectangular piece on a handle), on which you place a loose pile of plates or pieces. Then oh so carefully heat, then lift over to the anvil, striking with a very wide faced (specialized) hammer to weld. Using great skill not to jumble (much less drop) any of the small pieces.

I learned to prepare my stacks well before I ever had access to a modern electric welder, using several wraps of wire to hold the pieces together. This of course meant I had to pull off the wire loops after the first tack weld course. The wires would certainly weld into the top and bottom surfaces, but would end up bulging out and off the sides. Yes, you do have to use some extra care when heating to welding temperature, that you don’t just burn the wires away. (I find plain ‘black’ electric fencing wire ideal here.) Yes, this certainly adds an extra step, fixing the welded block in the vice and ripping the fragments of wire off.
An extension of this method would be using a box shaped collar, which would be knocked free once one end of the billet was at least tack welded. (3)
These days, truth be told, I have a big MIG welder, and I usually run a bead fusing one end of the stack together - and also at the same time applying a long bar as a working handle. I personally do this along one end of the plates, not multiples down the sides as seen above. This because the MIG process will ’smear’ the metals combined in the stack, which I certainly don’t what contained in the final layered billet. In practice, I’ve found that I usually get some cracks in the welded pile where the handle is attached anyway. (This primarily because the handle itself acts as a cold shunt.)
 |
| Here two pieces of flattened iron bloom, MIG welded to a handle |
Fixing the pile at one end, allows you to run your hammer blows from that point down and away to the open end. This will squeeze out excess flux, and importantly any remaining oxide or dirt, as you hammer from centre to edges, working sequentially down the stack.
Look at the measurements of the stack in that first image yet again :
- Ideally you want your stack of plates to be *square* in cross section - the height of the stack being the same as the width of the individual bars. This is simply to make sure that you are getting even heat penetration throughout the the whole stack. (4) You can see quite clearly here that the starting stack is easily three, perhaps four times as tall as it is wide!
- Ideally you want the strips in your stack to be roughly the same width as your hammer face, or not that much wider. (Does not necessarily appear a problem here.) This so you can quickly, and effectively, overlap individual hammer strokes. This to both ensure all parts of the stack get effective hammering, but also to ensure you squeeze out that same flux / impurities from between the plates.
- Ideally you want to limit the overall length of your prepared pile. There are two reasons here. First is to ensure that the whole pile will come up to both the correct, and importantly a uniform, temperature suitable for effective welding. (In this case, it was later shown the individual was employing a propane gas forge. There are other potential problems / method adjustments required for effective welding in a gas forge. One clear advantage is that in a well designed unit, typically internal temperatures are quite even throughout.) (5)
- The second reason to reduce the length of your starting stack is simply based on ‘how fast can you hammer’? Remember that your stack, especially for that first weld, is rapidly cooling as soon as it leave the forge. The outer layers especially. Even more so the bottom most ones, in contact with the cold anvil. You can mitigate this somewhat by letting the most distant part of the stack hang off the anvil, pulling the stack back towards you as you hammer, more or less in the same spot. (So moving the billet, not chasing the hammer over the surface.) But any way you look at it, you can only work so fast! I would expect anyone would find the temperature would have significantly dropped before they would reach the end of such a long stack (6).
This all suggests that there potentially would be welding flaws most likely to be found to the far end of the stack (away from the handle) and towards the outer surfaces, especially to what ever surface was placed down to the anvil. ( Guess what ended up happening here? )
( * ) ’Humping’
Ideally you would want to start on the part of the stack closest to you, pushing any flux / debris out of the layers and squirting this away from your body. Because the top layers are directly under the hammer, these distort the most, certainly more than the bottom layers (where the force has to be distributed down through the loose stack of plates. This is going to effectively cause those upper plates to stretch longer than those at the bottom. If you have fixed by welding at this starting point (or have a loosely held wire bundle) This does not present much of a problem. But if you have secured the entire stack with multiple weld lines as seen, what will happen is that as those top layers are effectively forced longer, they will shift forward and then bulge away from the lower plates. If you worked extremely fast, with very careful control of the hammer striking angle, you might be able to both limit and adjust for this as it happens. But given that there is no functional reason (that I can think of) for running multiple securing MIG beads to begin with? ( 7 )
I should also mention (although you must believe me here, see note 1) that in the short video showing the initial weld sequence, the hammer technique is, well, questionable (at best). The smith is striking with the hammer at a pronounced diagonal stroke. This is certain to impact more distortion force to the upper plates. If the hammer was coming in flat, at least the force would be directed straight down through the entire stack, rather than squeezing the plates forward. Additionally, the physical motion shown is simply horrible. The smith is striking with the left side edge of the hammer, arm away from the body, elbow lifted. This creates a kind of sweeping motion, rolling the wrist. And using what certainly looks like a 1.5 to 2 kg hammer (?).
 |
| 'Hero' shot of me forge welding (actually a billet of bloomery iron being compacted). |
My own experience has been that for the best results, is to run at least two (ideally four) welding courses. I first use the lighter, better controlled, and way faster, 800 gm hammer. I will usually do this twice, giving both the top, then the original bottom, surface a chance to be ‘up’. I consider these to be ‘tack’ welds, securing the individual plates together. Next I will repeat this combination, switching to a ‘next heavier’ hammer (for me this the 1000 gm - I find I can’t move the 1500 with enough speed or control). This ensures deep penetration and sold welding through the entire block. (Again your mileage may vary here)
Over the years, there has been a LOT of discussion on ‘the right way to forge weld’. Frankly ‘It works for me’ may be the most common statement. There is some science behind this (not what most people think, either). Working *clean* is most certainly the best single piece of advise.
(see a blog post )
Right now I think we all are seeing an absolute explosion of people thinking that now is the perfect time to attempt to turn their hobby into a ‘paying business’. Throwing money into high powered equipment, in place of developing any hand skills. There is a possibility that for a very, very small number, this might actually succeed. Knife *making* (7) is most certainly the ‘flavour of the month’. I’d bet this also annoys OABA members who have been forging blades for years.
1) I’ve specifically chosen not to credit the individual who provided this image, or the later process images / descriptions. (This to remove any possibility of bad feelings over my opinion - this is not from anyone in OABA, or even Ontario btw.)
2) ‘Sturgeon’s Law’ : coined by science fiction author Theodore Sturgeon
3) If you look at Scott Lankton’s several publications describing the making of his Sutton Hoo sword replica, you will see this use of sliding collars. (available as a pdf)
4) It is actually a bit more complicated that this. The differing carbon contents / alloy composition of the individual bars may also have slightly different ideal welding temperatures. Ideally you want to place either ’sacrificial’ strips, or the metal with the greatest tolerance against overheating, on the outsides (top and bottom).
5) I personally learned to forge weld in a ‘traditional’ coal forge - and continue to this day using coal as my primary method. The size of my fire box has been found to be most effective for welding billets up to at most 6 inches long. My normal starting stacks are roughly 1 1/4 x 1 1/4 x 5 inches long, which I find gives me the best results (your mileage may vary!).
6) Any of you who have seen me demonstrate certainly have noticed that my normal stroke rate is about double of most people. (This due to the ‘high and fast’ circular motion / technique that I use.) Again I find that for anything over about 5 - 6 inches, even this fast method will just not allow enough time to place the correct sequence of blows over the surface, before the metal has dropped below what I consider an effective welding temperature. (again, your mileage my vary!)
7) On later reflection, there is a possibility that occurred to me, coming from the use of the propane forge. The tight clamping and securing the individual plates may be an attempt to limit oxygen penetration onto the inner surfaces of the plates. (We all know that an oxide scale surface will not weld?) There are a number of reasons that I personally do not consider gas forges ideal for welding. Individual experience is most likely to differ (Good equipment design a critical factor). I will suggest that binding plates together is not a substitute for correct use of a fluxing agent.
8) I (strongly) distinguish between ‘knife making’ (grinding bars to shape and adding handles) and ‘blade smithing’ (forging bars to close profile). This becomes especially clear with much seen of recent layered steel blades. Billets that have been hand forged will show distortions from this process, which is part of their specific character. Surfaces with geometrically perfect lines obviously have to be ground to shape (often from purchased billets, themselves created using presses).
More fuel for the ‘that’s not blacksmithing’ debate ?


No comments:
Post a Comment