Tuesday, October 01, 2013

NEW - Fall course lineup...

Moving into NOVEMBER - I have added a number of new programs:


Intermediate Blacksmithing 
November 9 & 10

This two day program covers forge welding, 3-D punching, additional decorative techniques. Detailed Information on / registration for this course can be found HERE 

Basics of Casting Metals 
November 16 & 17

This two day program will introduce the student to casting PEWTER in SOAPSTONE and BRONZE in SAND.
 Detailed Information on / registration for this course can be found HERE

Introduction to Blacksmithing 
 November 22 - 24

ONE space remains!

Introduction to Blacksmithing 
November 29, 30, December 1

TWO spaces remain!

Detailed Information on / registration for these courses can be found HERE

NOW BOOKING -  Interested students should contact me

Tuesday, September 24, 2013

French Trade Axe from Bloom Iron (1)

One of the few artifact pieces I have in my collection is an early French trade axe, a 'Biscayne' type:
Artifact measurements - in mm
I bought this piece at an auction near Angus Ontario, quite a few years back. The original owner had told me he had dug it up on his property there. He had spray painted the thing gold, and had a loop of wire (thankfully no hole!) to hang it on the wall.
I had recognized an early, blacksmith made axe - and not much more. Back at my shop, I had thoughts of re-conditioning it. I ran it up to forge heat to burn off the paint, then gave it a heavy hand wire brushing to lift off the surface corrosion. After cooling, I started to clean up the edge on the bench grinder. (Sorry!) As I reduced the edge,  I found a massive flaw in the edge weld, a piece roughly the size of a quarter with visible fire scale inside the crack. At that point I realized I had a great commentary piece on historic blacksmithing work. 'See - not everything was made by masters - and they screwed up too.'

On a fast internet search this morning in preparation to this article, I was a bit surprised to find the following :

Fur Trade Axes  by Mark Miller - Biscayne Trade Axes

" The Biscayne trade axes are the oldest style of metal axe we know of traded in North America.  The eye pattern has a distinctive ovate egg shape..."

" Records show Biscay hatchets being traded to American Indians by the Spanish as early as 1520's - 1540's;  the French from about 1560-1750's; and the British from 1674 -1690's? which were copies of the French ones but were recorded as imports by the blacksmith Samuel Banner from England.  "

" The Hudson's Bay Company began literally copying the French biscay trade axes in 1674 ...  How long the English copied the French made axes is not known but there is no mention of it past the 17th C....
The French made Biscay style trade axes from at least the 1530's-and tapering off until the last known reference to them was 1758. "

The artifact I have is heavily pock marked with corrosion. There is no obvious makers mark I can distinguish on either face. 

Given that and the find location, it may be hard to date the axe accurately. Angus is within the north to south line of the Nottawasaga Valley, putting it directly south of Collingwood / Georgian Bay. This is potentially one of the routes possible to the French mission at Saint Marie Among the Hurons to the north (1639 - 49). Most certainly with the later expansion of the English into what became Upper Canada, there was a continuing European presence in this area to modern Canada.

Some images of the original artifact - along with the piece I have been working on the last couple of days based on it  (both images expand to roughly life size, the artifact is on the top) :

Side 'face' view

Bottom surface view

Along with the massive welding flaw on the actual cutting edge I mentioned, you can see that there is a serious flaw in the weld  along the bottom side. This would drastically impact on the axe's ability to be correctly fitted to - and remain attached on - a working handle. 

Together I get the impression of 'junk for the natives' - low quality work, produced as quickly and cheaply as possible!

Note : The replica version I am working on is only at the 'rough forged' stage at the point of those images!

Friday, September 20, 2013

Building an Icelandic Iron Furnace?

 Some questions concerning a possible DARC build of the Icelandic Iron Furnace - as suggested by Kevin Smith's work at Hals...

Richard  wrote:
 

-- what are the archeological dimensions I should be aiming for?
-- am I burying it in a bank or should it be free-standing?
-- given the strong prevailing winds here, should I be looking to place it in a sheltered location, or would careful orientation help create better draw
Suggested build of the original Hals Furnace

1)Link to the full report on the Hals furnace:

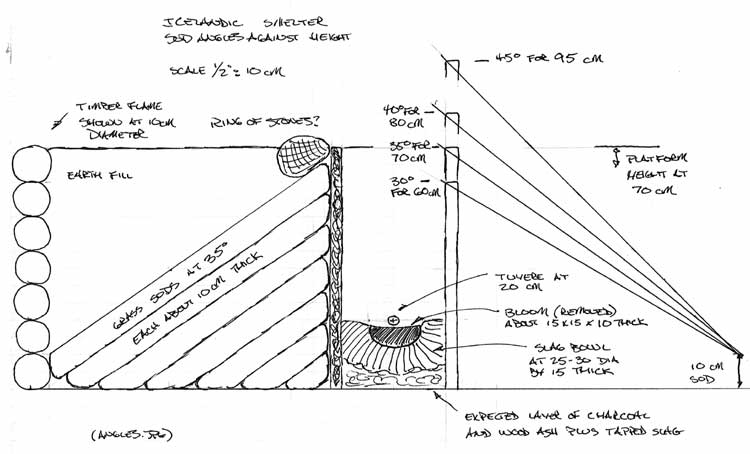
The full construction is  a cone of sod roughly 2 meters in diameter, standing roughly 70 cm tall. There is a 30 cm diameter cylinder down the centre. The suggestion is that this cone was surrounded by a box made of timber (alternating logs?) - with the gap between the timber and the sod filled with earth.

2) In effect the construction above is like a free standing bank. The box of earth makes a stable work platform on the top.
One important question is :
"How wide does the sod band need to be."
In use, the sod is in effect taking the place of the thick clay cob walls we have been building to date. The grass roots are creating the stability - during the firing process. The interior wall of the cylinder had a thin (3 cm suggested) layer of clay like marl as a fire proof coating. The fact that the stacking of the sods creates a series of diagonal lines - running downwards away from the interior - is going to keep hot gasses from seeping out of the grass layers.

A team from Iceland, under Margrét Hrönn Hallmundsdóttir, had run a version of the Hals system last year. Margret has worked with Kevin Smith, and she and I did converse a fair amount before her experiment (her first full iron smelt).
http://www.warehamforge.ca/ironsmelting/HALS/angles.jpg
The furnace they built (at least from the photos), was more a square, flat layered stack of the grass sods. They also made some other departures from the archaeology at Hals. I thought the main one was that they built a chamber of stone blocks for the bottom third of the furnace (basically square). The construction they used was using the sods more like flat stacked bricks.

It has occurred to me that we might do a first test by either partially earth banking the construction - or putting the whole inside a smaller plank constructed wooden box.
The first would allow us to undertake a top extraction - which is suggested by the Hals evidence (slag bowls in place). The second would be simpler using a bottom extraction.
Something to take a look at would be the way the team from Tranamo Sweden group had  built a semi portable demonstration furnace. They had used a cylinder of fire brick held in a 45 gallon drum - this surrounded with a wooden box that they used earth to stabilize.

At Heltborg, Denmark, 2008

On alignment to the wind:
It might be nice to have the wind going from our backs across the front of the furnace - or from side to side. At Wareham the prevailing winds go from the rear of the smelter towards the workers. This only occasionally pushes the heat into our faces (singed beards). In terms of providing air blast - it would only be the rare day this would really be useful. A bellows or blower system is still in play here.

DARC has undertaken a number of smelts in a series leading up to a full reconstruction of the Hals Iceland system. You can find this work documented on the full Wareham Forge IRON SMELTING web site
 

February 15 - May 15, 2012 : Supported by a Crafts Projects - Creation and Development Grant

COPYRIGHT NOTICE - All posted text and images @ Darrell Markewitz.
No duplication, in whole or in part, is permitted without the author's expressed written permission.
For a detailed copyright statement : go HERE