I had written earlier about the Fire Grid from the Mastermyr Tool Find. (See 'Interpreting an Artifact' - December 31, 2010)
Many re-enactors desire a 'cooking grill' for their camps. This artifact is most often pointed to as the historical reference. It is clear from a detailed look at the construction of the actual object, that it could never serve that function. Its relative light weight further supports the ethnographical references given by Berg in the primary report. This object is better suited to hold light pine knots serving as a source of area lighting, likely for a workshop.This was not an idle rambling, I had actually been approached about creating a replica based on the original artifact, modified for use as a camp fire cooking / grilling rack. I'm not going to go into detail about the original object, or a commentary about its intended use. (see the original posting for that!)
In the end we did work out a compromise, basing the size and many details on the artifact sample. The whole was considerably strengthened. Although I do have reservations on the strict authenticity of using a cooking grill in a Norse context, the customer was keen to keep as many historic details as possible. Most importantly, my earlier discussion was not wasted, and the budget was realistically large enough to support this level of work.
So - what was the result?
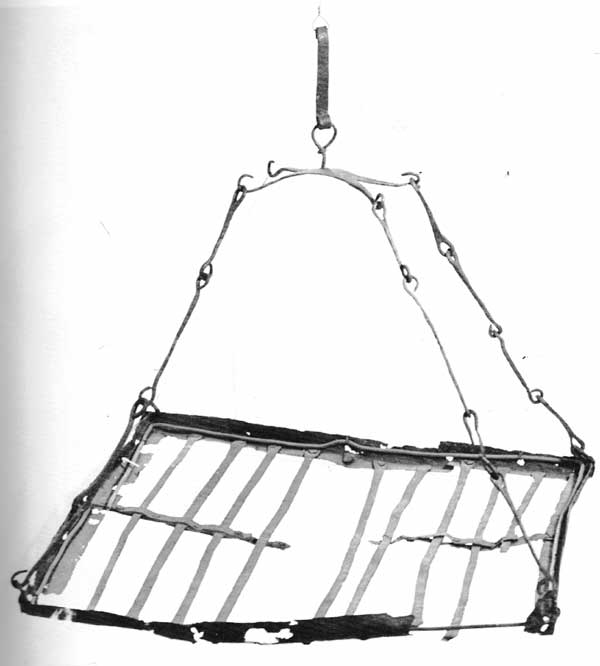 |  |
| Photo of the original artifact | Photo of the completed cooking grid |
So you can see that I have quite intentionally set up the image of the completed project to replicate the published image of the artifact.
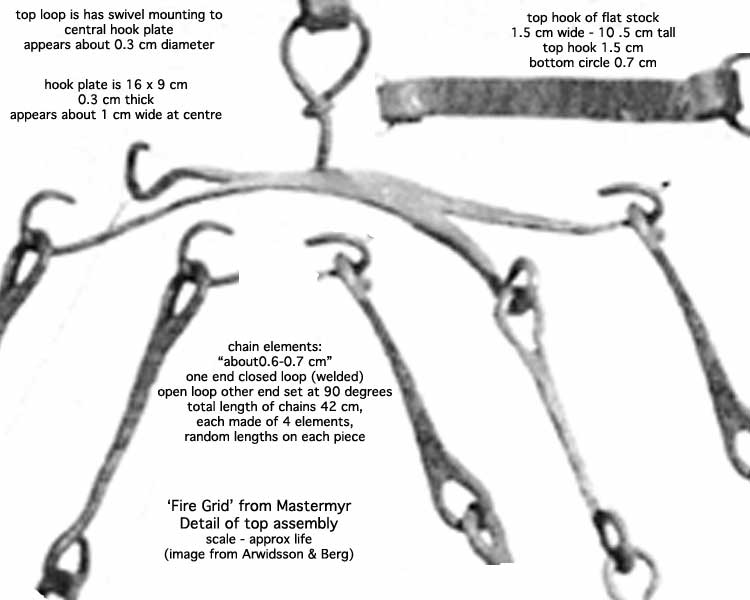 |  |
| Enlarged detail of artifact top mount | Completed top mount & chain |
When you compare the top support element on the artifact with the one used for the camp grid, one of the important modifications can be seen. To support the greater weight of the heavier construction of the cooking grid, I started with thicker material. The central H shaped element was made from 1/4" thick steel, split and forged to points. The artifact was forged the same way, only starting with closer to 1/8" thick wrought iron. In both objects, the chain elements were forged from 1/4" square stock, with one end loop forge welded closed. I retained the random lengths of the individual chain elements that is seen on the artifact. As the artifact, each length was composed of 4 elements with a total of 42 cm.
Rather than use commercial round stock for the top swivel loop, I forged down square stock to a cylinder before forming the loop and upsetting the lower swivel.
 |
| |||
| Illustrated artifact details | Grid detail End Hooks Bar Ends |


When the artifact drawings are compared in detail to the finished camp grill, some differences become obvious.
- For use as a cooking grill, the spacing between the individual bars was reduced, through the use of wider bars. Again for strength, the stock chosen was almost double the thickness (to 3/16" thick). To get the required shaping for the pair of central strips, thinner 1/8 thick material was used. Although standard 3/16 diameter round top rivets were used to attach all the bars, the hammer peened ends were place upwards to hid the machine made shape of the heads.
- The biggest change is the use of standard 1 1/2 wide x 1/8 thick industrial angle material for the side bars. In the original these were made of considerably thinner flat sheet, bent to the desired shape. The substitution was primarily done for physical strength (but cost and material availability was also a factor). To provide extra durability, the corners of these bars were MIG welded where they overlapped on the bottom side. A single use over the fire and even these hidden, admittedly modern, welds will be next to invisible.
- The angle material was cut away on the bottom surface. The remaining 'tab' was drawn out to a tapered point, then folded back to create the end hooks. Originally this was done without using the anvil's horn to mimic Norse tools and methods. (Norse anvils almost ALL do not have horns - see 'Shape of Forges in Early History' - December 2, 2010). When the result was compared to those on the artifact, the shapes were not quite correct. The central image shows the lower hook forged over the anvil's edge alone, the upper one forged over the horn. The more circular shape is the result of either great care (!) or the use of a conical or cylindrical forming tool. In the end I chose to use the horn to open up the circular shapes on all the end hooks.
- Another important fine detail was to hot punch all the rivet holes on the grill bars. This method results in a distinctive spreading to the bars. These were also forged round - rather than just being square (as saw cut). In the bottom image, the middle bar has had modern power tools (band saw and drill press) to finish the end. The other two bars show the distinctive shape of hand forged methods.
The customer's choices of hand forged methods, especially the 16 forge welds and the roughly 22 hot punched holes, easily doubled the cost of the project. The end result, although a different application than the Mastermyr fire grid, has resulted in the creation of an object which certainly has the appearance of an authentic Viking Age piece. I was very happy with the result.


1 comment:
Instead of using modern rivets with machine shaped heads, I use large diameter brite finished nails of suitable size. Then I pien their heads into a suitable shape, anneal them and cut to length and install them as normal rivets are used.
This process is more labor intensive than just using commercially produced rivets, but gives forged heads on both sides.
Post a Comment