(a duplicate of the post at Bloom to Bar)
Making a bloom requires an iron smelting furnace. I have built dozens over the years, most on the '
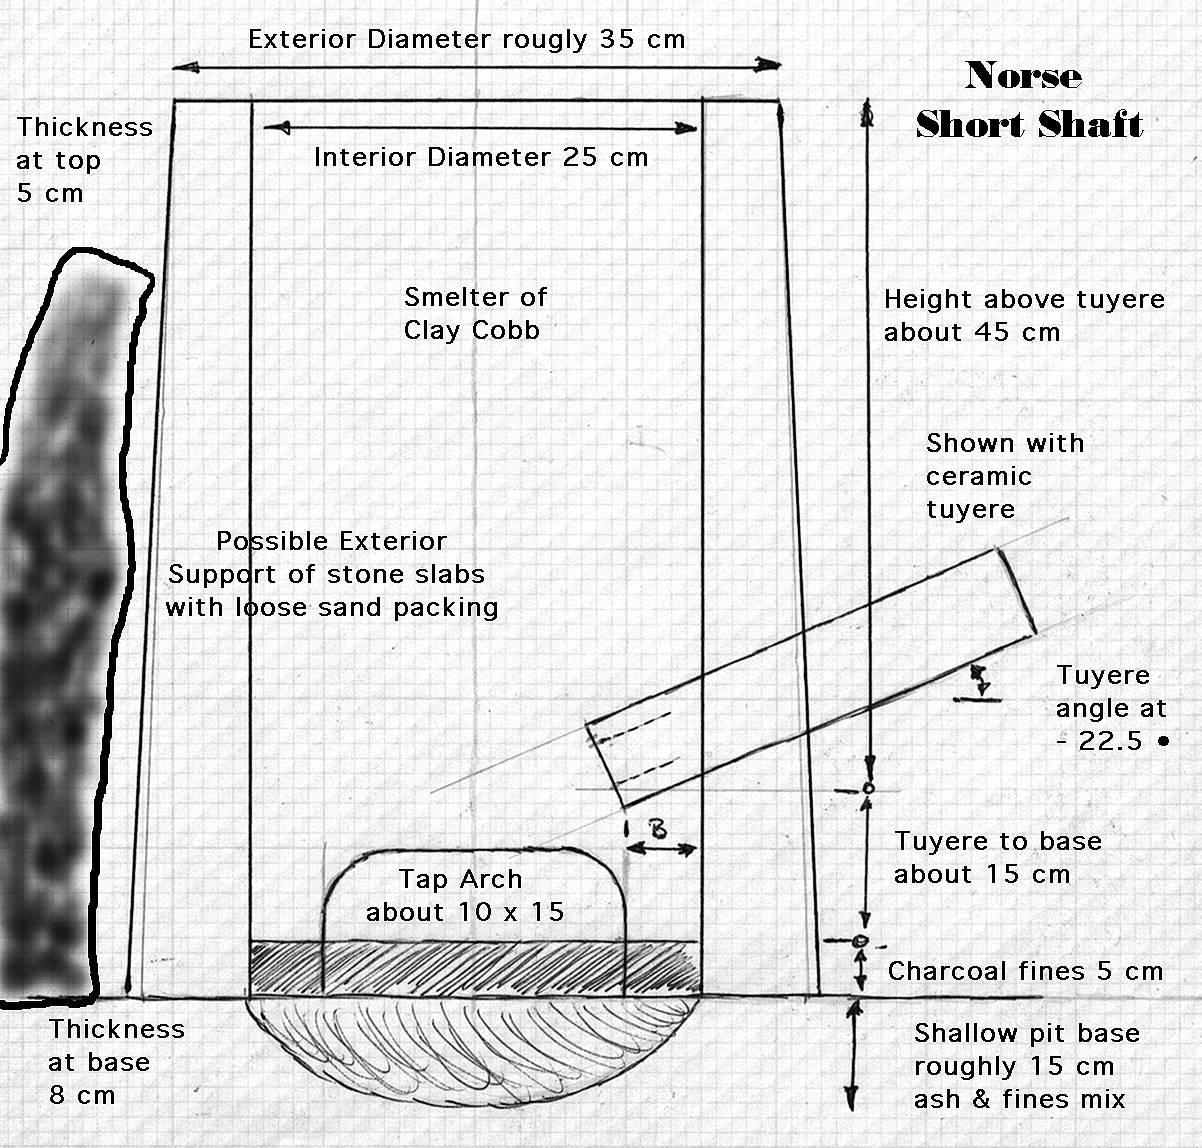
Norse Short Shaft'
model. The work on the actual smelting end (creation of the iron
blooms) has been a combination of a learning process extended into
experimental archaeology. Furnaces are often purpose built to test a
specific variable, and commonly only used one or two times.
I have decided to take the opportunity offered by the OAC project grant to build a more durable 'production' version furnace.
The
first day's work consisted of gathering the available supplies and
possible pieces, plus cleaning up and preparing the site. The furnace
built for last year's '
slag pit' experiments was examined to see if it could be simply repaired.
 |
| Damage to top of Fall 2011 furnace |
The nature of recording the slag pit experiments had
meant picking up and moving the furnace itself after each smelt. The
furnace had been returned to a prepared base and covered over with a
plastic drum for the winter. The combination of all that shifting, and
the winter weather, had resulted in a fair amount of damage. This
certainly could have been repaired, but I decided to build a brand new
furnace.
There would be a number major elements used for the production furnace which should combine to greatly increased durability :
use of a copper tuyere
base area built of fire brick
metal sheathing over the shaft
use of sand / horse manure / clay mix
 |
| Part way through construction, with measurements |
One of the things kicking around the shop was an old
metal trash barrel, with the bottom pretty much rusted out. It was
roughly 60 cm tall and about 35 cm diameter at the small end. Almost
exactly the same size as the exterior of a short shaft furnace. I
decided to use this as a combination form and protective shell for the
upper shaft. The base area would be built from a circle of dense fire
brick, both for durability and stability.
 |
| Firebrick base as laid out |
The furnace was constructed on the shelf that makes up one edge of the Wareham
smelting area. This places the bottom base of the furnace up about 25
cm above the working floor. To create a hard bottom and stable surface, a
(broken) concrete paving slab was placed first. The furnace is being
constructed with a large tap arch - large enough to allow for possible
bottom extraction of the bloom (although my normal method is a top
extraction). The location of the tuyere
will be to the left hand side as seen above. The placement of the fire
bricks on edge creates a heavy and flat surface for the shaft of the
furnace to rest on. The circle of standard construction bricks defines
the boarder between the furnace and the natural earth surface.
 |
| Brick layer with clay fill |
|
The first layer of clay was a mix of 50 /
50 rough sand and standard ball clay (mixes by volume). This was used as
a mortar to fill the wedge shaped gaps between individual bricks. Next
the space between the firebrick circle and the outer retaining bricks
was filled. Finally a sloped shoulder was created from clay to the top
of the fire brick layer. A full bag of clay was required here.
Next, the bottom of the metal barrel was cut out. A slot was cut
on one side, roughly 7.5 x 7.5 cm. This would be the hole allowing for
the insertion of the tuyere later. The measurement from the top of this hole to the top of the barrel was 40 cm. (When positioned, the angle of the tuyere will place its tip even lower, so there should be a good 50 cm of stack height.)
 |
Dry measures for the clay mixture
|
The furnace walls were composed of a
mixture of course sand, shredded dry horse manure and clay. The clay
used was 'New Foundry' - a higher firing temperature clay (which I had
gotten from
Lee Sauder).
The ratio is roughly 25 / 25 / 50. This is mixed dry by hand before the
water is added. (I took considerable care to make sure the mixture was
fairly stiff, particularly with the first layer.) The material was
kneaded up to an even consistancey,
then hand wedged into balls and left to stand for about an hour before
applying. (Note that Lee recommends letting the clay stand overnight to
even out the moisture content. Yes - I did rush this a bit!)
 |
First wall layer applied (tap arch at bottom right)
|
The individual balls were broken in half,
with the individual pieces blended in carefully as the walls were built
up. The metal form allowed to exert good pressure, but still keeps the
overall shape consistent (and under control!) The thickness of the walls
was kept to roughly 6 cm at the bottom, thinning slightly to closer to 5
cm at the top. You can see how the interior diameter is matched to the
ring of fire bricks.
Because the metal barrel tapers, the
interior diameter of the furnace will taper slightly as well. This is
actually ideal, as it moves the tuyere
tip slightly off the direct line of ore falling inside the furnace. (We
have seen this arrangement reduces the amount of slag that collects on
the tuyere tip.)
I
finished up a long working day just as the sun was getting close to the
horizon and the black flies were starting to come out. Expect some
images of the final construction, once the clay has had a couple of days
to stiffen up and I mount the tuyere.


No comments:
Post a Comment