What do you do with it??
 |
| Bloom Bowl #4 - Summer 2015 |
The source of the iron itself was from Smelt #24, conducted in June of 2007. The specific experiment was a 'hot swap' - a double use of the same furnace. Once this bloom was formed, and extracted, a second charge was added to the still hot furnace and a second bloom created.
The description of these pair of smelting experiments can be found on the main Wareham Forge Experimental Iron Smelting web records.
The starting bloom was created by the team of Neil Peterson, Dr Ron Ross, and myself:
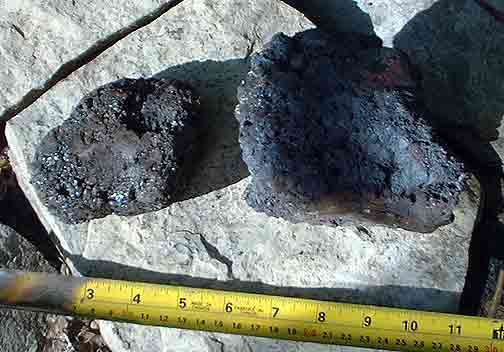 |
| The two blooms created - #24 to the left |
A spark test on the surface suggested the metal content was fairly low carbon - considerably less than the 0.20 % of modern mild steel.
I don't have any images of the actual forging 'bloom to bowl' sequence:
• The bloom mass was pre-heated to a bright orange in a gas forge (lengthy heat soak)
Considerable slag could be seen flowing to the outside surface at this step.
• The bloom was transferred to the coal forge, and brought to a welding heat (bright yellow)
• A first two compactions were under the hydraulic press
• An additional series of welding heats were taken, using the hand hammer in an attempt to weld in the ragged edges, resulting in a rough rectangle.
• Again at close to welding heat, the plate was returned to the hydraulic press, this time under a cylindrical 'drawing die'.
At this point, the plate started to fragment along the edges, with several match box sized pieces working loose.
I decided to try fluxing the remaining surface, then placing the individual fragments on top. The intent was to weld in the fragments, back to a solid (if thicker) plate. (This is something that I personally have never had a lot of luck with, but that I have observed friend Jesus Hernandez accomplish many times.)
I was also getting a bit tired out! It should be mentioned that a second small bloom had been in progress over the initial work cycle, heating one while the other was being forged. I had duplicated the steps up to switching to the drawing die on the second piece at the same time. (This other piece spark tested out to be closer to 0.30 carbon, so was set aside as a plate for later work.)
As it turned out - the key was a * slow * heating process (Thank you to Lloyd Johnson, who had stressed this during the adze forging demonstration he illustrated for OABA on Saturday!)
The result of a compaction at welding heat (on the press) was a successful weld.
Then:
• An additional series of welding steps with the hand hammer to ensure the edges were firmly attached.
• Several forging heats under the air hammer to thin out the welded plate (starting at about 1/2 inch thick) down to roughly 3/16 thick. A mushroom head die (on a handle) was used for these steps.
• A final set of forging heats using the 1 kg rounding hammer to smooth out any ripples from the die.
At this point I had converted the initial bloom into what was basically the * starting * material for the actual object I had in mind :
• Gathering natural rock ore = several hours work
• Building a smelting furnace, preparing raw materials = a full day's work (ideally two people)
• Smelting rock ore into the initial iron bloom = a very full day (ideal minimum two people)
• Consumed materials = roughly $110 (56 kg charcoal, ore not considered)
• Forging bloom to starting plate = just over 2 * hard * hours
• Consumed fuels - roughly $15 in propane + roughly $ 10 in coal
Note that 'knowing how' is not a consideration here.
Or the $2000 plus full week of work for the Hydraulic press - installed specifically for bloom work.
Forging the bowl itself took about another 30 - 45 minutes.
The next day there was polishing and finishing, about another 30 minutes.
The completed object is 550 gm (so roughly a one third loss in its creation).
The rough size is 6 inches long by 4 1/2 wide and standing 3 tall.

So...
How do you price an object like 'Bloom Bowl #4'?
( It probably should be a consideration that I am one of only two artisans in Canada who regularly works with bloomery iron. Certainly I have the most accumulated experimental experience in creating this unique material within Canada. )
...with endless thanks to Lee Sauder, for showing me how and then pointing the way


No comments:
Post a Comment