"Since I can't take your class right now, but you do have these training videos, if I wanted to set up a forge to try making some knives (after watching your videos) - what equipment should I get?"
I am not going to address the whole problem of training here.
At it's most Basic:
1) Something heavy and flat to hammer on
2) Something that will heat metal to 1,200 to 1,800°C - red to bright yellow (1)
3) A hammer
4) Something to hold (smaller) pieces while working
Related to blade making:
5) Some way to securely hold small pieces (to a bench or a vice)
6) Something to shape / smooth / polish the forged shapes
7) Something to shape / smooth handle materials
Now, it is certainly possible to create objects using the most primitive of tools. Remember that for the majority of human iron working (earliest about 2500 BC, practically from about 1200 BC), tools were extremely limited, both in size and complexity.
 |
| Set of Blacksmith's Tools from a Viking Age grave. |
As some Detail
1) An Anvil :
It is certainly possible to use any big / heavy, flat, ideally metal, surface as an anvil. - The heavier the mass, the more effective your hammer strokes will be.
- The closer to an actual 'anvil' shape, the easier the shaping process will become.
- The better the actual quality of an anvil, lower the physical impact on your body to the hammering process.
You certainly can use simple substitutes if you can not find / afford a large, good quality anvil. (Generally this is plus 100 lbs for simple hobby work, closer to plus 150 lbs for 'serious' smithing.) (2)
- Often a short piece of rail road track is suggested, and certainly is functional (even without any special modifications. (I worked on one for the roughly my first two years myself).
- You could purchase a simple block of mild steel, 3 x 3 or 4 x 4 and about 12 inches long. Would run you about $50 - $75, and although not ideal, it certainly would work. (3)
- At its simplest, you could scrounge a block shaped piece of machinery.
2) A Forge :
As mentioned, you need a heat source that :
- has temperatures into the correct working ranges (1300 - 1800 C)
- is physically large enough to heat the bars being worked
- ideally has some economy in fuel consumption.
Now - this is one of those places that the internet is not exactly your best guide. (4). The usefulness of a forge is going to be dependent on two variables : the physical design of the equipment, and the nature of the fuel.
You can get by with a simple pile of fuel, ideally contained somehow, ideally set at about waist height. Regardless of the solid fuel type, interjecting air into the pile will greatly increase the temperatures produced. At the cost of greatly increasing fuel consumption. A core principle is that X kilos of carbon = Y energy units, regardless of carbon type. The denser the fuel, the more carbon / energy you can potentially create within the limited space inside the forge. (5)
The next consideration is that fuel cost and availability. Here at the Wareham Forge, I mainly work with bituminous (soft) coal. With my equipment, I find this the most economical, in terms of $$ per working hour. But there is basically only ONE supplier of good quality forging coal in Ontario. 'Metallurgical Coke' is another possibility, but availability of this industrial fuel is very much limited (depending on your region). (6)
Propane, on the other hand, I find about twice as expensive per working hour. But here I drive to my local farm Co-Op (or most gas stations) for a re-fill.
Some basic forge types often seen :
a) Dish Forges / Solid Fuels
You will see small antique 'farm' forges, simple 'table with a hole' and the 'brake drum' home builds. Many home build variations are illustrated on the internet. All work (for some values of function). With some scrounging, the classic 'brake drum' forge can be made with about $30 worth of plumbing parts.
The basic problem with all these forges is that there is no containment for the fire, it spreads both upwards and outwards. Typically the shallow depth to the fire means proper control of oxygen balance inside the fire is very difficult (if not outright impossible). The lack of any method of removing ash means the fire fairly quickly will clog with clinker, with heating ability also declining.
All this means this type is fine to undertake simple work for short periods. Fine for occasional hobby level work.
b) 'Professional' / Solid Fuels
Here there will be a cast iron fire box that hangs below the table. There are two basic profiles to these. A round, fairly wide but shallow type, designed to make a large but generally not as hot fire, originally intended for making draft horse shoes. The other is rectangular and quite deep, which makes for a physically hotter fire, so intended for general forge work, including forge welding. Both will have some kind of moveable part (drum / ball / triangle / lobbed) at the bottom which can be rotated to let that accumulating ash drop out of the fire box.
Obviously the best choice, but essentially a factory made object. Do note that the table is just something to hold up the fire box and allow fuel to be piled up around it. This itself needs to be fire resistant - but can be fairly simple
 | ||
| the Wareham Forge. 180 lb, 1850's anvil, coal forge (deep fire box set into an old welding table) |
A gas forge is basically an insulated box with an attached burner. For general purpose work, it is the restriction of the box that poses the largest problem. Any three dimensional shapes become difficult - if not outright impossible. (Note that for the discussion at hand, many bladesmiths find the general ease of operation and degree of predictable control of gas forges ideal.)
For many, the ease of getting fuel, plus the lack of any requirement for a smoke stack leads them to a gas forge. Although gas burners can certainly be home built, many people are (correctly) concerned about possible fire hazard from poorly constructed burners. Purchasing a commercial burner can vary considerably in cost, but basically the more efficient the burner, the better the fuel economy (especially significant in the long run!)
The second element that effects the overall efficiency of a gas forge is the nature of the insulation. Unfortunately there is a direct relationship between the insulation ability of a material and it's relative fragility - and purchase cost. A simple pile of regular fire place bricks will certainly work. Although low cost, these absorb a significant amount of the energy produced by the burner, resulting in very long warming up cycles. High cost materials like K-Wool blanket are spectacular insulators, but are also extremely fragile.
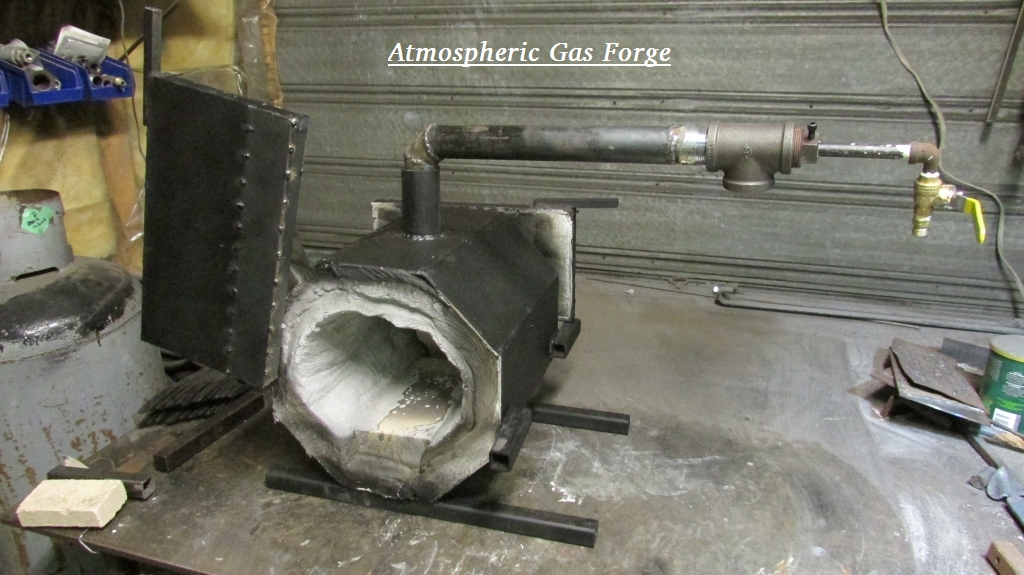 |
| Gas Forge by David Robertson |
3) Hammers
There is more opinion about what a good blacksmithing hammer is - than anything else related to the work!
A couple of key points :
- It does not matter how hard you hit - if you miss. CONTROL is more important than mere power. This is especially true related to bladesmithing.
- Most tasks can be effectively undertaken with a hammer in the 800 - 1000 gm range (that's 1 1/2 to 2 lbs for the Americans reading).
- A $200 'designer' hammer is not 20 times better than a $10 hardware store ball peen.
- the most useful all-round shape is a classic 'cross peen'.
Yes, individuals will have a specific 'favourite', style, weight, handle. There is a direct relationship between body size to motion dynamic, and so specifics in design in the hammer.
I have already gone into considerable detail on hammers for blacksmithing on earlier articles here :
a bit about HAMMERS
Getting HAMMERED (#1 - Shapes)
Getting HAMMERED # 2 - Dynamics
Getting HAMMERED - #3 Setting Up
4) Tongs :
There are more types and shapes of tongs than there are hammers. This is primarily because there is one ideal shape and size of jaws for any given stock profile and dimension. The tongs ideal for 1/4 square are likely impossible to use to grip 1/8 x 1 inch flat bar. (There are of course some styles that suit more than one stock type).
- Tongs are typically one of the first things you learn to make yourself. The resulting quality can vary by a huge amount - often based on how complex the shaping has been. If you look back to the Viking Age tool set shown at the start of this piece - you can see that those are actually pretty simple to forge.
- Because any working blacksmith shop has dozens of 'every day' tongs, and well as many more 'used this one time' pairs, used smithing tongs are fairly easy to buy at 'old junk' type stores. An important point to remember. As a smith yourself, you can always re-forge a set of tongs to a new, more useful to you, shape!
- Although it is certainly possible to use standard pliers to hold especially small pieces, this is hardly ideal :
- Small jaws mean a loose grip
- Pliers are designed to fit tight - leaving no room allow a flat grip on anything but the thinnest of metal.
- Pliers almost always have cut teeth - which will mar the surface of your bar as they grip (especially if at forging temperatures). This can be reduced by grinding off the inner jaws smooth.
- Many pliers have chromed finishes. If heated, this chrome will vent off - a toxic vapour.
- Vice Grips are especially to be avoided. Not only are all of the above true, but the heat from the forge will damage the internal springs - making them more difficult to use anyway.
To come : Part Two - Tools for Bladesmithing
I had written another commentary that relates directly to this initial question which also is worth reading. From back in 2009, when that economic downturn caused a lot of people to inquire about 'blacksmith training leading to a business'.
Commercial Message :
Here at the Wareham Forge, I do have a number of training videos that would be of value for those attempting to 'home instruct' .
This three hour program contains a wealth of information, including what to look for in used tools, building a home shop, and demonstrations of a number of basic forming techniques.
Originally filmed in 1992 (on Betamax!) Available as DVD or digital download.
This two and three quarter hour program deals with the historic development of cutting edges and forging technology, as well as demonstrating the methods of producing three reproduction blades.
Originally filmed about 1995 (VHS) Available as DVD or digital download.
This 2 1/2 hour program documents the creation of a number of the forged metal objects created for the 1997 'Viking Encampment' Program at L'Anse aux Meadows NHSC for Parks Canada.
Originally filmed in 1997 (VHS) Available as DVD (digital download soon)
For more details / to order
1) A special note about blacksmithing on video. Any blacksmith will be using the visual appearance of the heated metal to determine working temperatures. However - the camera records light differently than your eyes. Most typically these images show as significantly much brighter on film than they would to your unaided eyes. This is extremely important when assessing bladesmithing. Anything that shows as dull red on video will in fact be well below the minimum correct forging 'critical' temperature. At critical, the metal re-crystallizes, so any force applied will result in cracking - and eventual failure of the metal.
2) Right now, there has been both an increase in price, and shortage in supply, of used, working quality, anvils. The recent popularity of those blacksmithing related TV shows is largely the cause of this. At point of writing, 'fair market price' in Southern Ontario is running about $3.50 CDN per lb. New anvils are certainly available.
3) I have mentioned this often on this blog in commentaries related to Viking Age metalworking.
This becomes a special problem in the world of YouTube - where the objective is not information, but (usually) self promotion. Sure, some person did in fact undertake some stupid method, using the incorrect tools, to achieve poor quality results. 'Possible' is not anyway near 'Correct'. Why would you duplicate this?
4) Or more exactly - 'has way too high a noise to signal ratio'. You can find hundreds of 'I built a home forge' videos. The majority are just plain bad designs.
You will see those trumpeting their 'fire wood' forges (A dry oak camp fire will at best give 1200 C, which you see is the bare minimum forging temperature.) It is not that these designs will not work - it is just that they do not work very well.
5) Consider how light weight charcoal is. Charcoal certainly can produce higher welding temperatures in a well designed forge, and has been the primary fuel used for the bulk of human history. Unless you have the ability to make your own however, you will find charcoal simply way too expensive per working hour to be a realistic consideration.
6) A critical consideration when using solid fuels is the absolute necessity for effective ventilation. Charcoal has one advantage in that once lit, it produces little visible smoke. This is also the case with coke. Technically a coal fire is 'self coking' and this process produces the highly visible smoke and fumes. The fumes from both both coal and coke are toxic. An effective stack / ventilation system is a definite requirement.
Note - an apology to anyone who caught this article in progress over Saturday / Sunday. I managed to hit 'publish' rather than 'draft' - well before this piece was finished. So consequently there would have been multiple versions seen as I continued to work it up. (Some problems connecting my rural internet due to wet weather didn't speed the work either.)


No comments:
Post a Comment