This is a brief overview of the smelt undertaken as a course over the weekend of November 24 / 25, 2007 by Peter Martin and friends. Note that this report lacks certain details on the exact smelt sequence (others took the data there).
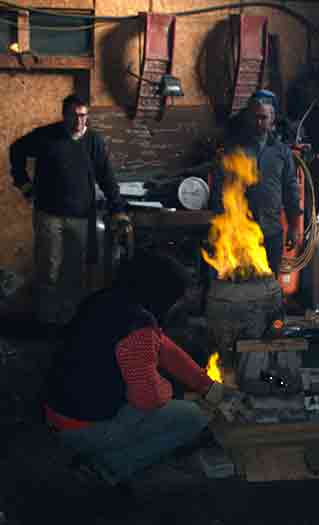
Saturday consisted of an overview lecture, construction of the smelter, plus preparation of the materials. One important difference with this smelt is that it took place INSIDE, on the main shop floor. The space is dirt floored with poured concrete walls and a 20 peak to the roof. This was done because of the start of winter weather (daytime temperatures just below freezing and with 4 inches of snow down).
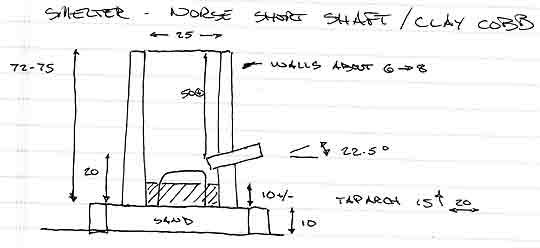
SMELTER: standard Norse Short Shaft - clay cobb
Height: 72 - 75 cm
Diameter: 25 cm (internal)
Thickness : 6 - 8 cm (somewhat variable)
Tuyere: 2.5 cm ID, standard ceramic tube
Position: 22.5 down angle / about 4 cm proud inner wall
Base: about 10 cm below tuyere
The smelter was constructed on a low plinth, a line of standard bricks filled with tamped sand. The shape of the smelter was to our standard profile, controlled by using two sheet metal forms for inner and outer diameters. In this case the clay was mixed up somewhat on the wet side and was not compacted as evenly as normal (first time builders). The cob was made of commercial ball clay mixed about 50/50 by volume with chopped straw (no sand added). The structure was left overnight with the sheet metal forms in place to allow the clay to stabilize.
After the metal forms were removed, the structure was straightened and tap arch and tuyere cut into the walls. It was obvious that the soft clay was starting to slump, so a split hardwood fire was started inside. The internal base level was allowed to develop from ash and small charcoal remnants. A much longer than normal pre-heat sequence was undertaken to dry the clay - twice the normal at over two hours. Only the last 15 minutes was under the influence of the blower at its lowest setting.
The primary ore material was commercial taconite pellets, sourced from Defasco in Hamilton Ontario. These had been previously roasted in a gas forge and then water quenched (to ease breaking). The team crushed 36 lbs of this material to the normal 'rice to half pea' size. In keeping with some recent observations by Lee Sauder, a further 4 lbs of poor quality Virginia rock ore was set aside as a seed charge. The expectation here was that the higher silica content of this material would speed the formation of the slag bowl. In total 40 lbs of the two ores was used.
As usual, the main sequence started by filling the furnace with rough carcoal, followed up with additions of graded fuel (2.5 cm pieces). Air was set at roughly 750 litres per minute. This number is only an estimate, as the first blower failed part way through the smelt and had to be replaced with the standby unit. (There are no exact measurements for the second blower, but sound and consumption rates remained constant - suggesting close to the same volumes.) From the first, the smelter ran hot, with initial consumption of the standard 10 litre (about 4 lb) measure of charcoal in the range of 6 minutes. Significantly, the entire internal volume of the smelter very quickly ignited, shortening the time required to first ore addition.
A fairly standard ore and charcoal sequence was followed. The material of the seed charges was added as 'slugs'. Time was allowed for this material to hit tuyere level before starting the main ore charges. A standard time internal was maintained at roughly 8 - 9 minutes per fixed charcoal bucket. As has been seen in the past, the furnace accepted ever larger volumes of ore inside those charcoal charges, in this case peaking at 5 scoops (about 2 kg) or about 1 : 1 ore to charcoal by weight. The alloted ore was added in roughly 3 hours. Latter in the sequence, the smelter make several self tapping leaks of slag. This proved to be transitional, thin and dark but with not enough iron content to be magnetic. As much as a teaching tool as anything else, this material was re-cycled. Over the course of the smelt there was no problem with too high slag levels. The tuyere only required rodgering out on two occasions.
Time was again given for the last of the ore to fall to tuyere level, then a last 'shock charge' of 3 scoops (about 1 kg) was added as a single slug. This was covered with a last two buckets of charcoal, then the furnace was allowed to start to burn down.
The furnace had been set up with a large enough tap arch to allow for a bottom extraction, but the team wanted to use a top extraction method. To that end, the interior level of burning charcoal was allowed to drop down to roughly 1/3 of the volume before extraction was started.
Air was cut back to a lower level (about enough to keep the interior temperatures constant) and the charcoal covering the slag bowl was scooped away. An attempt was made to loosen the bloom with the log 'thumper' but this proved less than normally effective. The tap arch block was pulled away, which also removed about 1/3 of the lower slag bowl which was stuck to the clay. The lower level of ash and some sand was raked out, making use of the thumper from the top more effective. With some use of a long chisel tipped rod it was possible to loosen and grab free the bloom with tongs.
The furnace had more fresh charcoal added and air blast returned. In this way it was possible to re-heat the bloom, allowing for several working heats to be taken. First, the loose mother was struck off using heavy hammers and an anvil set on the floor. Some attempt was made to compress the bloom in latter heats, but the smelter-as-forge set up proved not the best for getting back up to the higher heats required. In the end it was decided to use our remaining energies to section the bloom, a process that itself took three heating cycles to accomplish.
The finished bloom had a somewhat a lumpy and fragmented consistency. Spark tests after it cooled showed it has a range of carbon contents - from a good soft iron on one side through to a mid carbon on the opposite (guestimated at about .3 carbon) The total size of the finished bloom (before cutting) was 12 lbs. This is a 30% return on ore used.
In all a text book smelt, which proved perfect as a teaching experience for the team members. The furnace preformed perfectly, with no significant problems over the smelt. The sequence ran just as predicted, with end results almost exactly as expected.


2 comments:
"First, the loose mother was struck off using heavy hammers and an anvil set on the floor. "
What is a loose mother? A woman who has had kids and is now running around loosely?
Inquiring minds....
LOOSE mother
No - I don't get to play that way any more...
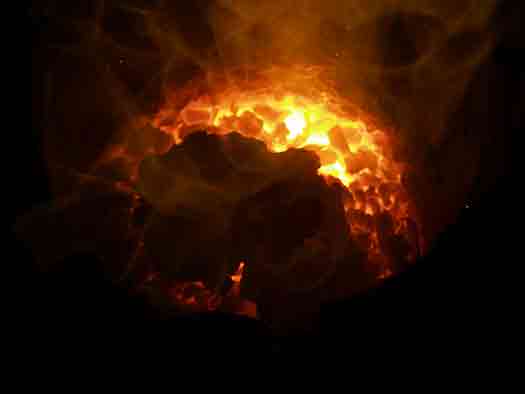
The developing bloom sits inside the slag bowl. The slag is a glass, which of course cools at its edges in contact with the edges and bottom of the smelter. So in operation, there is a transition from solid glass at the edges to liquid in the center. Also the bloom itself tends to accumulate and solidify over time (not exactly like a crystal growing - but its a good image). So there is a gradient from pure and solid slag at the outer edges to solid metal in the centre. (A picture would be a chocolate covered cherry.) When you pull the bloom, there is always some of the transitional layer remaining attached to the outside of the solid bloom. Much of this material is just slag glass, but also there is a fair amount of partially sintered iron mixed in and attached to the solid bloom core. Mike McCarthy I think is the one who coined the term 'mother' to refer to this lacy mix of metallic iron and iron rich slag.
Working quickly over the surface of the just extracted bloom, it is possible to recover much of the iron contained in this lacy layer. It can be compressed down and welded back on to the incandescent bloom. The slag cools extremely quickly, and as brittle glass will shatter off the surface. There is a marked colour difference between the greyish cold slag and the still orange to yellow hot metallic bloom - which is clearly visible.
Post a Comment